Design and Play Mode
The Capsules section of Board offers two working modes: Play mode and Design mode.
- When Play Mode is active, you can only view and navigate through existing Capsules
- When Design Mode is active, you can create new Capsules or perform specific action on existing Capsules
You can easily switch between these modes by clicking on the Design/Play Mode switch button ( ![]() ) located in the Top Menu of the Capsules workspace. You can also switch from Play Mode to Design Mode and vice versa by pressing the F4 key.
) located in the Top Menu of the Capsules workspace. You can also switch from Play Mode to Design Mode and vice versa by pressing the F4 key.
Only users with a Developer or Power User license can access the Design mode. See more in the Licenses section.
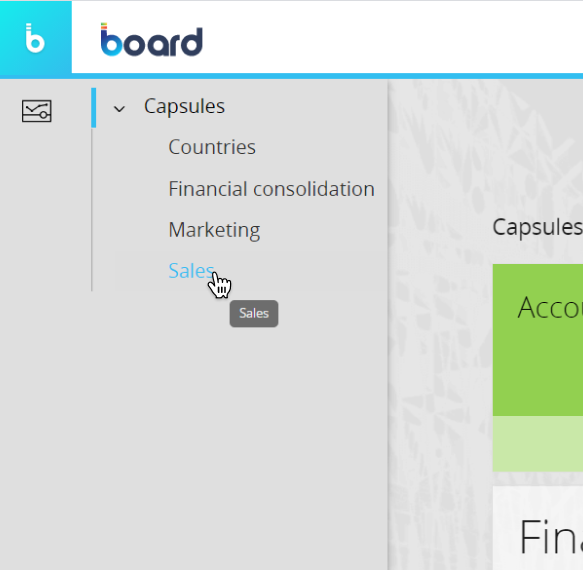
Once you've logged into Board, you will land in the Capsules home page (or Capsule browser) in Play mode by default.
When Design Mode is active, you can create a new Capsule from the navigation left panel by clicking on the +CAPSULE button.
Learn how to create a new Capsule.

You can also perform various actions on Capsules, by hovering over their names in the tree diagram.
Learn how to copy, delete, rename, and move a Capsule.
From the navigation left panel in Design mode you can also create, rename or delete Capsule folders.
Lear how to create, delete, and rename a folder.
When Play Mode is active, the navigation left panel allows you to browse through Capsule folders.
Capsules in Play mode
Open a Capsule in Play mode to view and interact with it. While in Play mode, the workspace provides a simple environment with fewer icons providing basic functionality for navigating the Capsule. All those icons are located in the Top Menu.
You can apply a Select to the entire Screen and save its settings as a Bookmark.
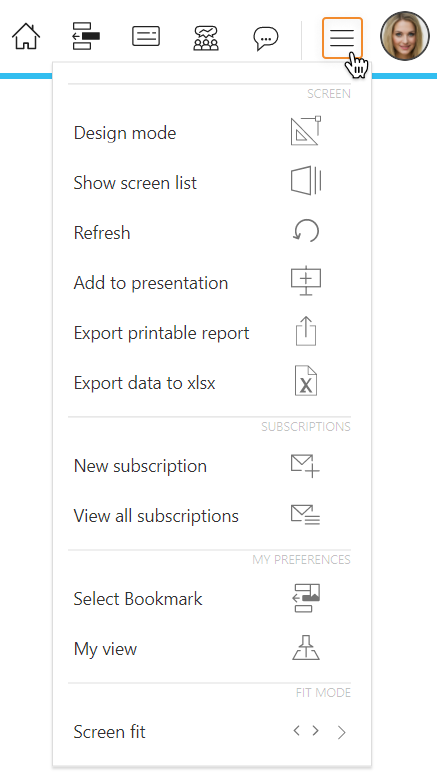
Hover over the burger icon in the Top Menu to reveal the following menu:
Any changes made to a Screen in Play mode is lost when you leave it. To save a modified Screen, add it to a Presentation or use the My Screen View feature described below.
Click the appropriate icon to:
- Switch to Design mode
- Show the Screen and folder list
- Refresh all Screen Objects. This will re-execute all Layouts associated with Screen Objects
- Add a Screen to a Presentation
- Export a printable report. This will export the current Screen as a PDF file, a Microsoft Word document, a Microsoft PowerPoint presentation or as a screenshot (PNG file)
- Export data to xlsx. This will export all Screen Object defined by a Layout as a Microsoft Excel Workbook or a Microsoft Excel Workbook supporting Board Excel Add-in functions such as change Select filters, drill-down, refresh or change data
- Set up a new subscription or see all existing subscriptions. By setting up a subscription, Board will send the current Screen to selected email addresses as an attachment (PDF, Excel, Word or PowerPoint file) at a given time, with a custom frequency and recurrence. You can also customize the email message as you prefer
- Select or create a bookmark. The feature allows users to create their own library of different Selects that can be saved and reused in Screens of the same Capsule. Users can set selections through selectors and/or Screen Selections and then save their personal configuration. That is called a Bookmark. Each Bookmark is available only to the user who created it
- Save the Screen current state as a personal view (My Screen View) that can be restored at will, applying filters, Layout configurations, Pager definitions and any other customization you made, except for Selections. If you want to save Selections, you can use the Select Bookmark feature explained above
- Upload a file (Cloud subscriptions only)
- Adjust your Screen to fit your viewing area. You can choose one of the following three options :
-
Fit to single page. The Screen is readjusted so that it is entirely visible in your web browser window size without any scrollbar
-
Fit to width. The Screen width fits the web browser window size width. The Screen area is stretched horizontally and a vertical scrollbar may appear
-
Actual size. The Screen is displayed at its actual pixel size. Vertical and horizontal scrollbars may appear if the Screen area exceeds your web browser window size.
-
By hovering over a single Screen Object, you'll have access to all multidimensional navigation features such as filtering, sorting, drill-down and so on. These features are different for each Screen Object and will be covered in the Objects section of this manual.
While in Play mode, it's possible to navigate through Screens but you won't be able to change their default configuration or create a new Screen. To do that, you will need to switch to Design mode.
Capsules in Design mode
When Design mode is active, clicking on a Capsule from the Capsule browser will take you directly to its Home Screen with all functions for configuring it and adding Screen Objects, provided the user has the appropriate Board license and privileges in place.
The last saved configuration will be the default one applied to the Screen when the end user lands on it in Play mode.
Top Menu
From the Top Menu, you can:
- Save your Screen current configuration
- Switch to Play mode
- Copy/paste Screen Objects or Screen Objects formats (you can copy/paste formats even between different Objects. Only properties and formats common to all Screen Objects will be copied/pasted)
- Delete a Screen Object
- Undo/Redo your last action
- Define the alignment and order of one or more Objects
- Configure the Layout of a selected Object
- Clear a Layout (only for Buttons and Labels)
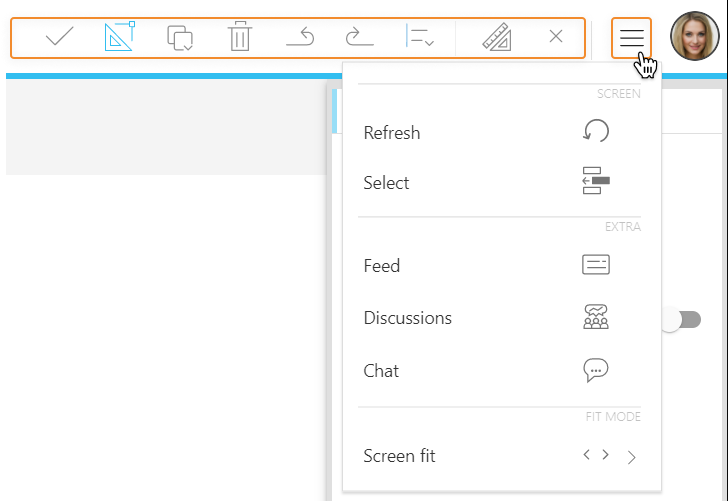
By hovering over the burger icon in the Top Menu, you can:
- Refresh all Screen Objects. This will re-execute the Layout on all Screen Objects
- Apply a Select to the entire Screen
- Access the chat feature
- Adjust your Screen to fit your viewing area
Left panel
In Design mode, the side panel on the left of the page allows you to build your Capsule Screens.
A tabbed menu on the top of the panel gives you access to the following sub-pages, showing:
- Structural elements of the Capsule (Screens, Masks, Procedures, Images)
- Screen Objects (Toolbox)
- Screen Objects in the active Screen, presented in the defined order
Screen Objects are placed in the Screen in the order you insert them, with the most recently added Object being on top of the stack. The first on the list is the bottom layer of the stack, while the last one is the top layer of the stack
From the Structural elements sub-page you can:
- Create a new Screen
- Search existing Screens
- Organize your Screens in folders. To move a folder, simply drag the folder and drop it where you want it to move in the tree structure. By dropping a folder on another folder, you will make the former a subfolder of the latter. See more about Screens
- Navigate through Screens in Design mode
- Set a Home Screen
- Save a Screen in another Capsule
- Delete Screens
- Add new Masks
- Save a Mask in another Capsule
- Delete Masks
- Edit a Mask
- Access the Capsule Procedures section
- Access the Images section. Board supports .jpg, .jpeg, .png, .gif, .svg, and .bmp file types
The Screen Objects sub-page allows you to design a Screen, by dragging and dropping Screen Objects in the Screen design area.
See more about Adding Objects to a Screen.
The Screen Objects order sub-page allows you to change the order in which stacked Objects appear on a Screen, by moving each one up or down the list.
If a container is added to the Screen, it will look as a folder in the tree structure: by moving the container up or down the list you will be able to rearrange its position, but not the order of the objects it contains.
Contextual Right Panel
In Design mode, the side panel on the right of the page allows you to access Screen and Objects additional properties.
If no Screen Object is selected in the Screen design area, the panel will show the following general Screen options:
- Screen. Here you will be able to change the Screen name, set the Screen size (4:3, 16:9 or Custom), define how it should fit your viewing area and configure the following options for the end-user:
- Deny layout designer. Prevents entering the layout editor for all Screen Objects
- Deny selection editor. Prevents applying a Select to the Screen
- Save/Undo mode. (enabled by default) Lets you make multiple data-entry actions, save values in bulk or undo them. If disabled, after each data entry the new value is stored and you can't go back
- Enable ATO. Enables Advanced Transaction Object (ATO) management for the Screen. This option is activated automatically as soon as the Object Entity Editor is added to the Screen: the ATO allows users to execute CRUD (Create, Read, Update, Delete) actions on Entities, Entity members and Relationships
- Refresh on data-entry. (enabled by default) Refreshes all Screen Objects' Layouts when you save/apply a data entry action on a single Screen Object. If disabled, only the Layout of the Screen Object you've saved/applied a data entry action on gets refreshed
- Data model. Shows the default Data model linked to the Screen and lets you select the multiple Data models mode. If that option is selected, you can choose which Data model to link to each Screen Object in the Layout editor. This option is disabled by default and all Objects are linked to a single Board Data model: the one set as default when creating the Capsule or the one selected when creating the Screen
- On open trigger (Not available for the Home Screen). Triggers the execution of a Capsule or Data model procedure when the Screen is opened in Play mode. You can also disable the Layout execution when the Screen is opened, so that the Procedure is executed before populating the Screen Objects. If the "Disable the initial Layout execution" option is not ticked, the Procedure is executed immediately after the initial Layout execution
- Background color. Lets you choose a background color, gradient or image for your Screen
- Comments. Lets you associate a textual annotation to your Screen that will be only visible in Play mode, by clicking on a dedicated icon in the Top Menu
- Beta features. Gives access to beta features for the Screen

If a Screen Mask has been applied to the Screen, a link to that Mask will be shown right above the Screen Properties menu.
If a Screen Object is selected in the Screen design area, the contextual right panel will show specific options for that Object.
If multiple Screen Objects are selected in the Screen design area, the contextual right panel will show options common to those Objects.