Other enhancements
Board Engine
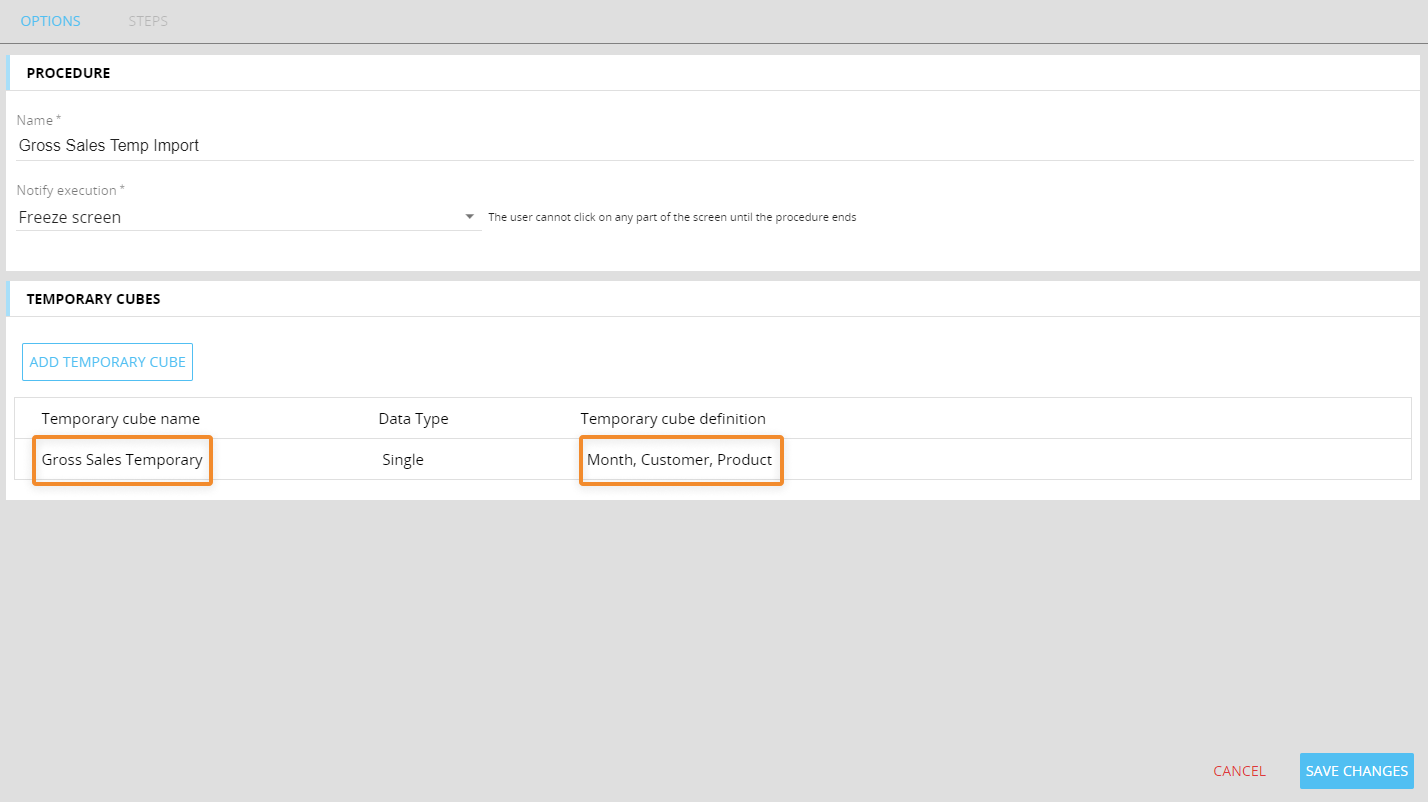
Temporary Cubes in Data readers - Temporary Cubes are now supported in Data readers, giving Makers a lot more flexibility in terms of Procedure design and reducing the need for Cube maintenance and possible concurrency issues, for example when multiple users update the same Cube via multiple instances of the same Procedure.
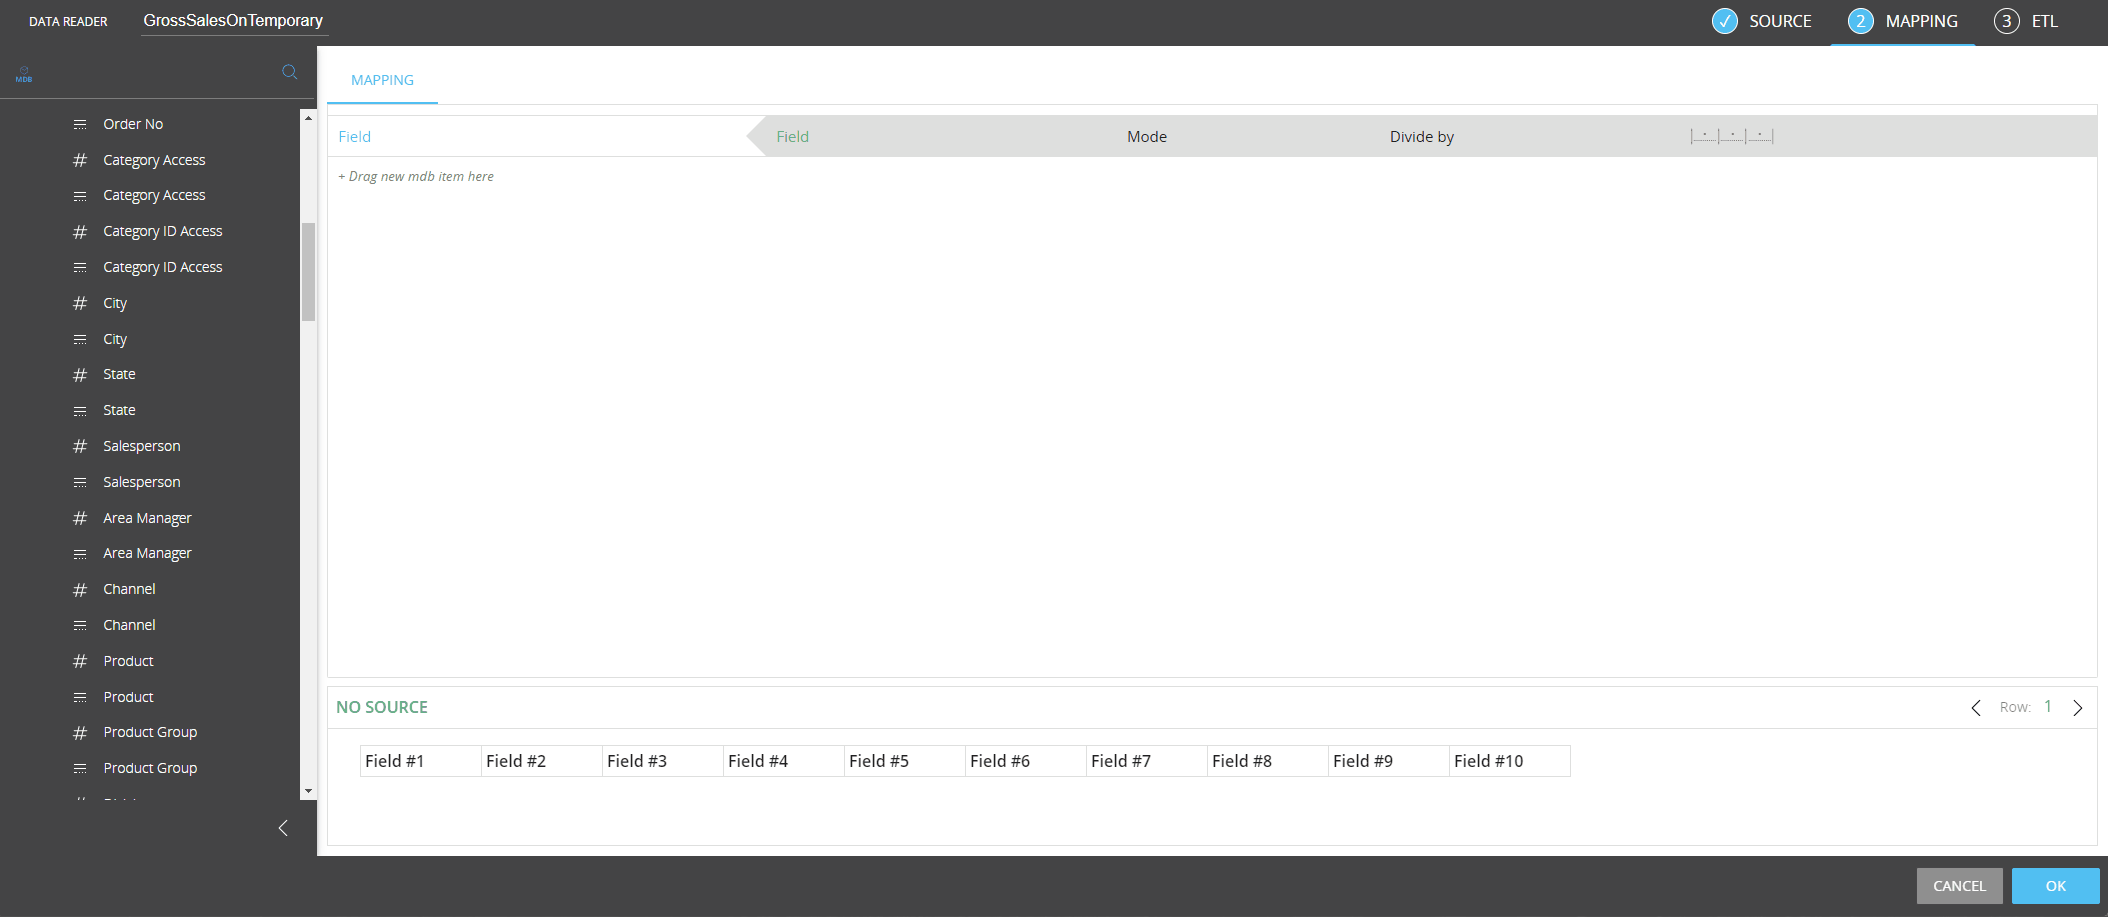
The configuration of a Data reader with Temporary Cubes is the same, except for the mapping phase.
To map a Temporary Cube to your data sources, proceed as follows:
- From the left-hand side of the Mapping page, drag the new "Temporary Cube" object from the "More" group to the center area outlined in blue
- Enter the Temporary Cube name in the "Temporary Cube name" placeholder. The name must match exactly the name you chose during the creation of Temporary Cube
- Drag the code placeholder (and the description placeholder, if needed) for each dimension of the Temporary Cube structure from the "Entities" group to the center area outlined in blue. For regular Cubes, those Entities are automatically added when you drag the Cube in the mapping area, but this is not the case for Temporary Cubes: you must add the code placeholder (and the description placeholder, if needed) by hand for each dimension, which must match the dimensions in the structure of the Temporary Cube.
If the Temporary Cube name and/or the dimensions entered in the Data reader mapping page do not match the actual name and the dimensions of the Temporary Cube, no data will be imported, but the Data reader won't fail.
If a manually entered Temporary Cube name does not match the actual Temporary Cube name in the Procedure, in the Diagnostic Log set to verbosity level "Warning" a new specific log entry will be created. The Log entry would look like the following example:
2023-03-16 12:35:59.053 +01:00 WARN Administrator 491b04bb-6b4e-4c3a-9b36-88e2cc1d9405 DataRead 15affa90-7e50-4a7b-93f8-7343753a78ad 2. ASCII Data Read Echo No virtual cube defined. A required virtual cube definition was not found by name: Gross Sales Temporary. DR mapping removed
If one or more dimensions of a Temporary Cube are missing in the mapping configuration, a new specific log entry will be created for each missing dimension in the Diagnostic Log set to verbosity level "Warning". The Log entry would look like the following example:
2023-03-16 12:44:12.931 +01:00 WARN Administrator d6f45ad2-4359-4963-9467-6892b8b8bf9f Import in Gross Sales Temporary a8db4810-f525-4993-b369-3a4ea12e2d5a 2. ASCII Data Read Echo {"Cube":"T001", "MissingEntityIdx":3} Cube dimension is missing in mappings
Since Temporary Cubes are created and used only as part of the Procedure in which they are defined, manually running a Data reader that imports data in Temporary Cubes from the Data reader home page will not produce any results (on Temporary Cubes). These new Data readers should be used only in the Procedure in which the Temporary Cubes were created.
Example
In a Procedure, the following Temporary Cube definition has been defined:
If you wanted to use that Cube in a Data reader, the configuration would be as follows:
Temporary Cubes in Procedure steps - The use of Temporary Cubes has been extended to all Procedure steps whose configuration includes a Layout or other cube-based options.
Please note that:
- In the Dataflow step, if a Temporary Cube used in the Layout is not found when the step is executed, the Dataflow will fail. This may happen, for example, when a Cube is configured in a Dataflow Layout and that same Cube is later deleted from the Procedure.
- In the Dataflow step, if a Temporary Cube configured in the "Limit calculation to tuples of the Cube" option is not found when the step is executed, the Procedure will fail and a specific error message will be displayed. This may happen, for example, when the Temporary Cube is configured in the "Limit calculation to tuples of the Cube" option and that same Cube is later deleted from the Procedure.
- In all steps affected by this implementation, if a Temporary Cube used in the Layout or in a cube-based setting is not found when the step is executed, the Procedure will fail and a specific error message will be displayed. This may happen, for example, when a Cube is configured in a setting and that same Cube is later deleted from the Procedure
- In the "Export Data View to file" step, the Yearly Cumulated Value function is not supported when applied to a Temporary Cube in the Layout
- When a Temporary Cube holds data, it is treated as a regular Cube in terms of logging, selections, and all other features available for regular Cubes
- A Procedure where Temporary Cubes are configured as per the new implementation cannot be executed in previous versions of Board
- Temporary Cubes are not considered in the Impact Analysis section
- As a consequence of this new implementation, we have removed the Dataflow Analysis feature from the Dataflow configuration (the cog icon in the "CALCULATION DOMAIN" menu) and the "SCAN DATAFLOW ACTIONS" button in the OPTIONS tab in the Procedure configuration panel
Special Select options for Entities with an unbalanced hierarchy - The special Select options that you can use in the Select window on an Entity member of an unbalanced hierarchy, are now also available in the Custom selection scripts that you can configure under the "SELECTION FILTERS" menu in a Database security profile or under the "SELECT" menu in a Role.
The new Selection script syntax for the Entities with an unbalanced hierarchy, which has been changed and enhanced, is the following:
Select EntityName = FunctionName(MemberCode1, MemberCode2;InclusiveBoolean;HierarchyLevel;IncludeNonLeafBoolean)
You can find the explanation for each syntax parameter below:
- EntityName. This parameter is the name of the Entity on which you want to apply a selection
- FunctionName. This parameter is the name of the special Select option you want to apply to a member of an unbalanced hierarchy. The options can be the following:
- Ancestors
- Descendants
- Parent
- Leaves
- Children
See this page for more information about these functions
- MemberCode. This parameter is the code of the Entity member that you want to use for the selection. You can add as many member codes as you like by using the comma character as a separator
You must use double quotes in the case where a member code contains spaces or special characters (i.e. Select Entity = FunctionName(MemberCode1,"MemberCode,;{}[]@=()2"...). This means that you should not use the double quotes character as part of an Entity name or Entity member code since it is a reserved character for the Custom selection script syntax.
- InclusiveBoolean. This parameter is a boolean (True or False) that you can use to include or exclude the MemberCode parameters used in the selection. For example, if you have an Entity with an unbalanced hierarchy where the members are FatherMember -> ChildMember1 and ChildMember2 and you perform the following selection: Select Entity = Descendant(FatherMember;false) then the applied selection will include data only related to ChildMember1 and ChildMember2, but not FatherMember
This parameter is true by default, therefore the MemberCode parameters are included in the selection unless specified otherwise.
- (Only applicable to Ancestors and Descendants functions) HierarchyLevel. This parameter is a number value that you can use to specify the levels of the hierarchy that will be included in the selection. For example, if you have a hierarchy of 6 levels and you enter the number "3" as the HierarchyLevel parameter, then the selection will include data only related to ancestor or descendant members that are within 3 levels away from the selected member in the hierarchy
The default value of this parameter is "0", which equals the "ALL" option in the Select window, and therefore includes all levels of the hierarchy.
- (Only applicable to Ancestors and Descendants functions) IncludeNonLeafBoolean. This parameter is a boolean (True or False) that you can use to include or exclude non-leaf members of the Entity on which you are applying the selection
This parameter is true by default, therefore the non-leaf members of the Entity are included in the selection unless specified otherwise.
Here are a couple of important notes to keep in mind regarding the special Select options:
- Like in the Select window, you can add multiple special Select commands in the same script, like in the following example:
Select EntityName = FunctionName1(MemberCode1;InclusiveBoolean...)
Select EntityName = FunctionName2(MemberCode2;InclusiveBoolean...)In the case of multiple Select commands, Board will unite all the selection script commands and include data related to members that appear in at least one of the script commands.
-
You can add multiple functions to the same selection script command by using the comma character between functions, and you can also use the same function more than once on the same Entity, like in the following example:
Select EntityName = FunctionName1(MemberCode2;InclusiveBoolean...), FunctionName2(MemberCode2;InclusiveBoolean...), FunctionName3(MemberCode2;InclusiveBoolean...)
- You can retrieve a member code from metadata variables, like in the following example:
Select EntityName = FunctionName(@var(Metadata);InclusiveBoolean)
- Applying a special Select option to an Entity with an unbalanced hierarchy, might cause the hierarchy of the selection result to look different from the original hierarchy depending on the configuration of the selection script. Consider the following example:
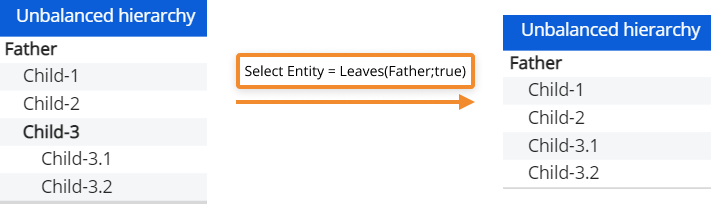
In this case, applying the selection script, like in the image above, to the Entity with an unbalanced hierarchy, causes the displayed hierarchy to appear differently from the original. This is correctly displayed since, for example in this specific case, the Leaves function selects leaf members ("Child-1", "Child-2", "Child-3.1" and "Child-3.2" members) that are descendants of the selected member ("Father" member) and excludes Nodes ("Child-3" member) from the selection. Therefore the position of the node descendants is displayed in a different order in the hierarchy when this type of selection is applied.
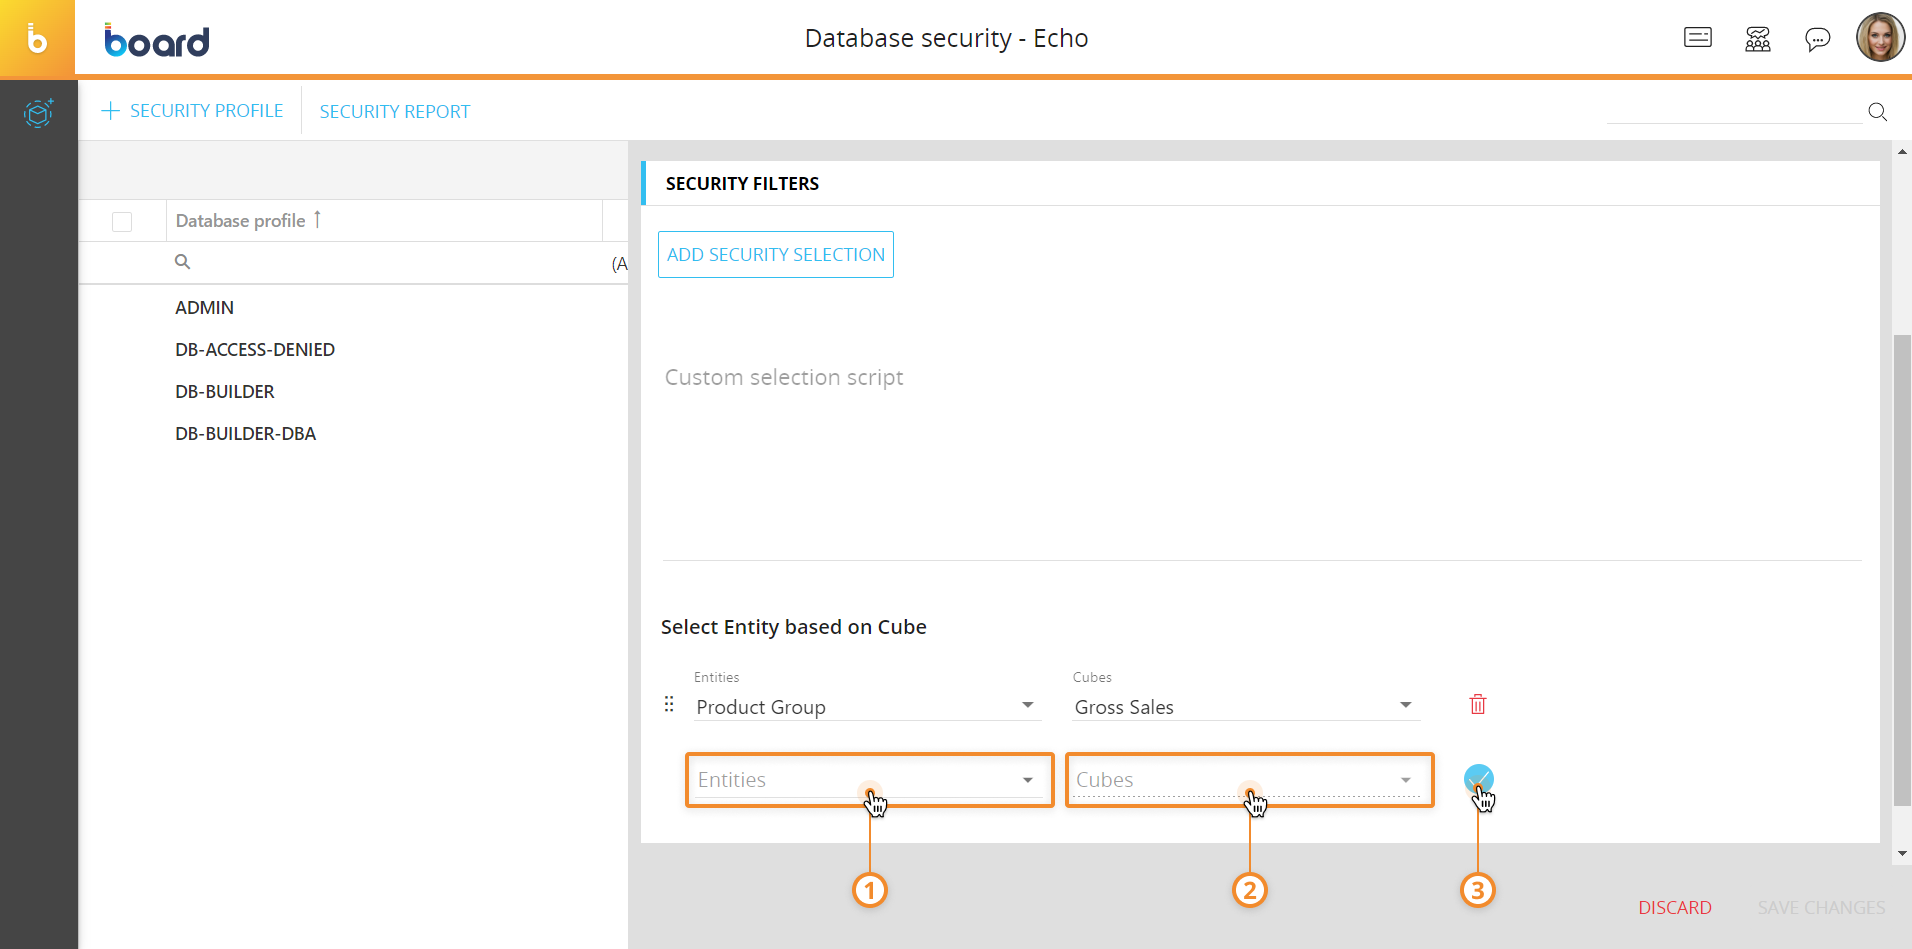
Select Entity based on Cube feature in Security selection filters - The "Select Entity based on Cube" Dynamic selection feature can now be used as a security selection filter in the "SELECTION FILTERS" menu in a Database security profile and under the "SELECT" menu in a Role. This gives administrators much better flexibility and efficiency in dynamically managing user access to the data of a Platform.
The feature applies a selection based on Entity members that have a non-0 value on the chosen Cube. The security filters are applied in the following order, from top to bottom:
- Security selections
- Custom selection scripts
- Dynamic selections
Board applies the selections in a funnel-like way, narrowing the selection down after applying each selection feature. For example, consider the configuration of the following selections:
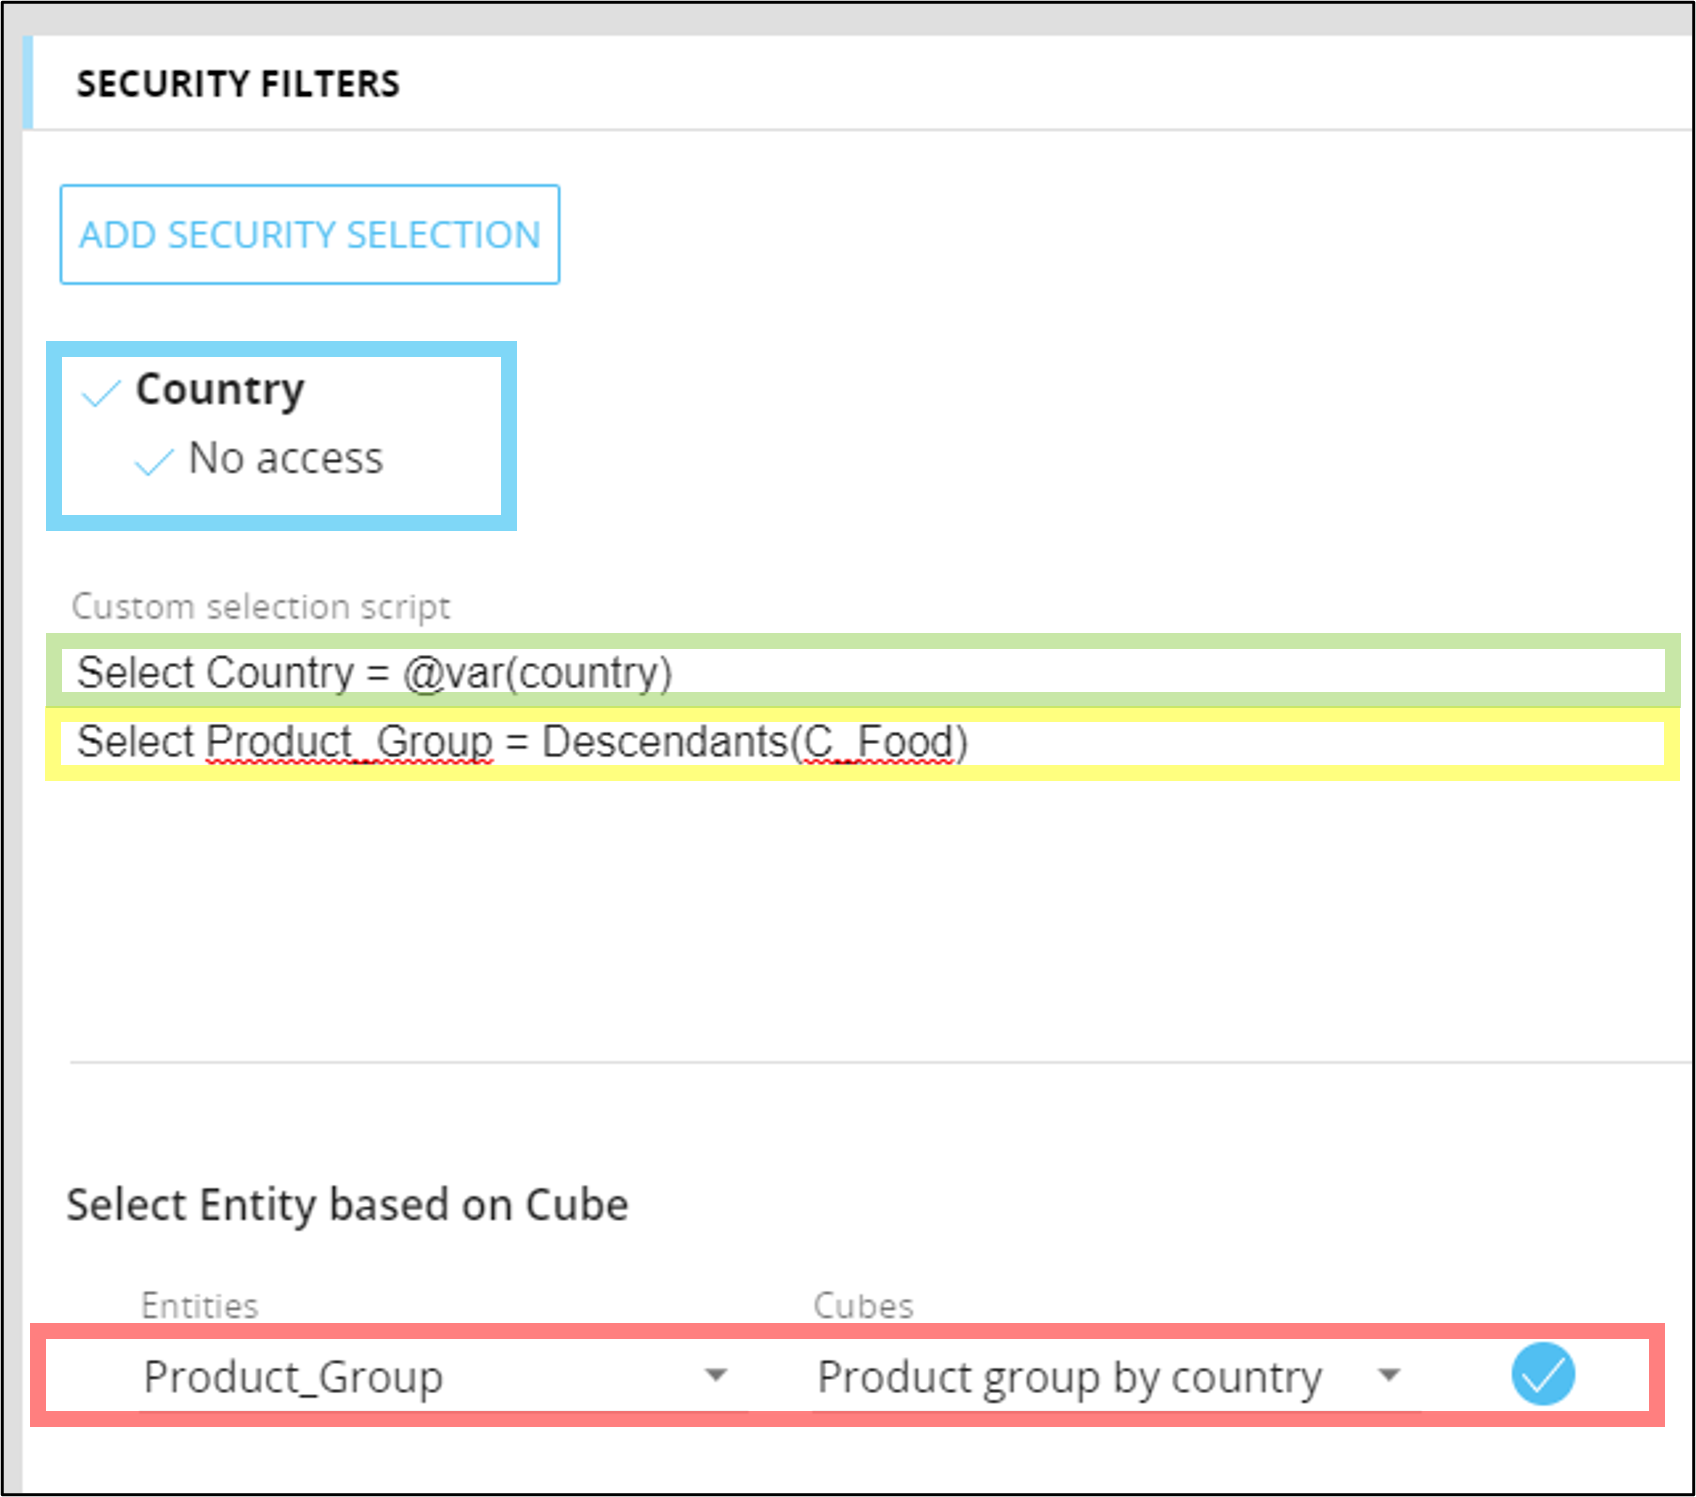
The selections will be applied in the following order:
- The security selections will be applied first, therefore denying users access to data related to all countries
- The custom selection scripts will be applied second, therefore granting users access to data related to their country, based on the value of the "Country" metadata of each user, and the member "Food" of the "Product Group" Entity.
- The dynamic selection will be applied last, therefore granting users access to data related to the members of the "Product Group" Entity members that have a non-0 value on the "Product group by country" Cube
Given the data set in the image below, if the "country" metadata value of a user is "Italy", then each selection filter above is applied in the following way:
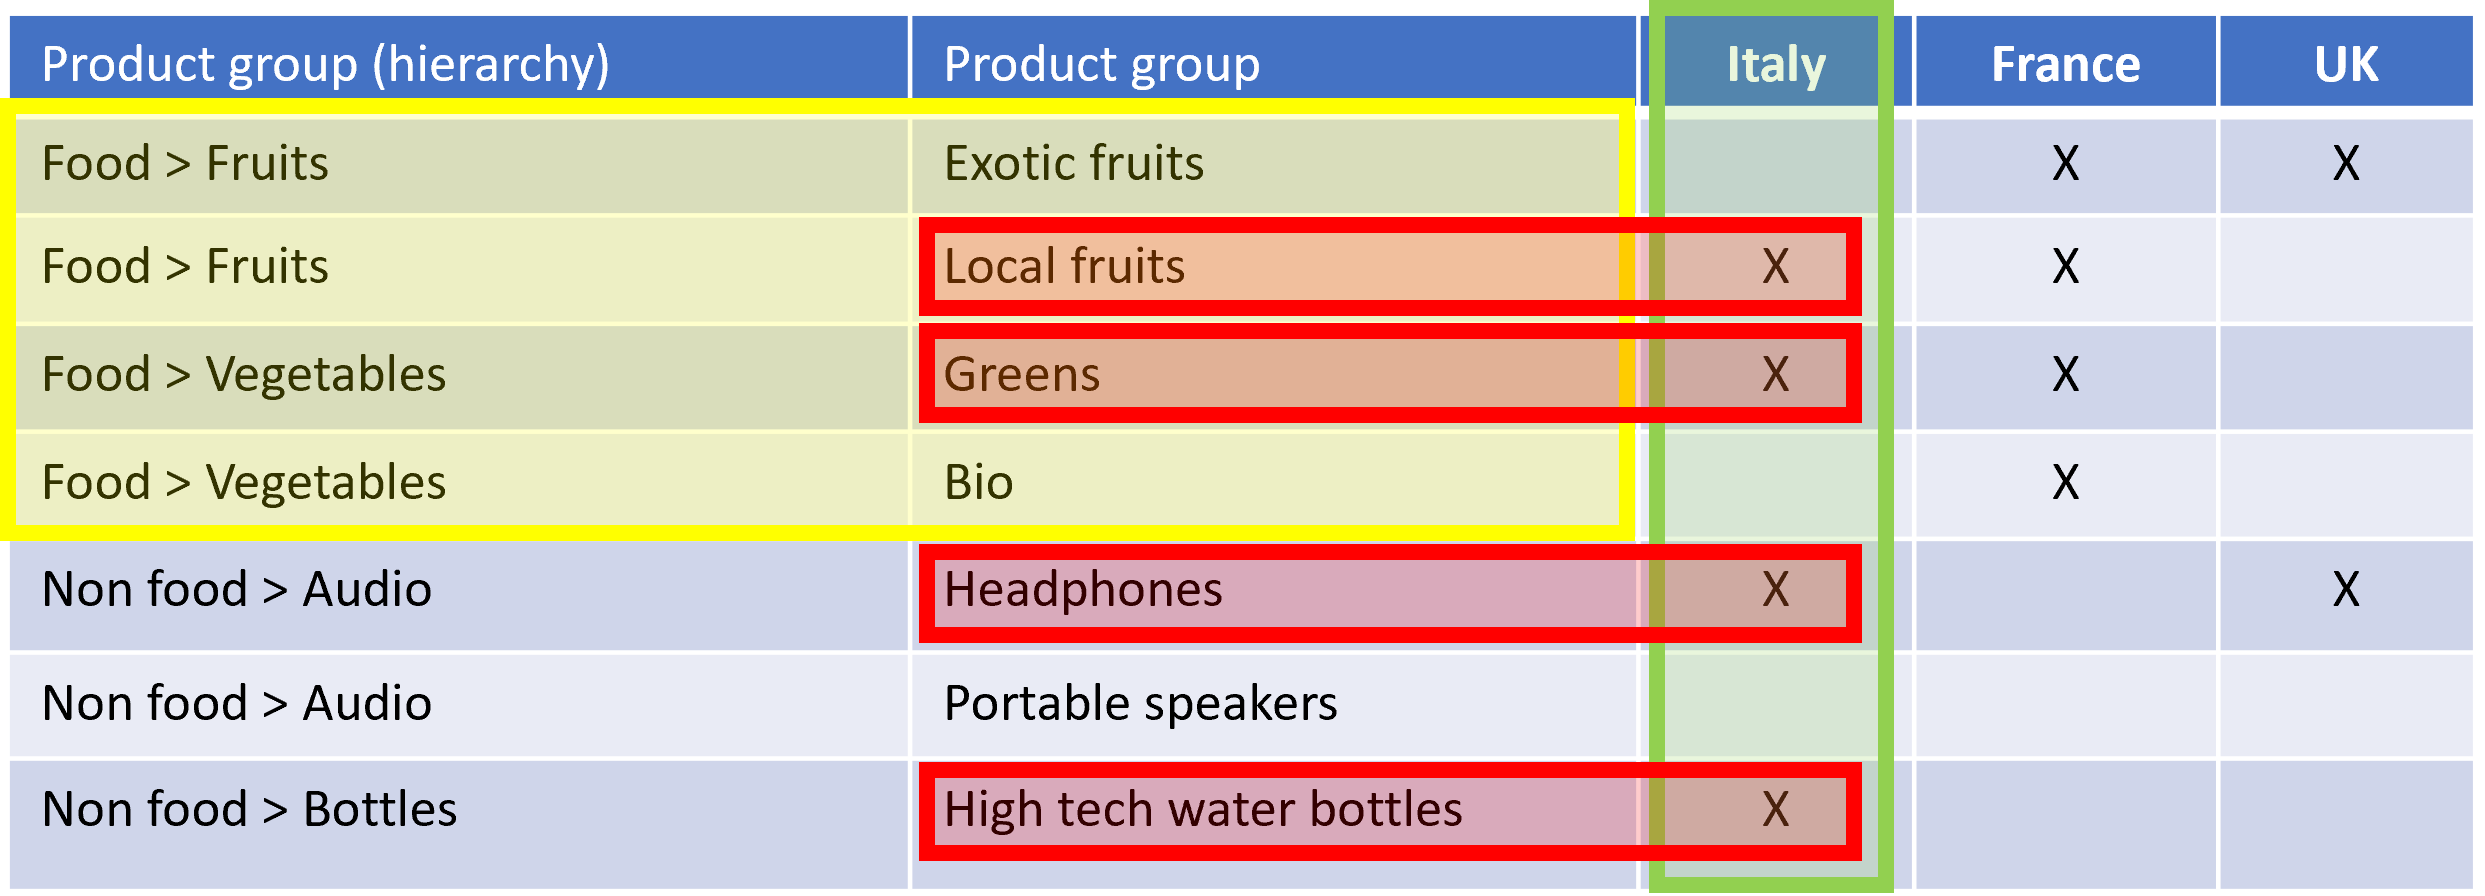
The various selections would be singularly applied to the data highlighted in the image above. In this case, since the selections are applied together in the order described above, then a user associated with a security profile with the configurations above will have access only to the following data:

To add a Dynamic selection in the security selection filters, proceed as follows:
- Open the "SECURITY FILTERS" menu in the Database security page or open the "SELECT" menu and then the desired Data model menu in the Roles page
- Select the desired Entity from the "Entity" drop-down list
- Select the desired Cube from the "Cube" drop-down list
- Click the blue check mark on the right to add the Dynamic selection
Here are a couple of important notes to keep in mind regarding the Dynamic selections:
- You can add multiple Dynamic selections. In this case, Board will apply them in sequential order from top to bottom, narrowing the selection down after each execution. You can change the order of the Dynamic selections by dragging and dropping them as desired
- You can add multiple Dynamic selections on the same Entity and/or the same Cube
- The Dynamic selections are executed in keep mode
- In the case where an Entity that is already configured in a Dynamic selection is deleted, Board will deny access to data related to the members of that Entity
- In the case where the Relationships of an Entity that is already configured in a Dynamic selection are edited causing the Cube dimensioned by that entity to become less aggregate, Board will deny access to data related to the members of that Entity
- In the case where an Entity that is already configured in a Dynamic selection is removed from the dimensions of the Cube configured in that Dynamic selection, Board will deny access to data related to the members of that Entity
- In the case of Database security profiles, the selections, including the Dynamic selection, are applied before the Cube Visibility rules
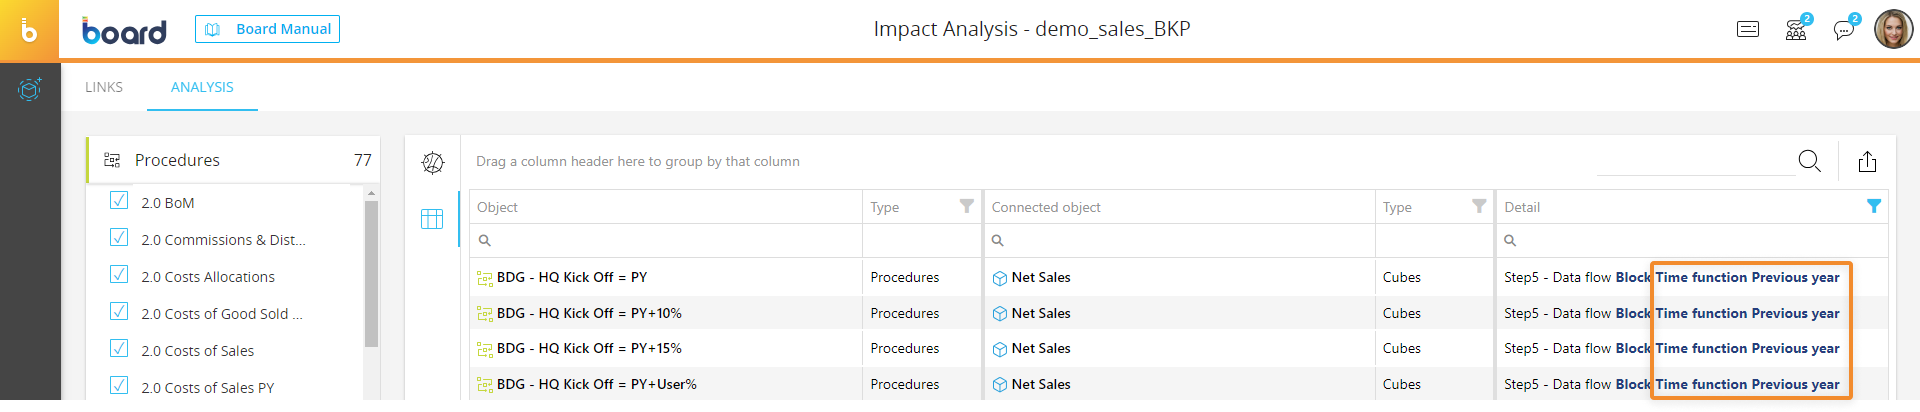
Impact Analysis - The table-view in the Analysis page of the Impact Analysis now shows additional details regarding the connection between Cubes used as Blocks of Dataflow Layout definitions: in particular, if a Time function or an Analytical function has been set on a Block, the chosen function is shown in the corresponding row.
For Time functions, those details also include the Previous year option and the Period Offset value (if any). For example: Time function Yearly Moving Total Previous year Period Offset: 2
For Analytical functions, those details include the function name. For example: Analytical function Nascency
Data Entry log - The Data Entry log has been enhanced and it now includes more system-level information and more data entry actions-related events.
The following improvements have been implemented:
- All Entities set By Column are now included in the corresponding log entry
Example
2023-06-23 12:33:34 User: admin Original Value: 50 New Value: 100 Cube: Gross Sales (V001 - Gross Sales) Coordinates: C04920 (C04920), Missouri (MI), Jun.11 (201106), Kids Analog (P16)? Selections on db Echo - Entity: Customer, elements: A & N SUPPLIES (C04916), A & N SUPPLIES (C04920), A B CHALMERS (INVERNESS) LTD (C03684), A C WARD & SON (C03596), A F BLAKEMORE (C04552), ? Selections on db Echo - Entity: Year, elements: 2011 (2011),
(bold added) - The hyphen (-) placeholder has been removed from the Coordinates section of log entries when there are no Entities By Row or By Column
- The Entity members description included in log entries is now written in invariant culture format (culture-insensitive): this culture is associated with the English language but not with a specific country/region
- If a Detail by option is active, the Coordinates section of log entries now includes the related information, with the following syntax: Detail by: {entityCode} (entityDesc}.
Example
2023-06-23 12:26:58 User: admin Original Value: 125 New Value: 500 Cube: Gross Sales (V001 - Gross Sales) Coordinates: May.11 (201105), Men's Dress (P11), C04916 (C04916), Detail by: COST OF SALES (B1)? Selections on db Echo - Entity: Customer, elements: A & N SUPPLIES (C04916), A & N SUPPLIES (C04920), A B CHALMERS (INVERNESS) LTD (C03684), A C WARD & SON (C03596), A F BLAKEMORE (C04552), ? Selections on db Echo - Entity: Year, elements: 2011 (2011),
(bold added)
Select - The known limitation about Dynamic selections and selections "based on Cube" that could not output an active selection with more than 32,767 members has been fixed. It is now possible to apply selections through Dynamic selections and selections "based on Cube" that exceed 32,767 members in both the Capsules environment and Procedures.
Performance improvement - In previous versions of Board, updating a Database security profile or a row style template required the Data model to be unloaded and reloaded in memory to apply changes: this could freeze the system and cause other service reliability issues. Now administrators can update Database security profiles and row style templates without causing stability or performance problems.
Performance improvement - In previous versions of Board, slow performance issues were experienced in the case of a large number of concurrent users in the same Platform. This update includes various improvements that reduce memory usage, allocate memory more efficiently, especially in cases of Cube Sparsity, Nexel calculations and Selections management, and fix a number of potential memory leaks that improve Board’s overall performance and efficiency with a large number of concurrent users in the same Platform.
Enhanced Backup Utility (Cloud customers only) - We have reviewed and optimized the backup/restore Procedure steps, significantly improving their efficiency. As a result, Cloud customers can expect faster execution of backup and restore actions, making it particularly beneficials for large Data models. This enhancement ensures quicker and more efficient data backup and recovery Procedures.
Cube and Entity identifiers - Starting from this version, newly created Cubes and Entities will always be assigned new identifiers (Physical name and IDX for Cubes, and Physical name and Export name for Entities), instead of being assigned those that were previously associated with Cubes and Entities that had been deleted.
For example, if you create Cube 1, Cube 2, and Cube 3, their Physical names would be V0001, V0002, and V0003, respectively. If you delete Cube 2 and then create a new Cube 4, the Physical name assigned to it would be V0004, instead of V0002 which was previously used by the deleted Cube 2.
Data model - When localizing the descriptions of Entities with the Entity localization feature, you are no longer required to restart the Engine or unload and reload the Data model in order to update the language list or translations, which are now also updated after:
- the execution of Data readers on Cubes that handle the translation
- Data entry actions on Cubes that handle the translation
- the execution of Dataflows on the Cubes that handle the translation
- Cubes that handle the translation are updated via the Smart Import Object
Google Maps Object is only available upon upgrade - After a recent Google API update, the Google Maps Object will now display properly only with this latest Board version. If you are on a previous version and you want to use this Screen Object, you must update to the newest Board version.
Increased security to Data sources - To enhance security, the option to connect data sources to Board using “localhost”, “127.0.01”, or all the access requests that are resolved internally to the server are not supported anymore. This is true for all types of Data readers, including SAP and ASCII readers.
This kind of configuration should be changed with a specific server URL/address to continue using the connection.
The URL security check, whether positive or negative, is logged at the DEBUG level into the Diagnostic log.
Data reader fix for newest version of SAP Connector - If a customer upgraded to the newest version of Theobald software, Board was unable to connect to the SAP Connector server where at least one Table CDC was configured. With the new Theobald update, the new SAP Connector only uses the HTTP/HTTPS protocol, which uses the data transfer port.
In order to fix this, administrators must upgrade to the latest Summer update version and change the connection URL in the Data Reader section of Board from TCP to HTTP or HTTPS, pointing to the same server but using the data transfer port. The data transfer port default for HTTP and HTTPS respectively are 8097 and 8197.
(e.g. The old connection with TCP, board-connection.com:8098, must now be changed to HTTPS, https://board-connection.com:8197)
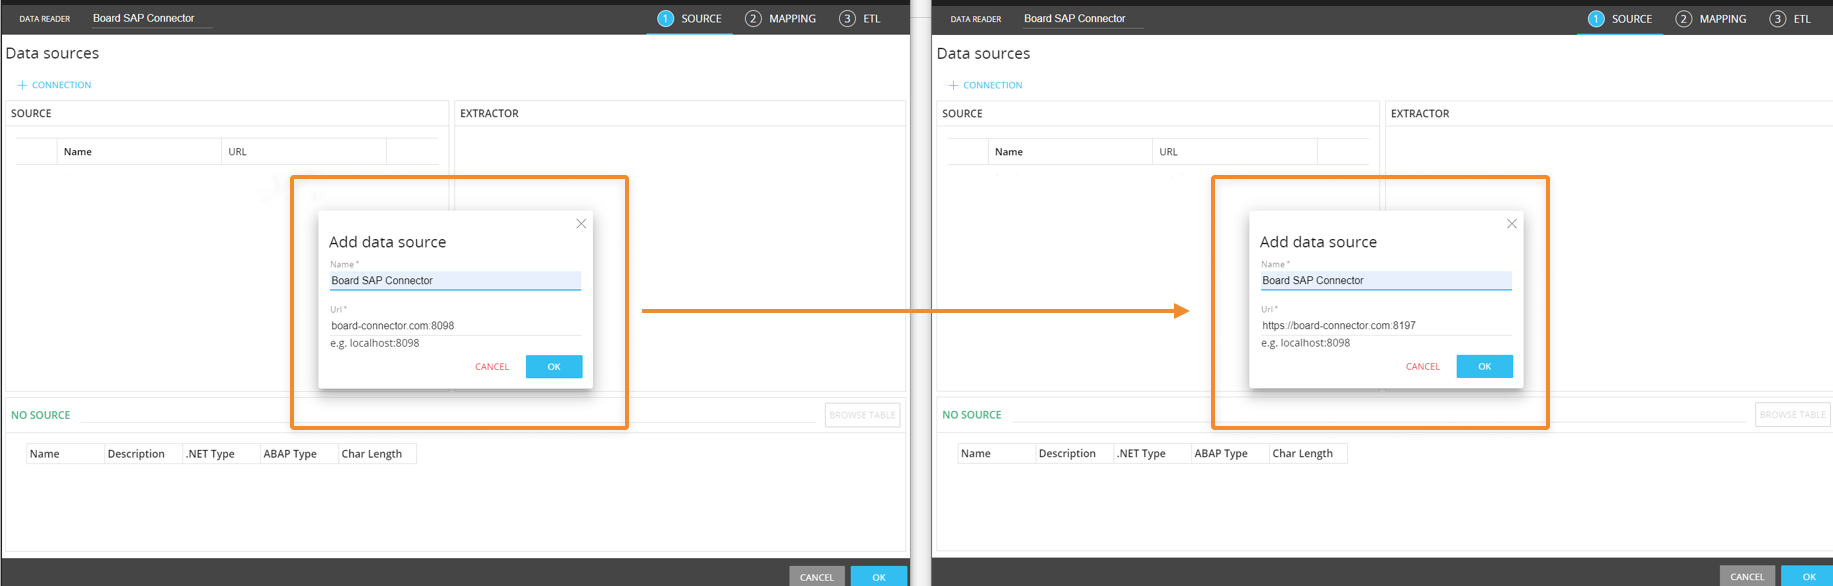
The ports 8097 and 8197 are the default ports that the SAP Connector offers during installation but can be changed by the client.
If customers upgrade to a new Board version, but do not upgrade to the new SAP Connector version, the data connection will still work as expected. This only applies to those who upgraded the Theobald software to use the Table CDC extractor
"Row style template" widget in the Waterfall chart properties panel
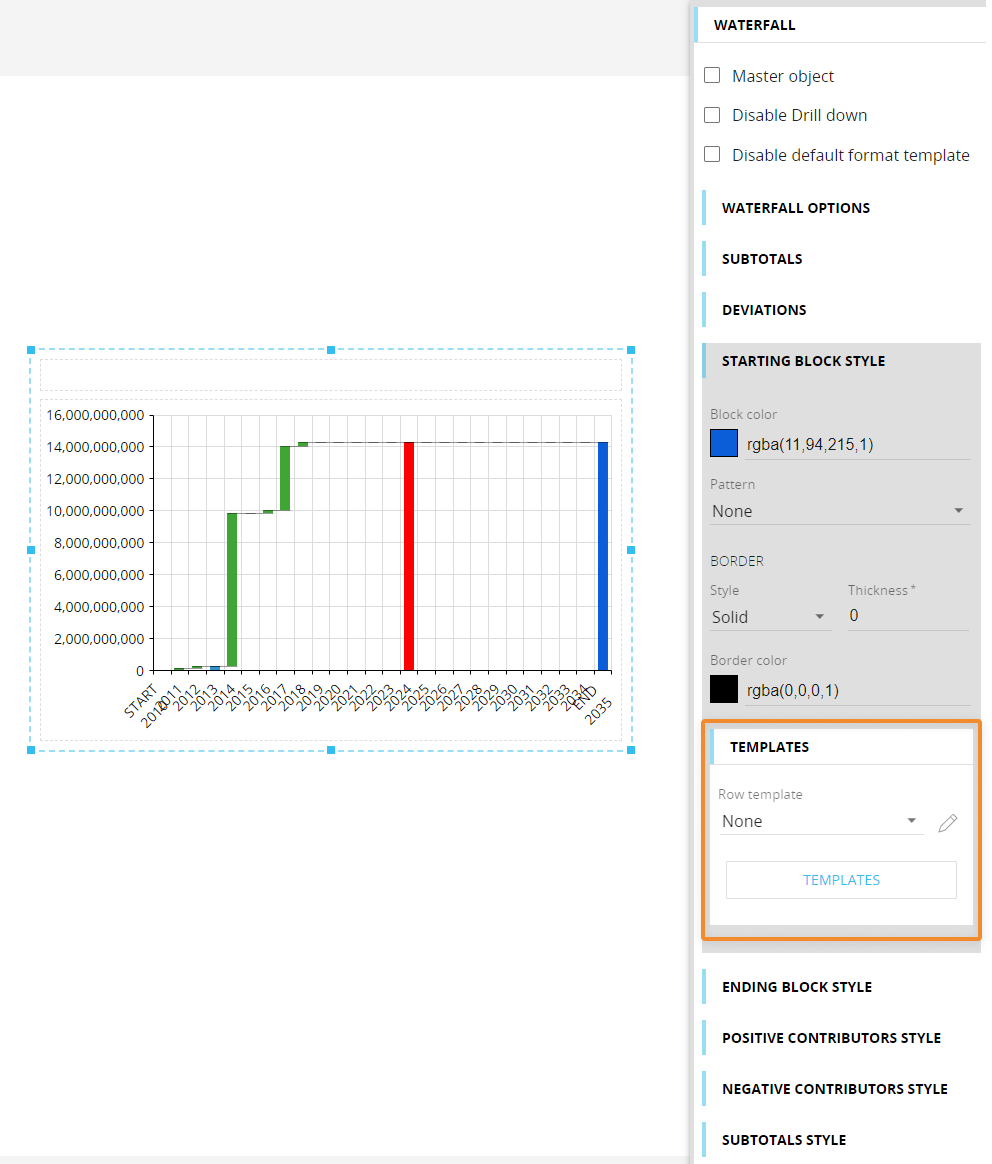
The use of the "Row style template" configuration introduced in the Board 2023 Spring release has been extended to the Waterfall chart released in the Board 2021 Winter release: you can define various formatting options for an Entity or for single members of an Entity that are set "By Row" in the Axis area of the Layout associated with the chart and save them in a Row style template. Then, you can assign the template in the appropriate menus within the the Waterfall chart properties panel in Design mode to apply the formatting options to specific bars of the chart.
In detail, the "Templates" widget has been added to the "Starting Block style", "Ending Block style", and "Subtotals style" menus in the Waterfall chart properties panel.
In the "Row template" dropdown menu, Makers will find all templates defined in the Data model, regardless of the Entities used in the Layout.
As with the previous implementation, the formatting options in the template also work if the associated Entity is set in a “Refer To” option.
In case of a “Refer To” option in place, only the template set as default for charts for the chosen Entity is applied and it cannot be changed at the Object level, as the template has the highest priority over any other formatting option.
In case of a “Refer To” option in place and no default template configured for charts on the chosen Entity, no template is automatically applied: to apply one, the user must select it manually from the “Row Template” dropdown menu in a “Templates” widget.
MULTIPLE TEMPLATES
There can be only one template applied to each supported chart element (Starting Block, Ending Block, and Subtotals): the template set manually in the "Template" widget has always the highest priority.
If one or more "Refer To" options are set in the Layout and none of the configured Entities is linked to a default template, the template set in the "Template" widget is always applied, provided the Entity configured in the "Refer To" option is the same.
Given the potential impact of these new formatting options, it's important to understand the order in which Board applies formatting styles to charts, as this sequence determines how it will appear to the end user:
- First, the default chart style is applied, then the row style defined in the Template widgets is applied (if any)
- If a "Refer To" option is configured on an Entity which has a default template, this template will be applied with the highest priority above all other formatting properties
- If no default template is set, but it has been chosen manually from the "TEMPLATES" widget in Design mode, and the Entity associated with the template is not used in a "Refer To" option and it's not in the Layout axes (By Row), the active selection is considered. In this case, the selection on the Entity associated with the template must include only one Entity member.
SUBTOTALS
If one or more Data Blocks have been selected as subtotals, the template is applied only if a “Refer To” option is configured on that Block.
If one or more Data Blocks have been selected as subtotals and a template for subtotals has been applied manually, its formatting options are applied only if one member of the Entity associated with that template is selected (through a Screen or Layout Select).
If one or more members of the Entity set By Row are selected as subtotals, the following scenario may occurr:
If a default template is set for the Entity, it will be applied automatically to the selected members
If no default template is set for the Entity By Row and a template associated with a different Entity has been applied manually, its formatting options are applied only if one member of the Entity associated with that template is selected (through a Screen or Layout Select).
Templates are always applied during the Layout execution. Existing formatting properties applied at the Object level are always kept, even if a template is applied: if you unlink a template from the Object, the Object will automatically revert to the previously saved formatting properties. This also applies to default templates.
If a template applies custom formatting properties only to specific members of an Entity, other members of that Entity will inherit the existing formatting properties applied at the Object level.
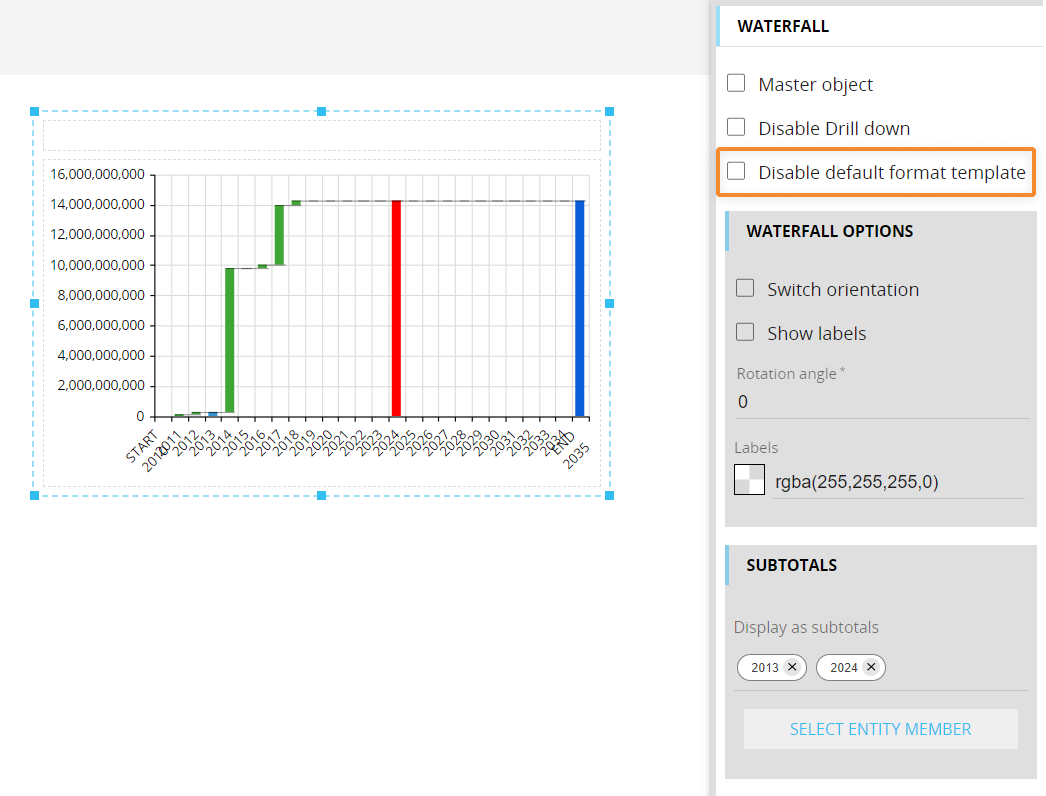
As with the previous implementation, a new “Disable default format template” property (checkbox) has been also added to the Waterfall chart properties panel, deselected by default. If enabled, it allows the Developer to override the default template applied to all series (bars) of the chart.
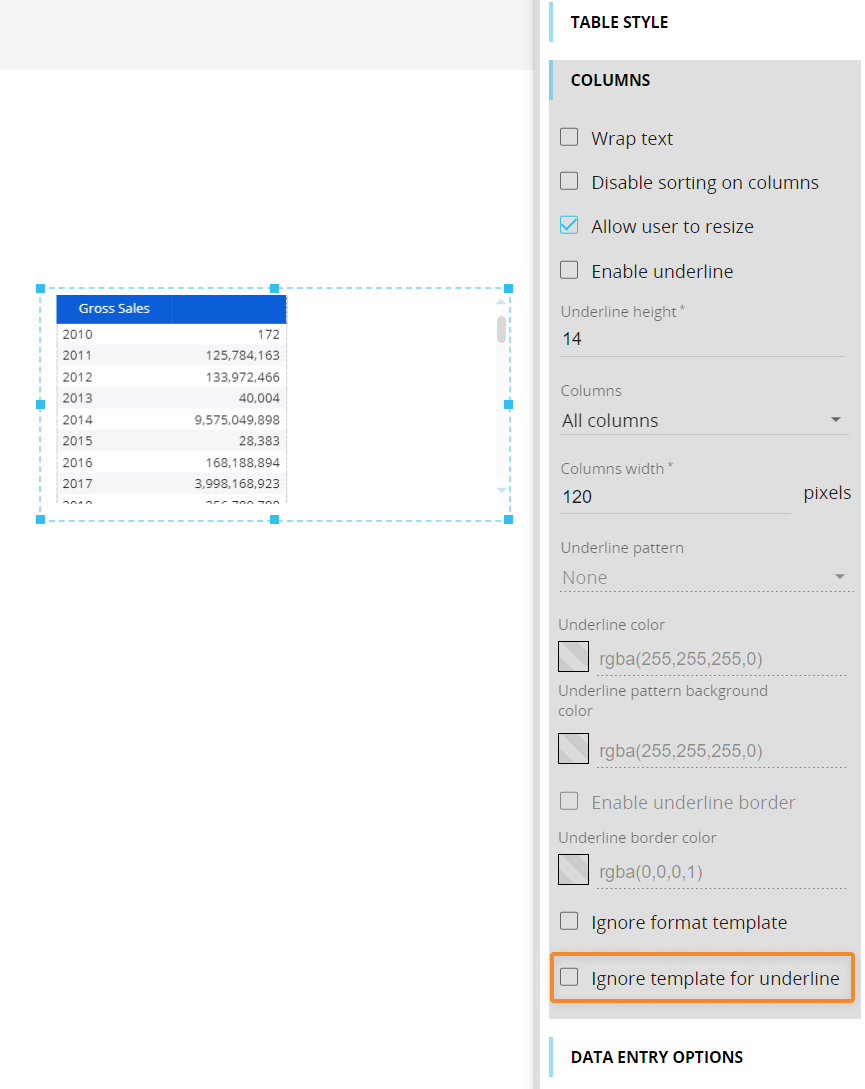
"Ignore format template for underline" property for the Data View - A new “Ignore format template for underline” property (checkbox) has been added to the Data View properties panel, under the "Columns" menu. The new property is disabled by default.
If enabled, it allows the Developer to ignore the underline options in the applied row style template for specific Blocks (columns) of the Layout.
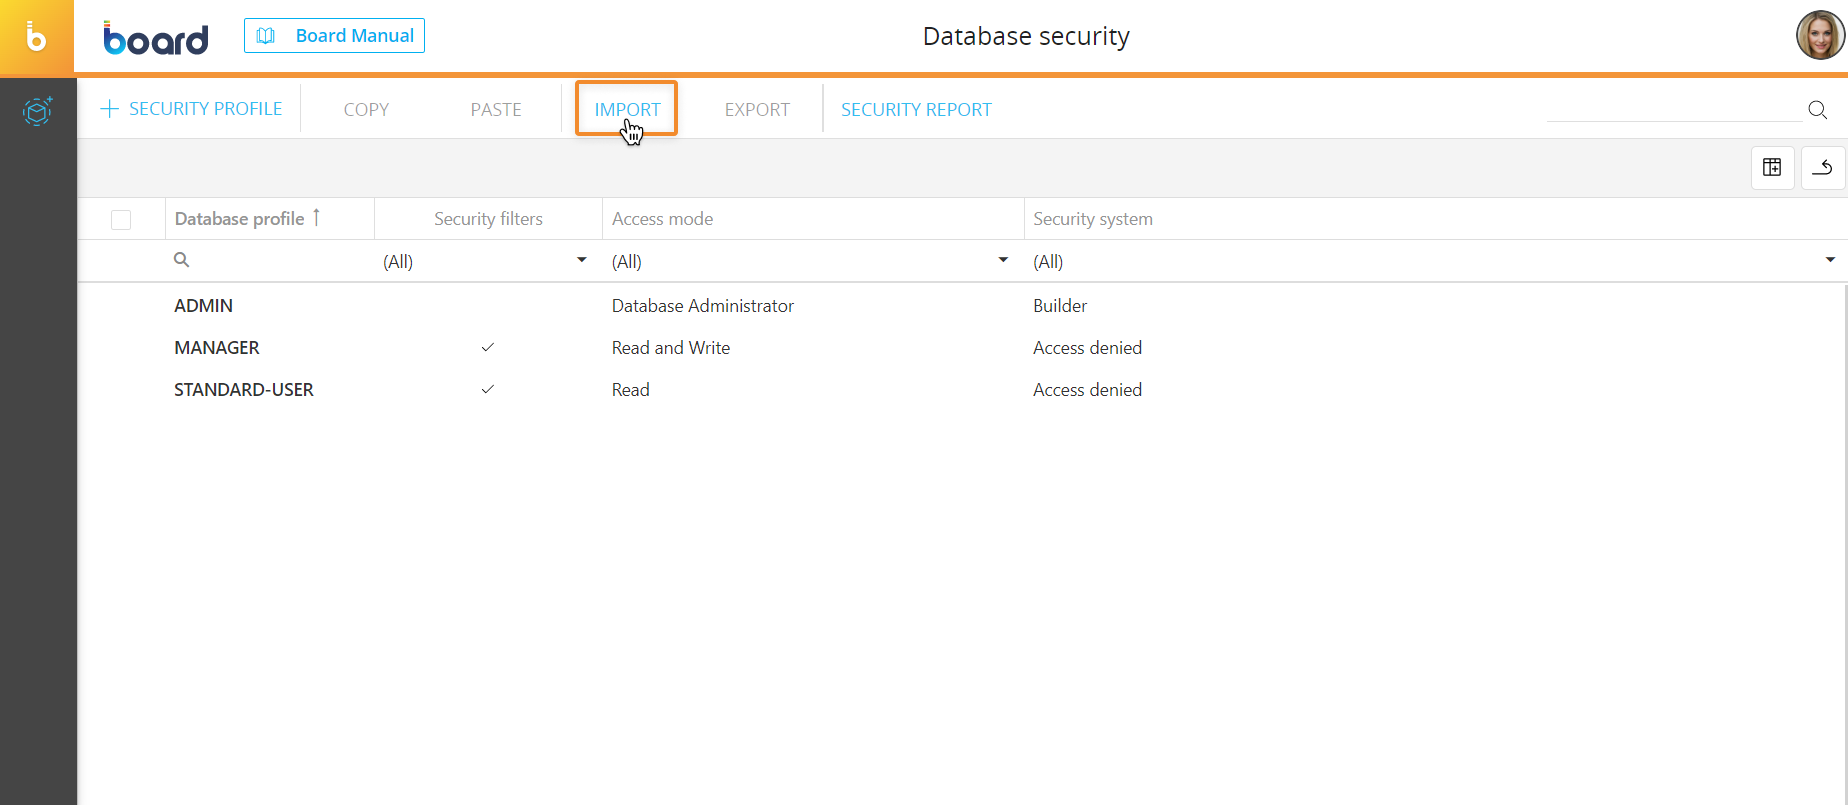
Database security profiles
Database security profile export/import - In the Database security profile section, a new feature allows you to export and import Database security profiles. This new feature completes the integrated ALM (Application Lifecycle Management) process, allowing security configurations to be seamlessly transferred between different Data models or to create backups of those configurations and perform a rollback to a previous Database security configuration on a given Data model.
To export one or more Database security profiles, proceed as follows:
- From the Database security profile section of a Data model, select the desired profiles
- Click "EXPORT" to download the security profiles and all their configurations to your local machine. The profiles are saved in a single file with the following name: DataModelName_security_profiles.bsp.
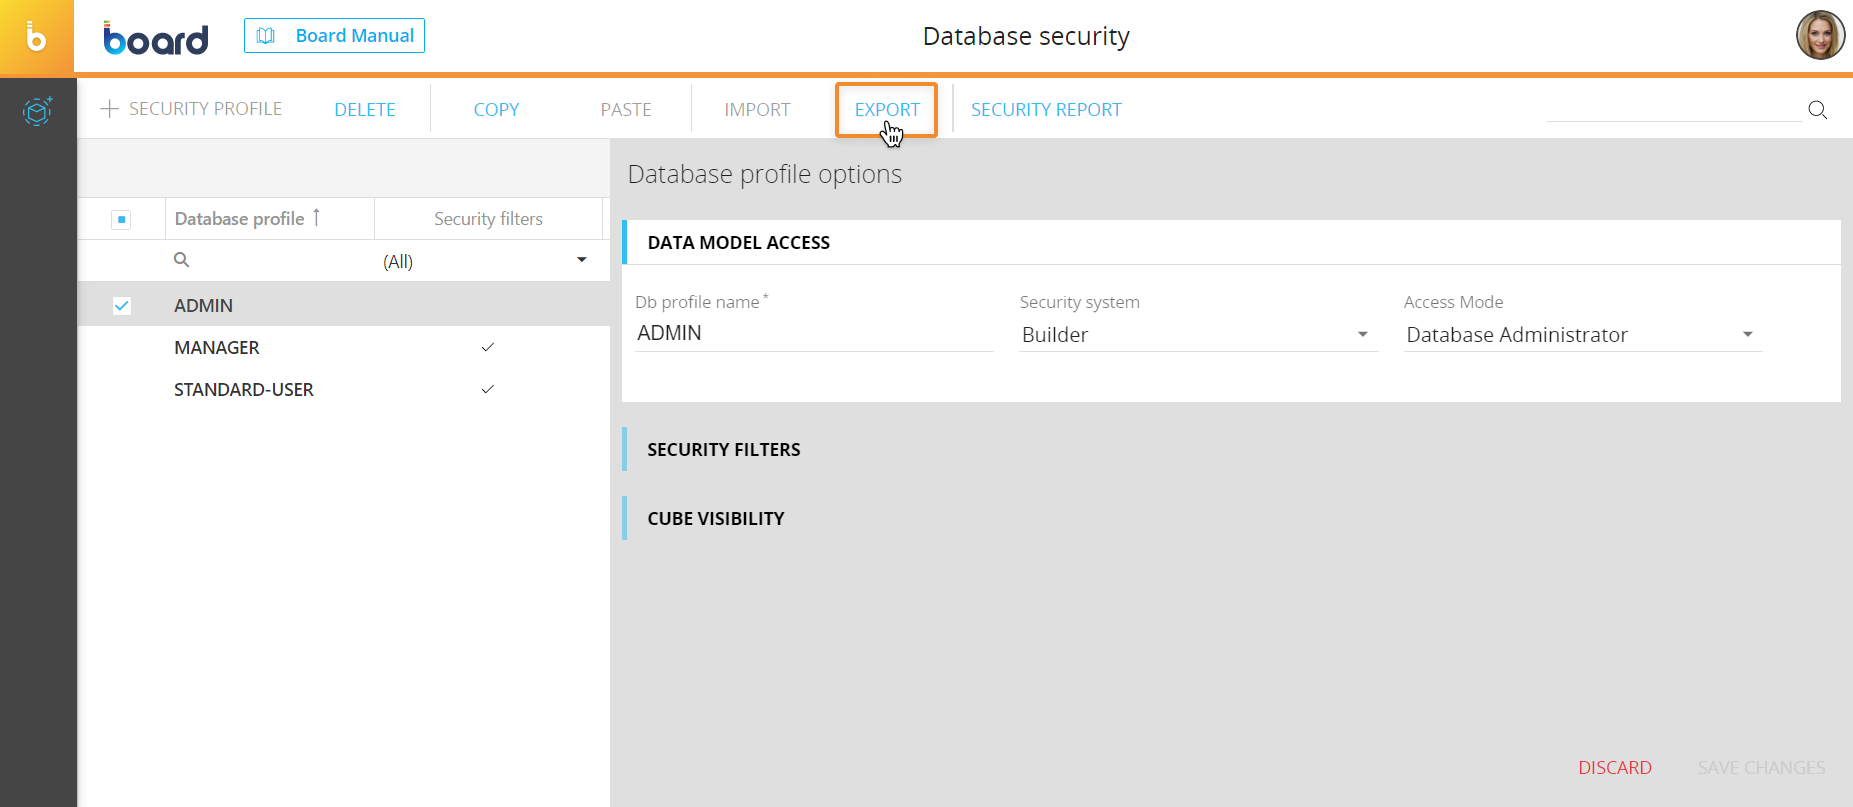
The .bsp file contains all the configurations of a Database security profile, including Security selections and Cube visibility configurations.
To import one or more Database security profiles, proceed as follows:
- From the Database security profile section of the desired Data model, click on "IMPORT" to open the upload pop-up window
- Click "UPLOAD" or drag and drop the .bsp file that contains the desired Database security profiles, then click the "IMPORT" button.
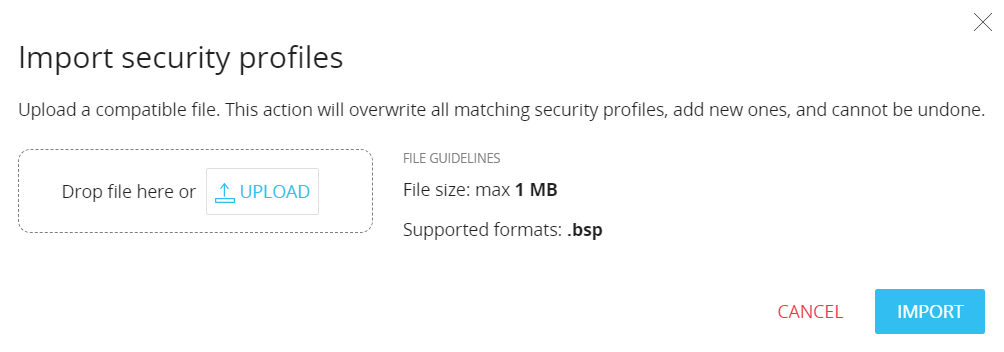
The maximum file size limit is 1MB.
The import process will add the Database security profiles contained in the .bsp file and overwrite all existing Database security profiles that have the same name as those in the file.
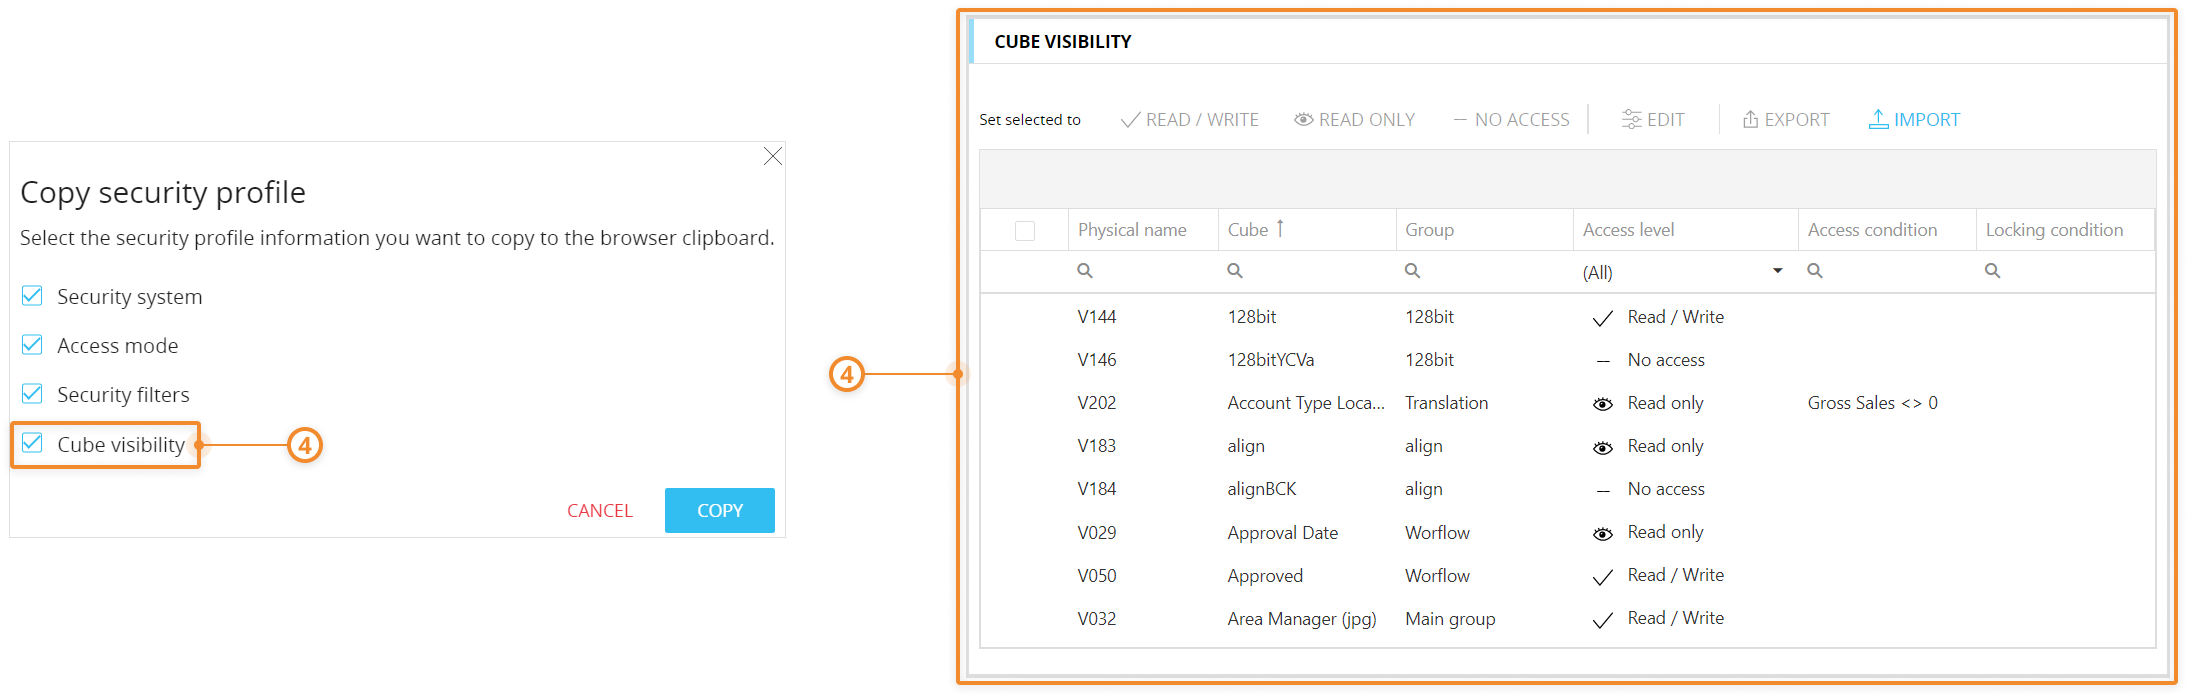
Database security profile settings copy/paste - This new feature allows all or only part of the configurations of a Database security profile to be copied and pasted into other security profiles of any given Data model of the same Board platform.
To copy the configurations of a Database security profile, proceed as follows:
- From the Database security profile section of a Data model, select the desired profile and click on "COPY". A pop-up window will appear
- In the pop-up window, enable the configurations that you want to copy to the browser clipboard. The configurations are the following:
- Security system and Access mode

- Security filters
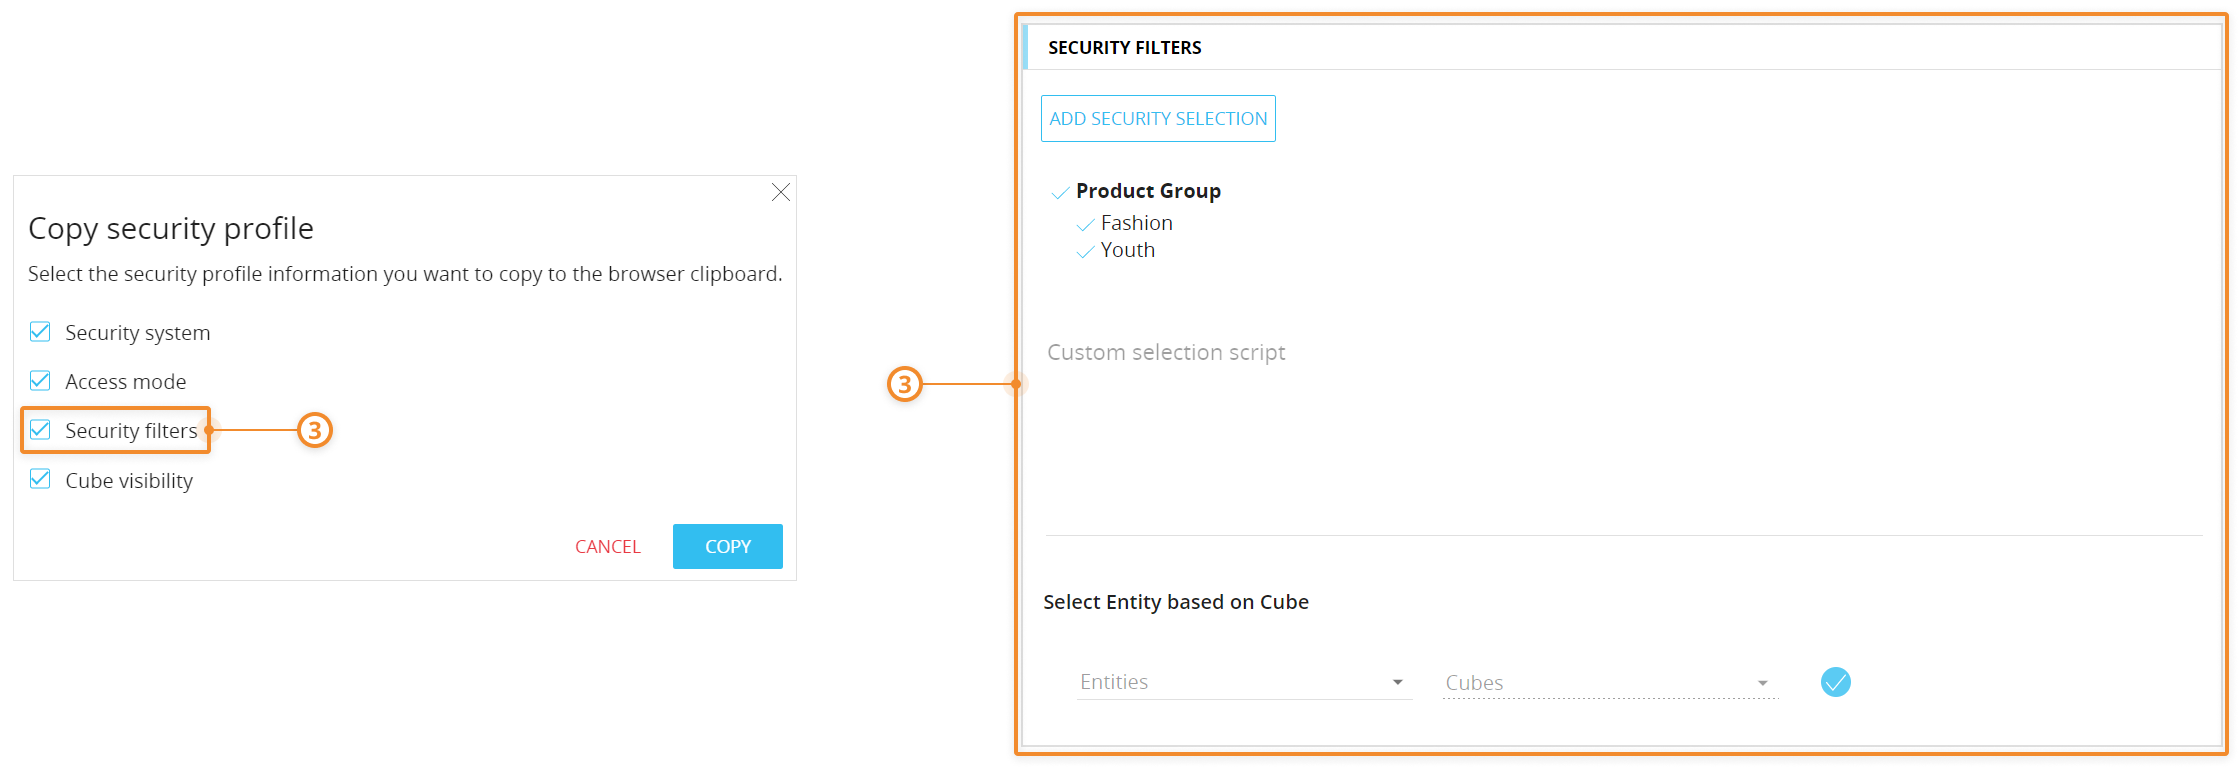
- Cube visibility
- Security system and Access mode
- Click the "COPY" button to copy the selected configurations in the browser clipboard
You can copy the configurations of only one Database security profile at a time.
To paste the configurations of a Database security profile, proceed as follows:
- From the Database security profile section of a Data model, select one or more security profiles whose configurations you want to overwrite
- Click "PASTE" to overwrite the configurations of the selected Database security profiles with those in your browser clipboard
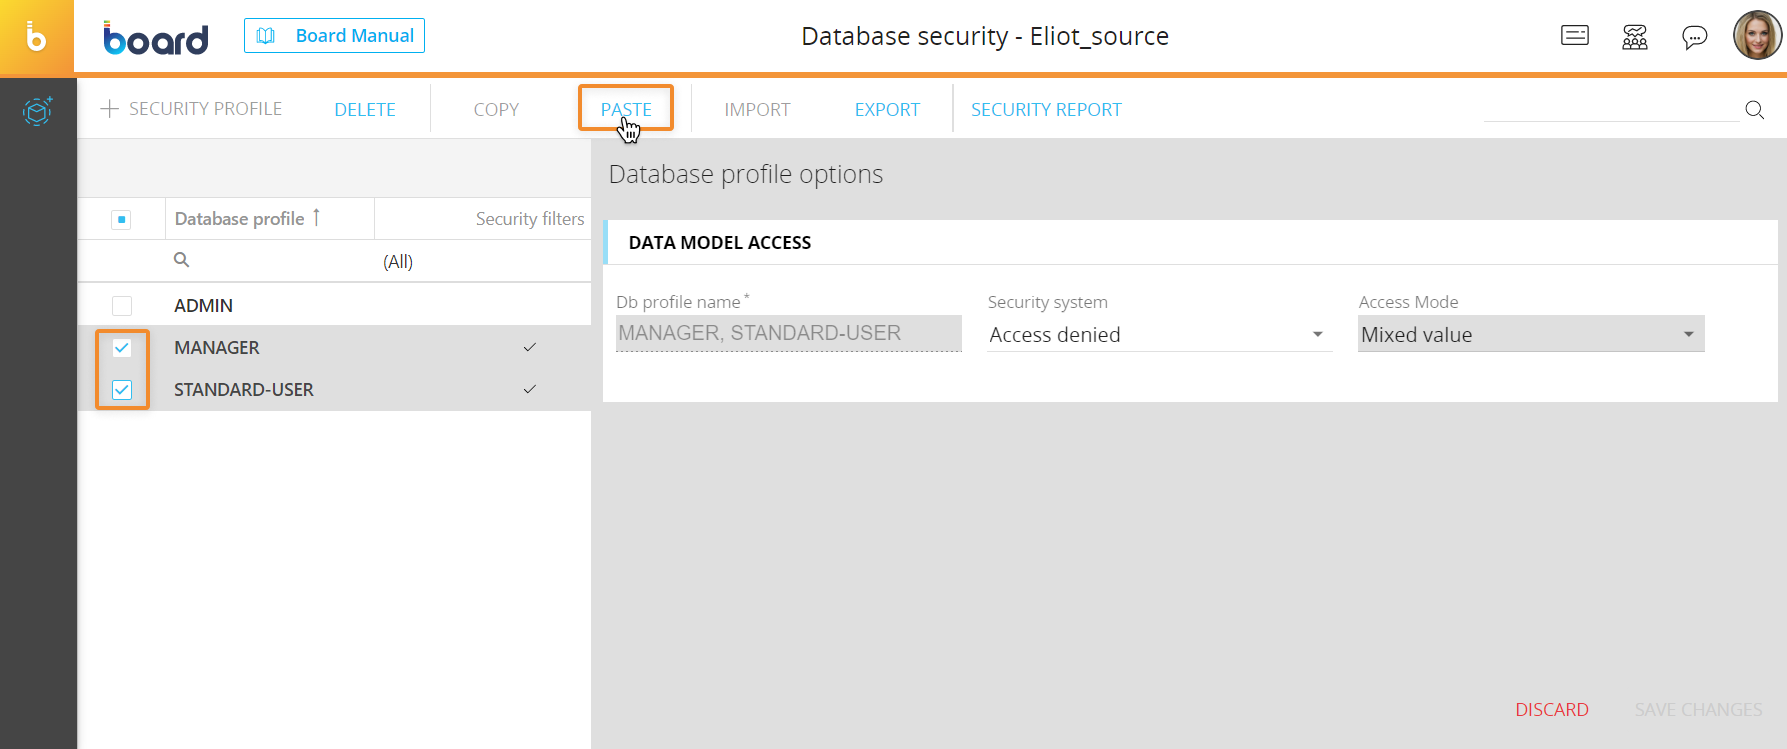
- Click "SAVE CHANGES".
The paste process will overwrite only the configurations that have been enabled in the "Copy security profile" pop-up window. For example, when pasting configuration into a target Database security profile, its security selections will not be changed, if they have been disabled in the "Copy security profile" pop-up window.
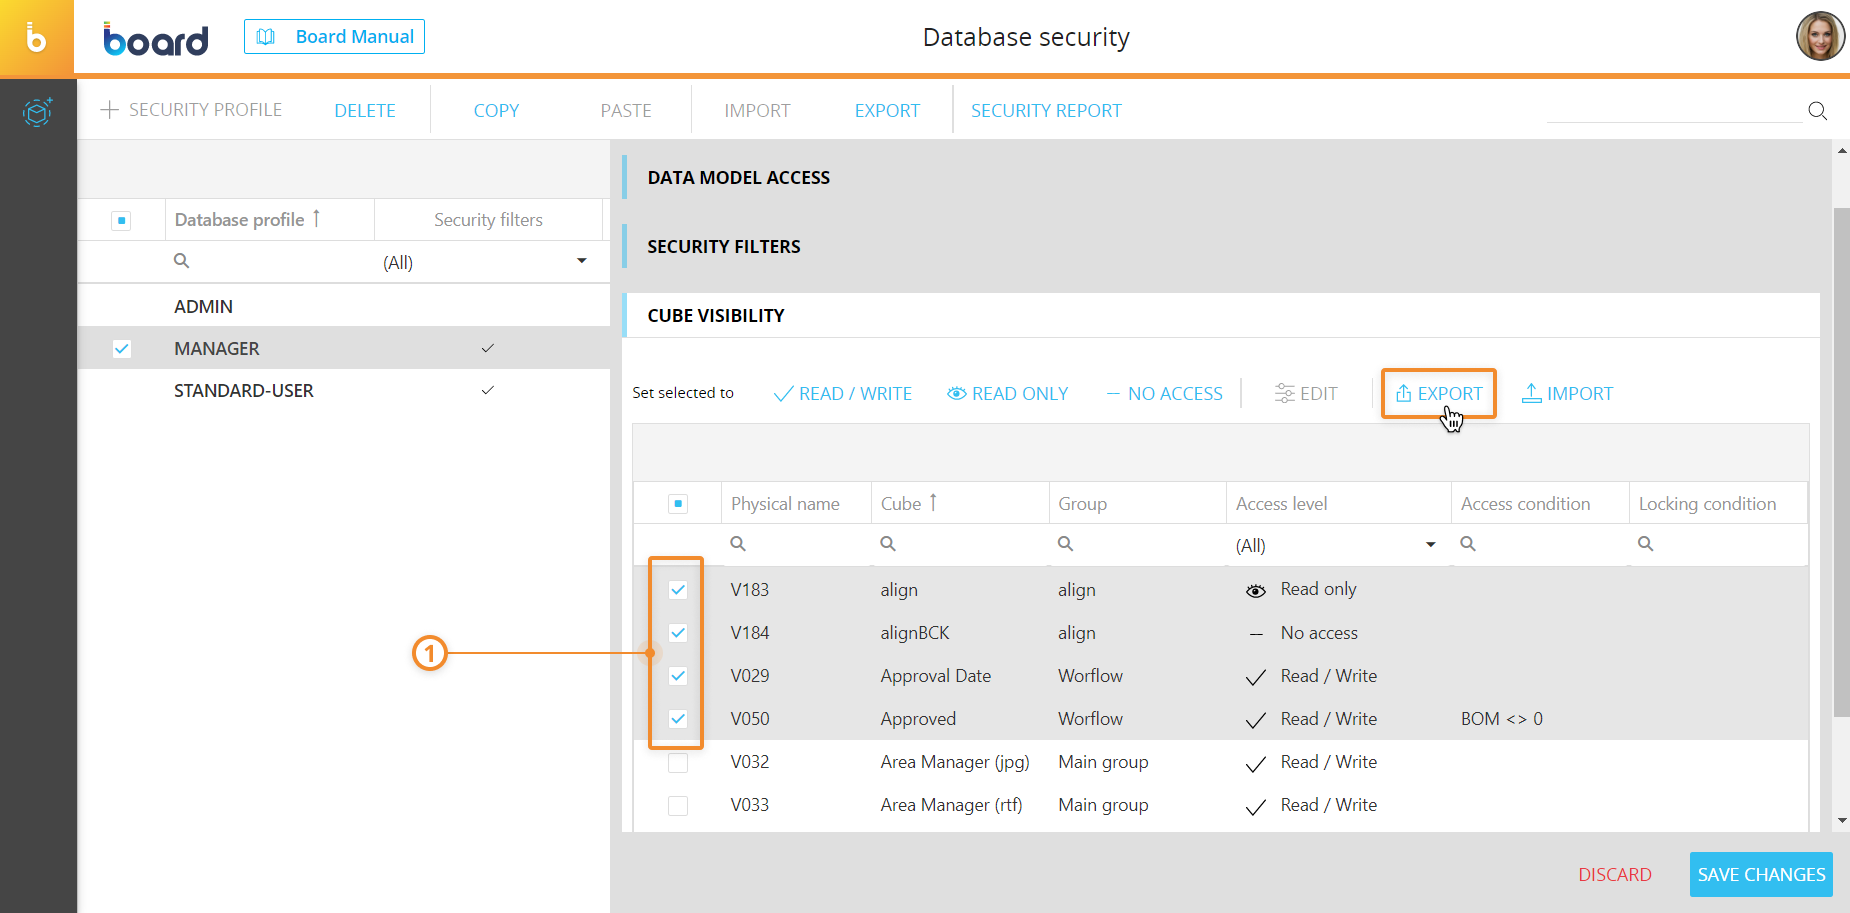
Cube visibility settings export/import - The export/import feature has been extended to the Cube visibility configurations to give you a much more flexible and efficient way of configuring Database security profiles, especially when you need to copy and paste all or some Cube visibility configurations from one security profile to another.
To export the Cube visibility configurations of a Database security profile, proceed as follows:
- Open the "CUBE VISIBILITY" menu of the desired Database security profile
- Select the desired Cube visibility configurations and click "EXPORT". A file containing the selected Cube visibility configurations will be downloaded to your local machine and will have the following name: cube_visibility_export.bcv
To import the Cube visibility configurations from a .bcv file into a Database security profile, proceed as follows:
- Open the "CUBE VISIBILITY" menu of the desired Database security profile and click "IMPORT" to open the upload pop-up window
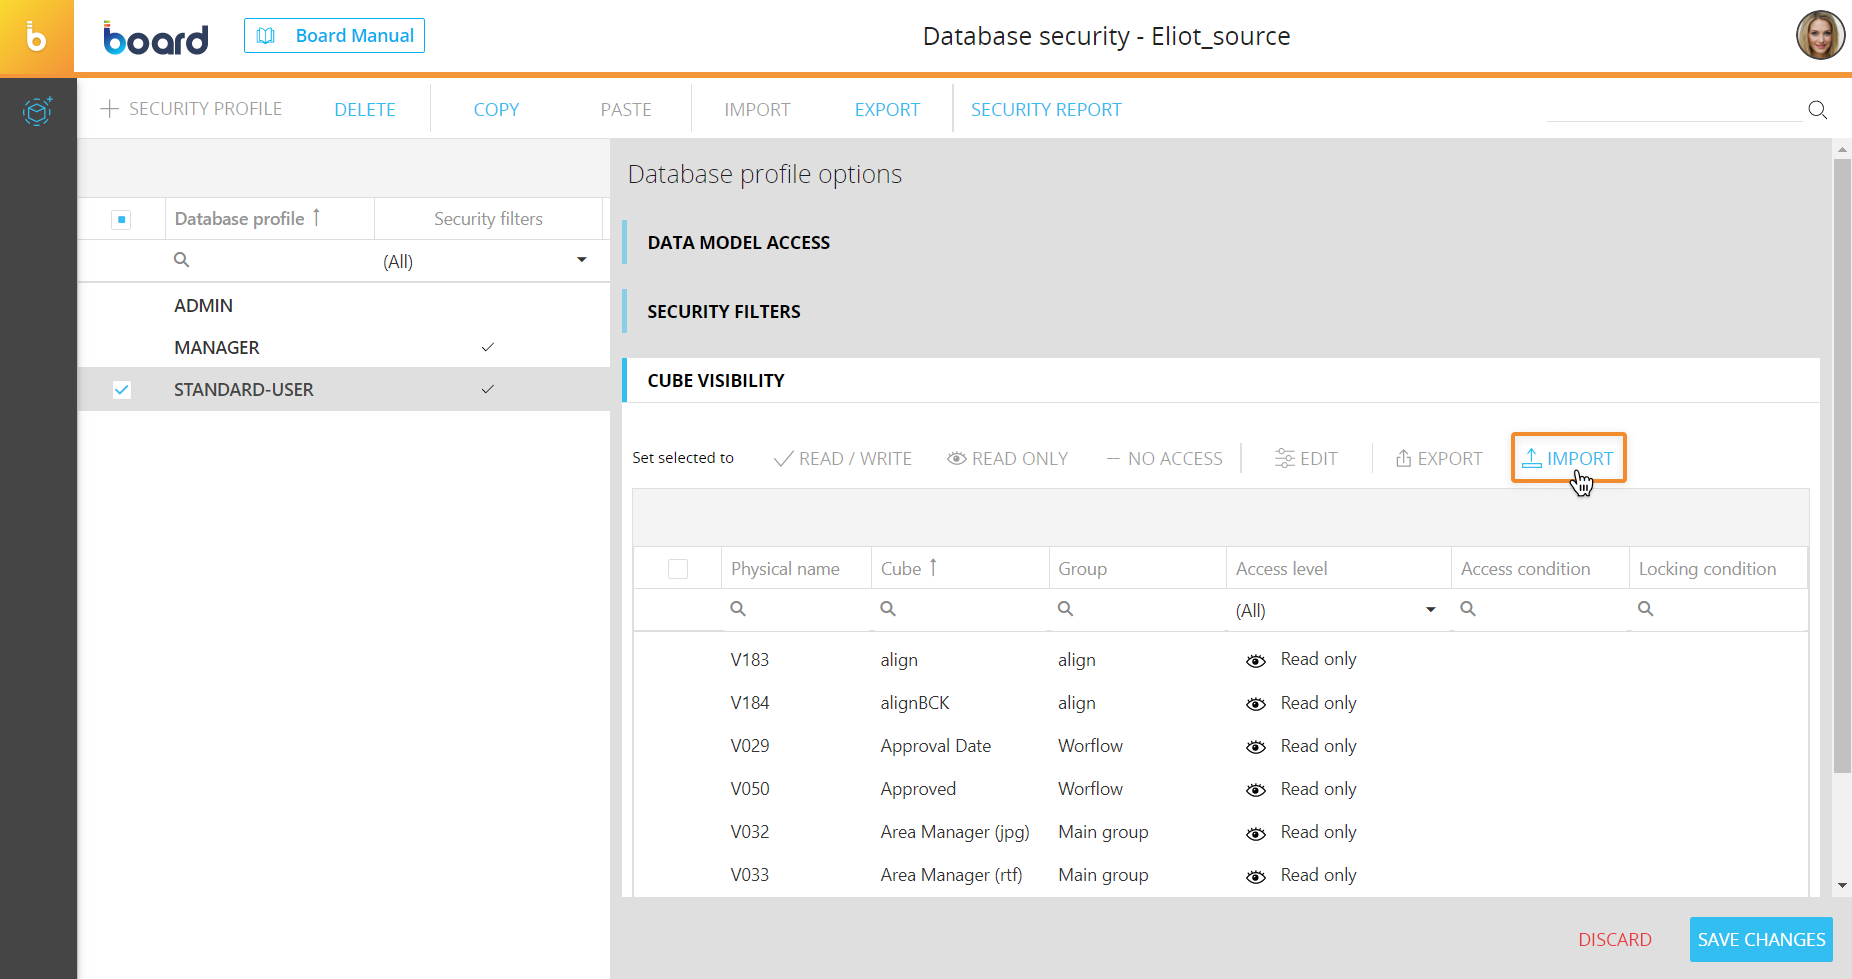
- Click "UPLOAD" or drag and drop the .bcv file that contains the desired Cube visibility configurations, then click the "IMPORT" button
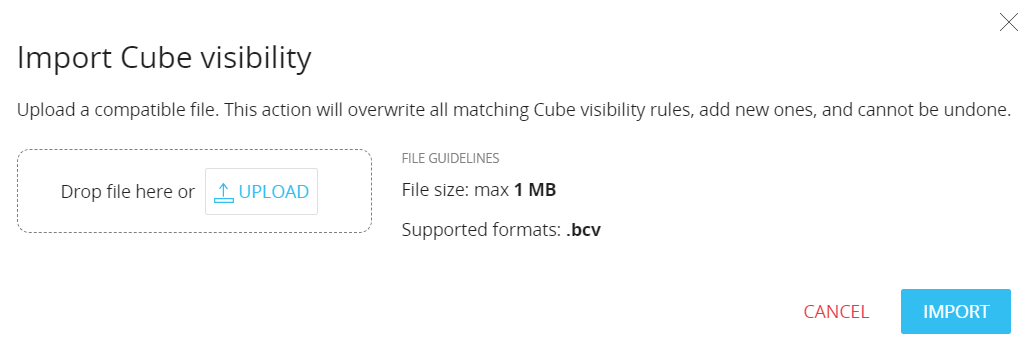
- Click "SAVE CHANGES".
The maximum file size limit is 1MB.
The import action will overwrite all Cube visibility rules based on the Physical name of the Cube they're associted with.
The import action does not import Cubes. It only imports the Cube visibility configurations of Cubes that already exist in the target Data model and have the same name and Physical name as those in the .bcv file.
Various
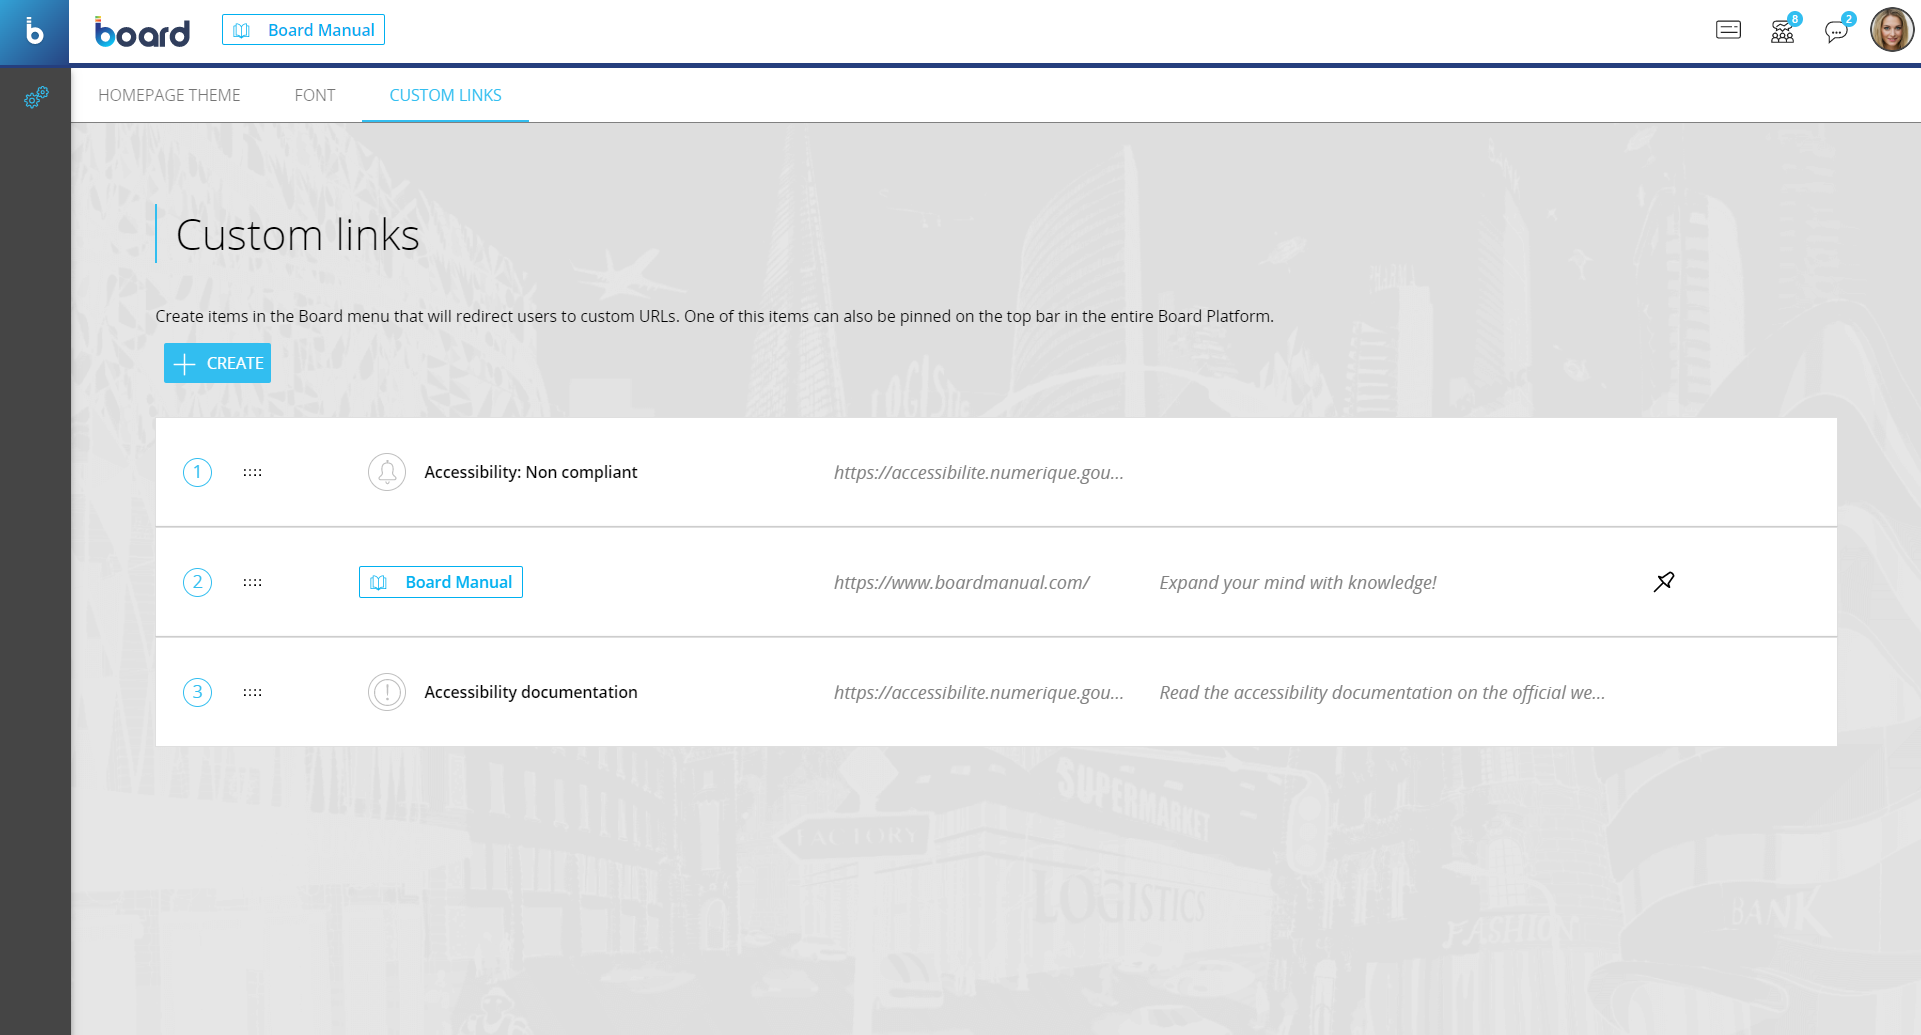
Custom links - A new area under System Administration, the Appearance section (formerly named "Theme"), allows Admins & Ops to create custom links to external online resources that are added to the Board main menu, or can be pinned in the top bar, right after the logo.
This new feature is particularly useful, for example, when Admins & Ops need to notify users about important resources available online, link other systems that are part of a business process, add links to information required by law, and so on.
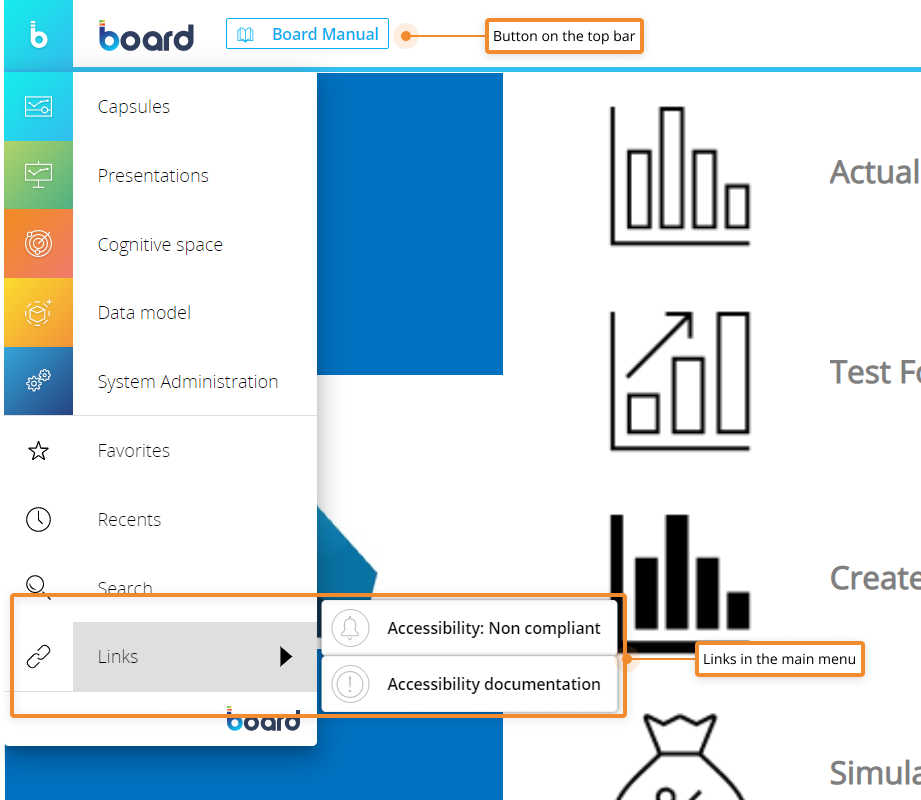
In the Custom links home page you'll see all the existing links in the configured order. By dragging and dropping each row, you can rearrange the links order in the main menu, except for the one pinned on the top bar. You can also pin, edit, delete links, by hovering over each row and clicking the appropriate icon on the right.
You can only pin one link on the top bar.
When you pin a link on the top bar, the pin icon will remain visible in the list. If you pin another link on the top bar, the previously pinned link will be moved to the main menu.
To create a new custom link, proceed as follows:
- Access the Appearance section under System Administration, then click on "Custom link" in the tabbed menu
- Click the "+ CREATE" blue button to open the link configuration area
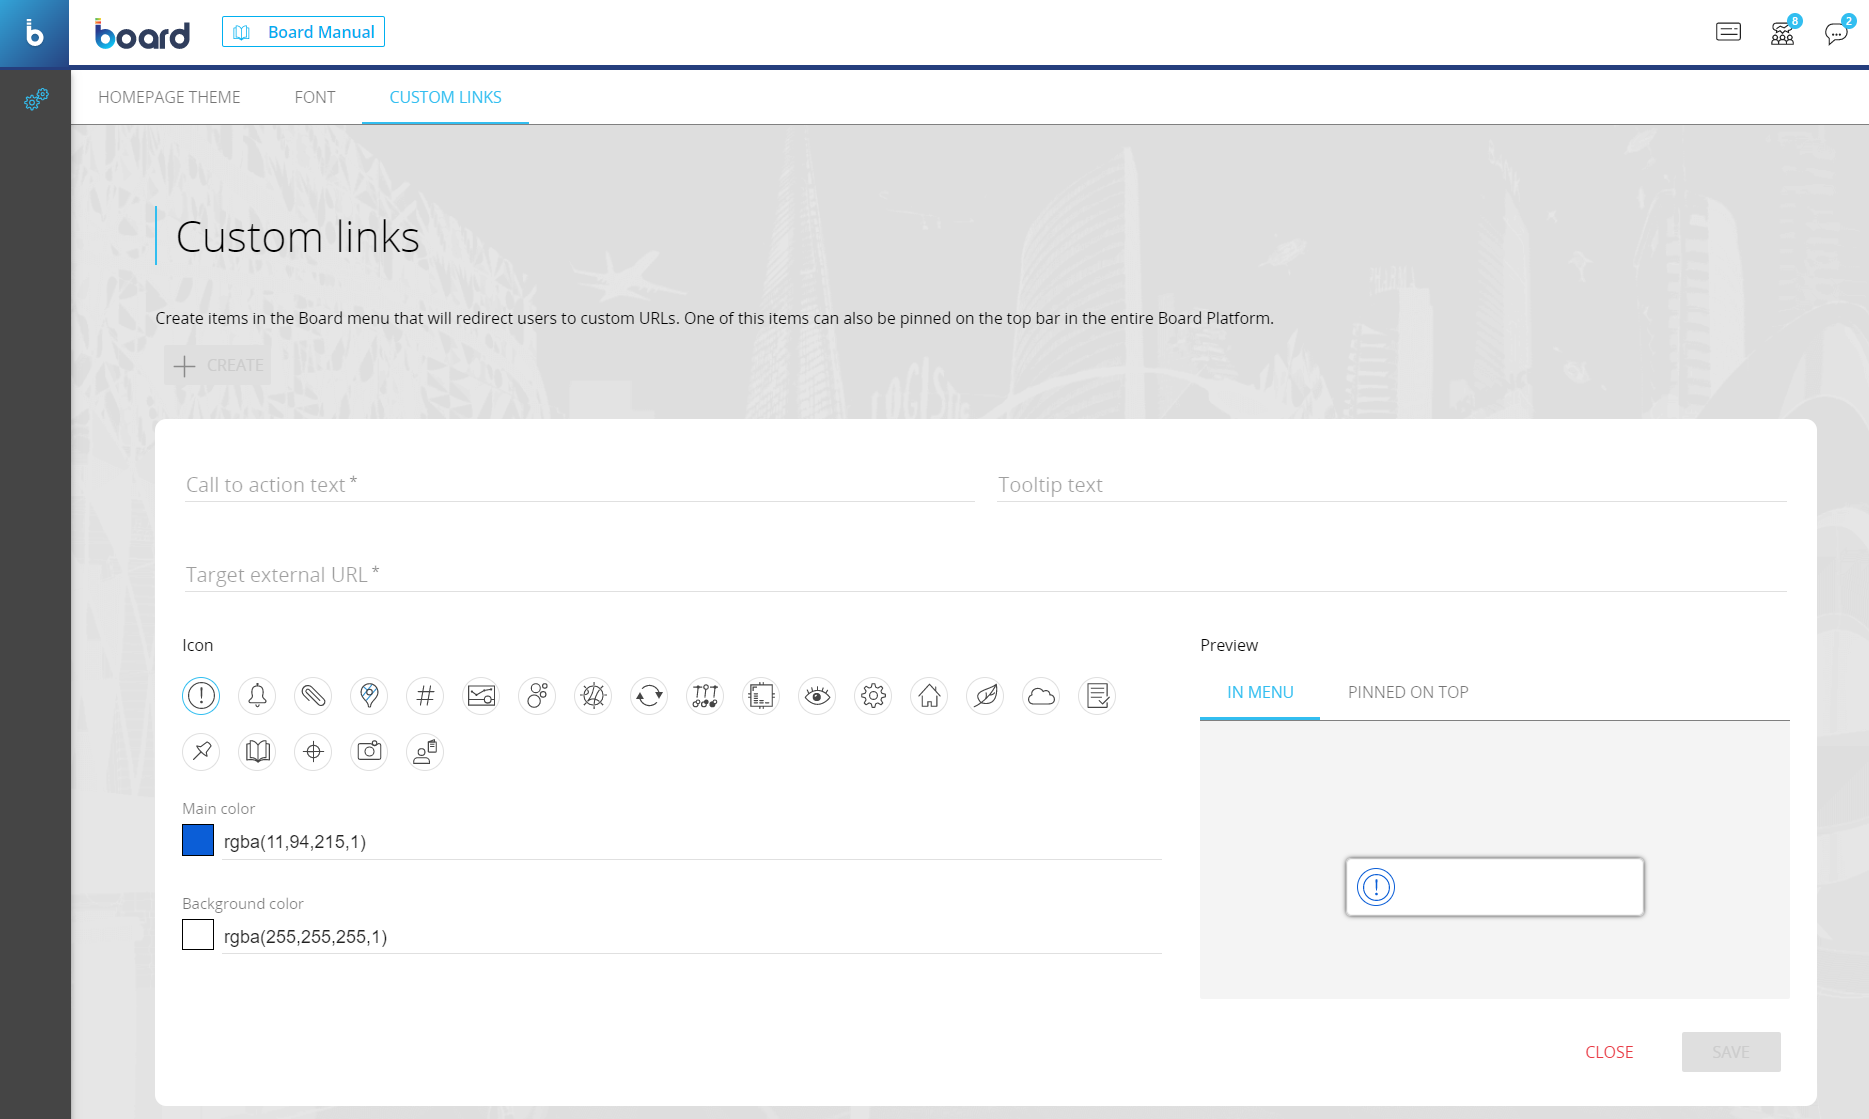
- Enter a call to action. The call to action will be displayed on the top bar or in the Board menu and cannot be longer than 35 characters
- Enter a tooltip (optional). The tooltip will be displayed when a user hovers over the button/menu item
- Enter the target URL. This is the link to the external resource to which users will be redirected to after clicking the button/menu item. No URLs that redirect to Board resources/services can be used in this field
- Choose an icon. The icon will be shown alongside the button/menu item
- Choose a main color. The color chosen will be applied to the icon and the call to action text of the button
- Choose a background color. The color chosen will be applied to the background of the icon/the background of the button
- Click the "SAVE" blue button
The "Preview" area on the right will show the appearance of the custom link as a menu item and as a button when it is pinned on the top bar.
Newly created links are added to the main menu by default and are located in the new menu item "Links".
All users of the Platform will instantly see the newly created link in the Board menu or in the top bar, depending on the element configuration.
Board's public APIs - It is now possible to trigger the execution of a Procedure with a selection added through query string parameters: the selection will define the scope of the Procedure, just as it happens when the Procedure is triggered from a Capsule Screen which has an active Selection applied.
This improvement is particularly useful for business cases when the API call should update and process only data for a specific selection and this information is not stored in Board but in the external system that triggers the execution of a Board Procedure.
For example, if a user has updated sales data for 100 products in their ERP system and wants to launch a Procedure which reads in only the information about them and calculates the related margin, now a selection can be passed with the "Procedure" API query to limit the scope of its execution to those 100 products.
Examples:
- Base
?{entity_name}={member_code}
?year=2012
Result: The Procedure scope will only consider the year 2012 - Multiple
?{entity_name}={member_code}&{entity_name}={member_code}
?year=2012&city=IT01
Result: The Procedure scope will only consider the year 2012 and the city whose code is IT01 - List
?{entity_name}={member_code},{member_code},{member_code}
?year=2012,2017,2019
Result: The Procedure scope will only consider the years 2012, 2017 and 2019 - Range
?{entity_name}={member_code}..{member_code}
?year=2015..2019
Result: The Procedure scope will consider all years from 2015 to 2019 - Escape
?{entity_name}="{member_code}"
?city="IT01"
Result: The Procedure scope will only consider the city whose code is IT01
Other details about the "Procedure" API query are available here.
New "Execute procedure for active selection" option - A new option has been added to the Data View properties in Design mode, under the "Set trigger" menu in the "Data entry options" menu.
If enabled, the new option triggers the associated Procedure only once as soon as new values are saved and only on the active Selection on Screen, instead of running it one time for every updated value.
The new option is disabled by default.
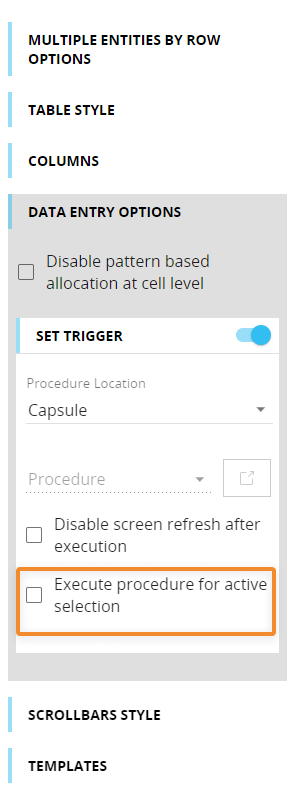
This new implementation allows Makers to automatically trigger workflow and calculation Procedures when new values are saved, without the need to add other Objects on the Screen (e.g. Buttons) to manually trigger said Procedures.