Cube visibility
The new Cube visibility feature is designed to provide a significant amount of both control and flexibility in determining who can access and perform data entry actions on specific Cubes.
It is a new security layer that enhances Board's standard security by allowing administrators to create free data access models based on custom access and locking conditions that rely on dedicated grant Cubes for applying access level rules to physical cells of data Cubes.
The Cube visibility feature has a great impact on the read/write workflow in Board, as it greatly speeds up the configuration and management of data access, and, at the same time, offers the possibility to create very specific rules for each Data model security profile.
With the new Cube visibility feature, you no longer have to limit access to data in Screens or Procedures with complex locking or filtering rules: now you can define an extremely granular data access level right into the Data model itself, for each user and for each cell of Cubes.
The new feature makes Board's self-service capabilities even more powerful: the new security layer is, in fact, always active regardless of any changes that the user can make to Layouts and any selections applied in Play mode. Capsule builders no longer have to disable data manipulation features and other data entry options in Play mode, as the new security layer prevents users from writing into Cubes cells where they shouldn't: this really takes Board's planning capabilities to a whole new level.
Cube visibility rules are calculated and applied in real time for each aggregated cell during the data retrieval phase: any change in the authorizations is immediately reflected in Screens and other Board resources (after a page refresh). Since the Access and Locking conditions are based on grant Cubes, you can dynamically change permissions by performing data entry actions on Data views having said Cubes in the Layout with, of course, data entry enabled.
Each Cube visibility rule is automatically applied to:
- Layouts
- Selections (including Dynamic Selects and "Select based on Cube" steps)
- All Procedures steps involving Layouts (except Dataflows)
- Smart Import Objects. Currently, Smart Import Objects respect only Access and Locking conditions set on Cube visibility rules. Default access permissions (Read / write, Read-only, and No access) are ignored, just like with the Data reader
Cube visibility rules are currently ignored by:
- Dataflows and Data readers. Both Procedure steps always consider and write to the entire dataset stored in Cubes, and are only affected by selections
- Data Pickers. Data Pickers can always be configured in order to retrieve values from any cell of the Cube
- Reverse Rules. Reverse Rules are always allowed to write to any cell of the Cube, as per their configuration
- Nexel layers. Nexel formulas always consider and write to the entire dataset stored in Cubes, and are only affected by selections
- Data entry-enabled Data Blocks with the "Pattern based allocation" option turned on. Data allocation based on a Cube always considers its entire dataset to obtain a correct pattern
- RDB (Rolap) Cubes
If a Cube is affected by a Cube visibility rule, you cannot enable the "Cube cell locked by" option on it in the Layout editor: if you do, the Layout execution will fail.
New Cube visibility table
Cube visibility rules can be defined from the Database security section of each Data model. When editing or creating a new security profile, a new table in the “Database profile options” sliding panel allows you to manage/review Cube visibility rules.
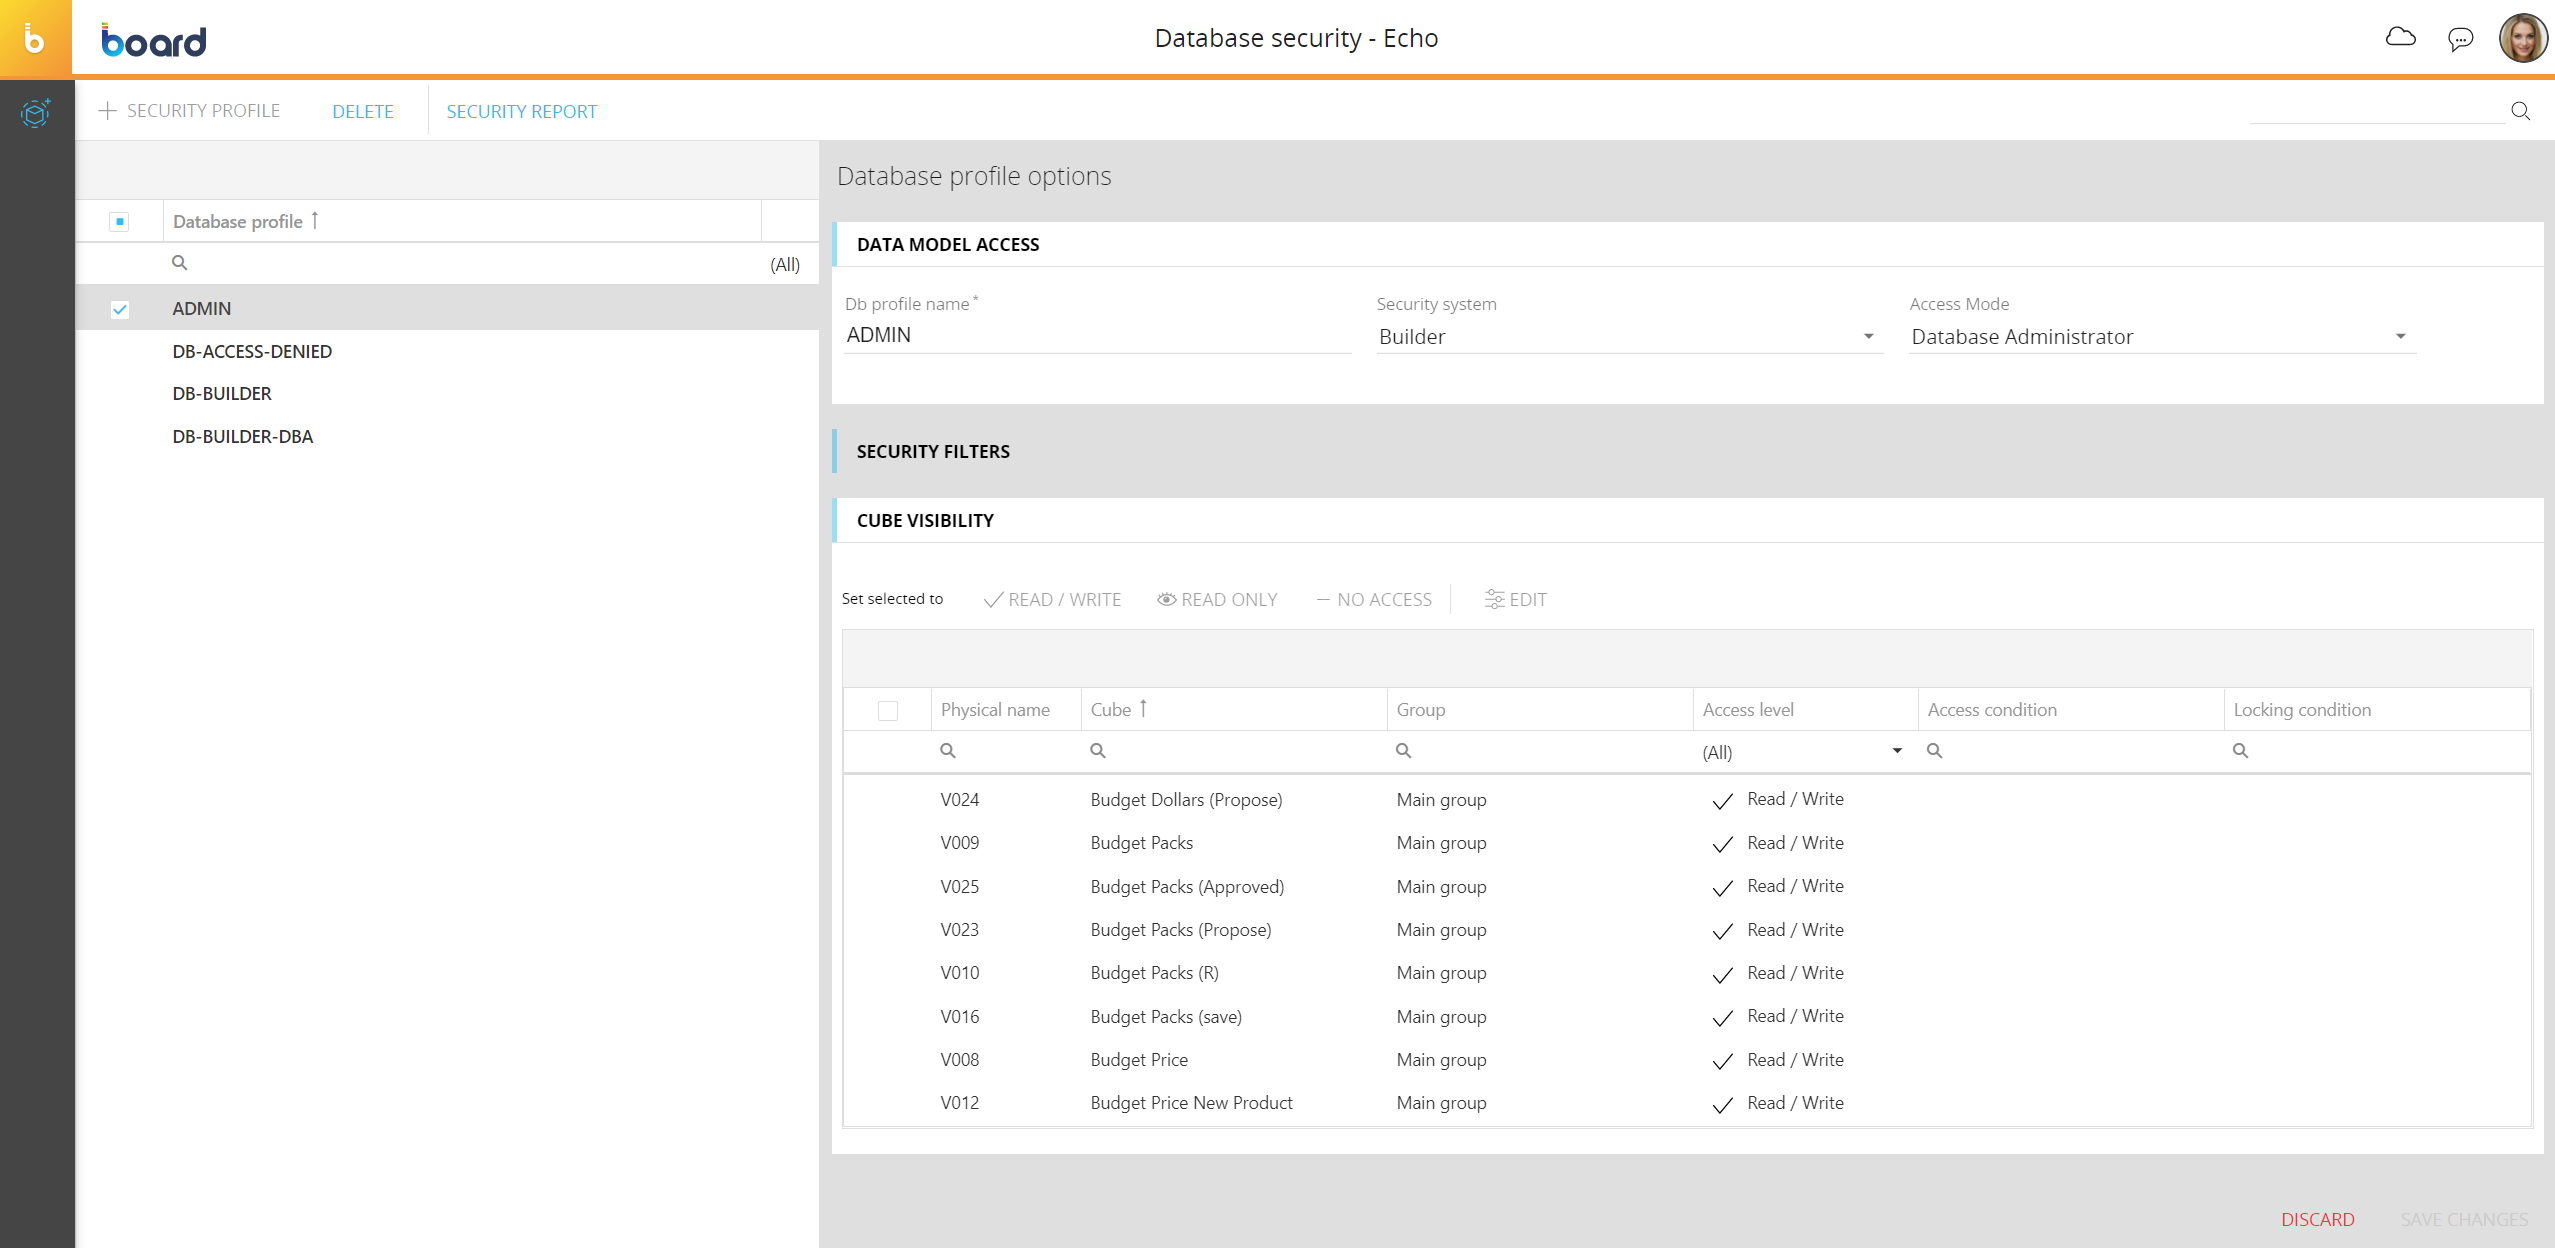
The new table is sortable and searchable using the interactive header fields on each column. It also allows for single and multiple selection of rows, using the checkboxes in the first column.
Data access settings created in previous versions of Board will be automatically migrated to the new model.
The default access level for Cubes is Read / write.
You can copy and paste an existing Cube visibility rule right from the table by selecting the desired row and using the CTRL+C and CTRL+V keyboard shortcuts or by using the “COPY” and “PASTE” buttons that appear above the table. The “COPY” button is active only when a single row is selected, while the “PASTE” button is active for both single and multiple row selections.
When you hover over a condition that doesn’t fit in the corresponding cell, a tooltip appears showing the condition in full.
The conditions shown in the "Access condition" and "Locking condition" cannot be edited directly in the table: you can only copy the settings of the entire row (access level and conditions) and paste them on other rows.
From the table, you can apply default access level permissions (Read / write, Read only, and No access) by selecting one or more rows and by clicking on the corresponding button above the table.
The “EDIT” button opens the Advanced access settings configuration window. This configuration window also opens when the user double-clicks on an Access condition cell or Locking condition cell in the table. See next paragraph for more details.
Creating Cube visibility rules
To create a new rule, proceed as follows:
- Select a Cube in the Cube visibility table
- Define the desired access level by clicking on the corresponding button above the table. The available default access levels are the following:
- Read / write. This level grants permission to enter data into the Cube and run update Procedures. Access to the data model design features is not affected by this configuration, as it is based on the user's license
- Read only. This level grants read-only access to the data stored in the Cube. Users with this profile can view values in reports coming from the Cube or run update Procedures, but they cannot enter data
- No access. This level completely denies any access to the Cube. Users will not be able to view values coming from it in reports or run update Procedures
- You can further refine access permissions with advanced Access and Locking conditions by clicking on the "Edit" button above the table. This will open the advanced access settings configuration window
- Set access and/or locking conditions in the "Grant cells access where" or "Deny cell editing where" menus.
To create a new condition, proceed as follows:- Select a grant Cube from the dropdown menu. The dropdown supports autosuggest: the input field reveals options for the user to select from as a text string is typed.
Grant Cubes are numeric Cubes whose values regulate which cells of the Cube selected in step 1 of the main bulleted list can be edited and/or viewed by the user.
- Define the comparison condition from the next dropdown menu. The only comparison conditions available are “< > 0” (not 0) or “= 0” (equal to 0)
- Define a logical operator to logically join the condition with the following ones. The only logical operators available are AND and OR. Logical operators combine relations according to the following rules:
- AND. Both conditions must be true for the entire condition to be true
- OR. If either condition is true, the the entire condition is true
The logical operator set in the first row is always applied to the following rows (it is not possible to configure mixed AND and OR conditions)
- Save the condition using the blue "✔" icon at the end of each row.
You can add as many conditions as needed by starting over from step 1.
You can delete previously saved conditions by clicking on the red recycle bin icon at the end of each row. - Click on APPLY to save and close the advanced access settings configuration window
- Select a grant Cube from the dropdown menu. The dropdown supports autosuggest: the input field reveals options for the user to select from as a text string is typed.
The "Grant cells access where" or "Deny cell editing where" menus are enabled or disabled depending on the Access level configured in the “Database profile options” sliding panel. When one or both menus are disabled, they are greyed out as per the table below.
| Grant cells access where | Deny cell editing where | |
| Read / write | Enabled | Enabled |
| Read only | Enabled | Disabled |
| No access | Disabled | Disabled |
If one of the menus includes previously saved conditions and is disabled, the conditions are saved but they no longer affect data access control. If the menu is enabled again, the conditions will also become effective again.
If the Advanced access settings configuration window is opened after selecting multiple Cubes in the table, and those Cubes have different access settings, the fields that aren’t matching will show a “MIXED VALUES” label. In this case, changing and saving settings will affect all selected Cubes and overwrite any existing individually configured conditions.
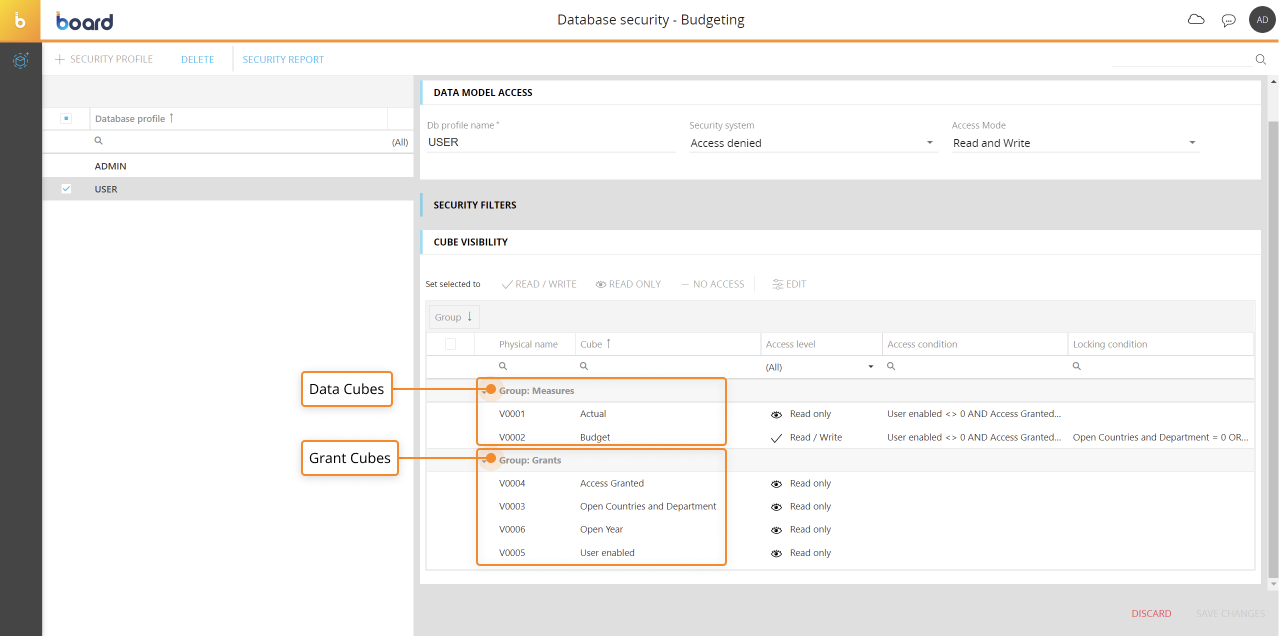
Example
Let's consider the following configuration for the "User" security profile.
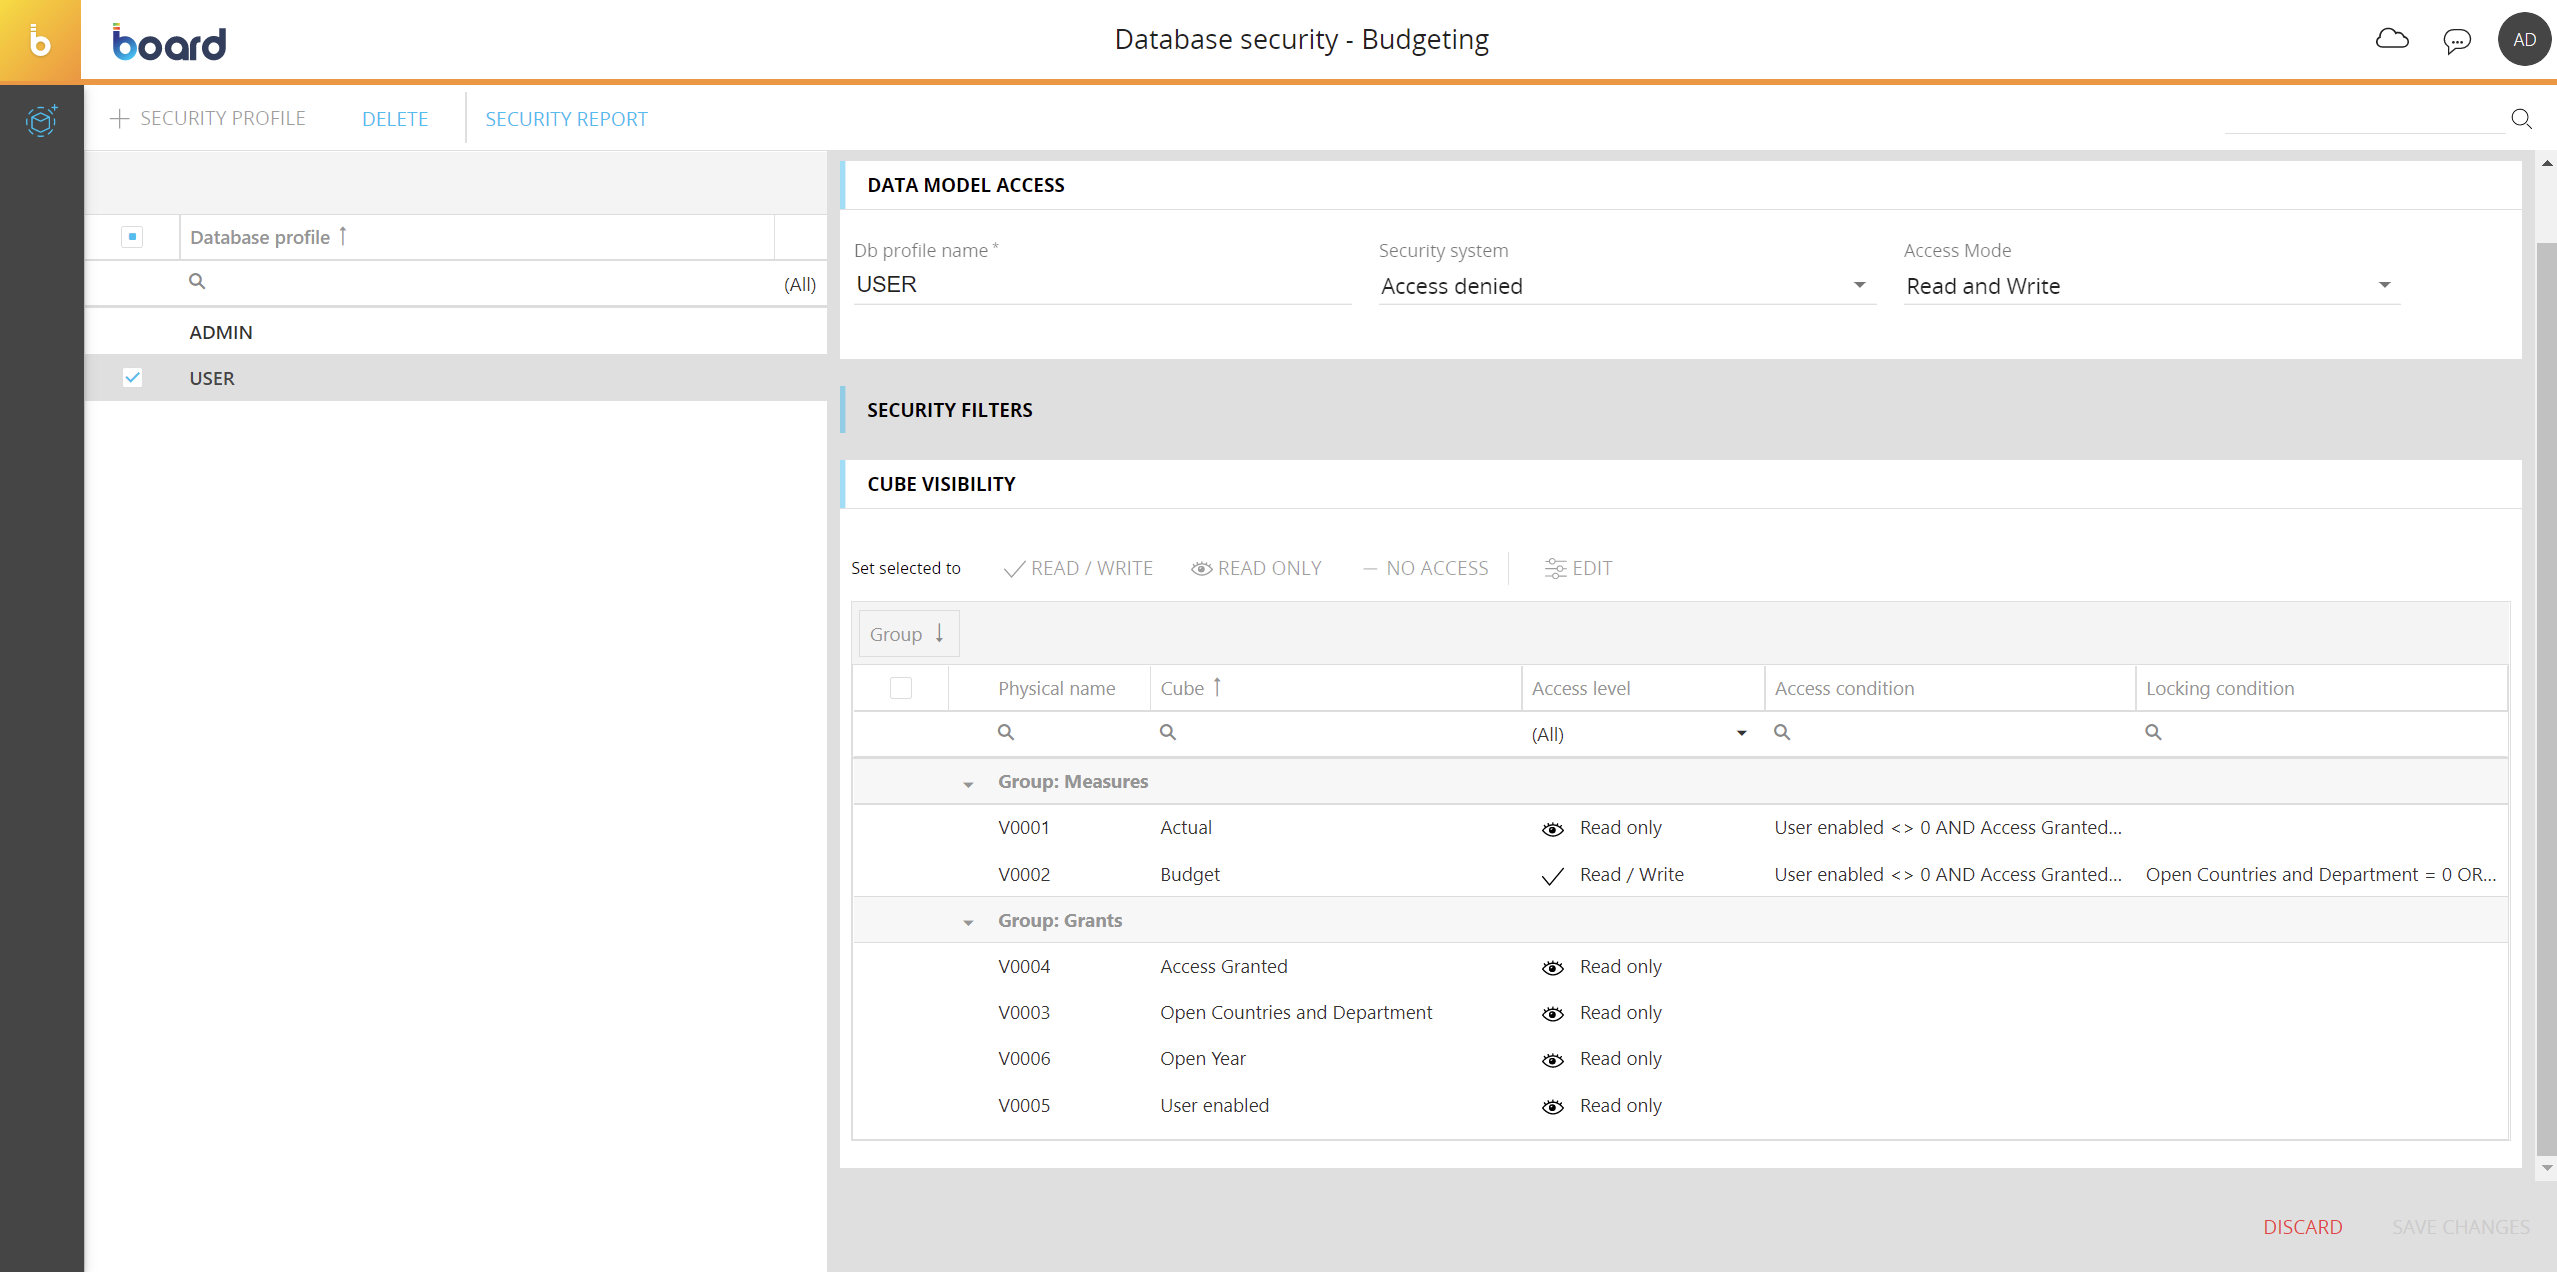
As you can see the Actual and Budget Cubes have been configured via specific Access and Locking conditions. These conditions are based on four grant Cubes that regulate which user is able to read and/or write on the Actual and Budget Cubes and on which combinations of the Entities in their structure.
By creating a simple administrative Screen with four Data Views having a single grant Cube in their Layout with data entry enabled, you can dynamically change permissions for each user.
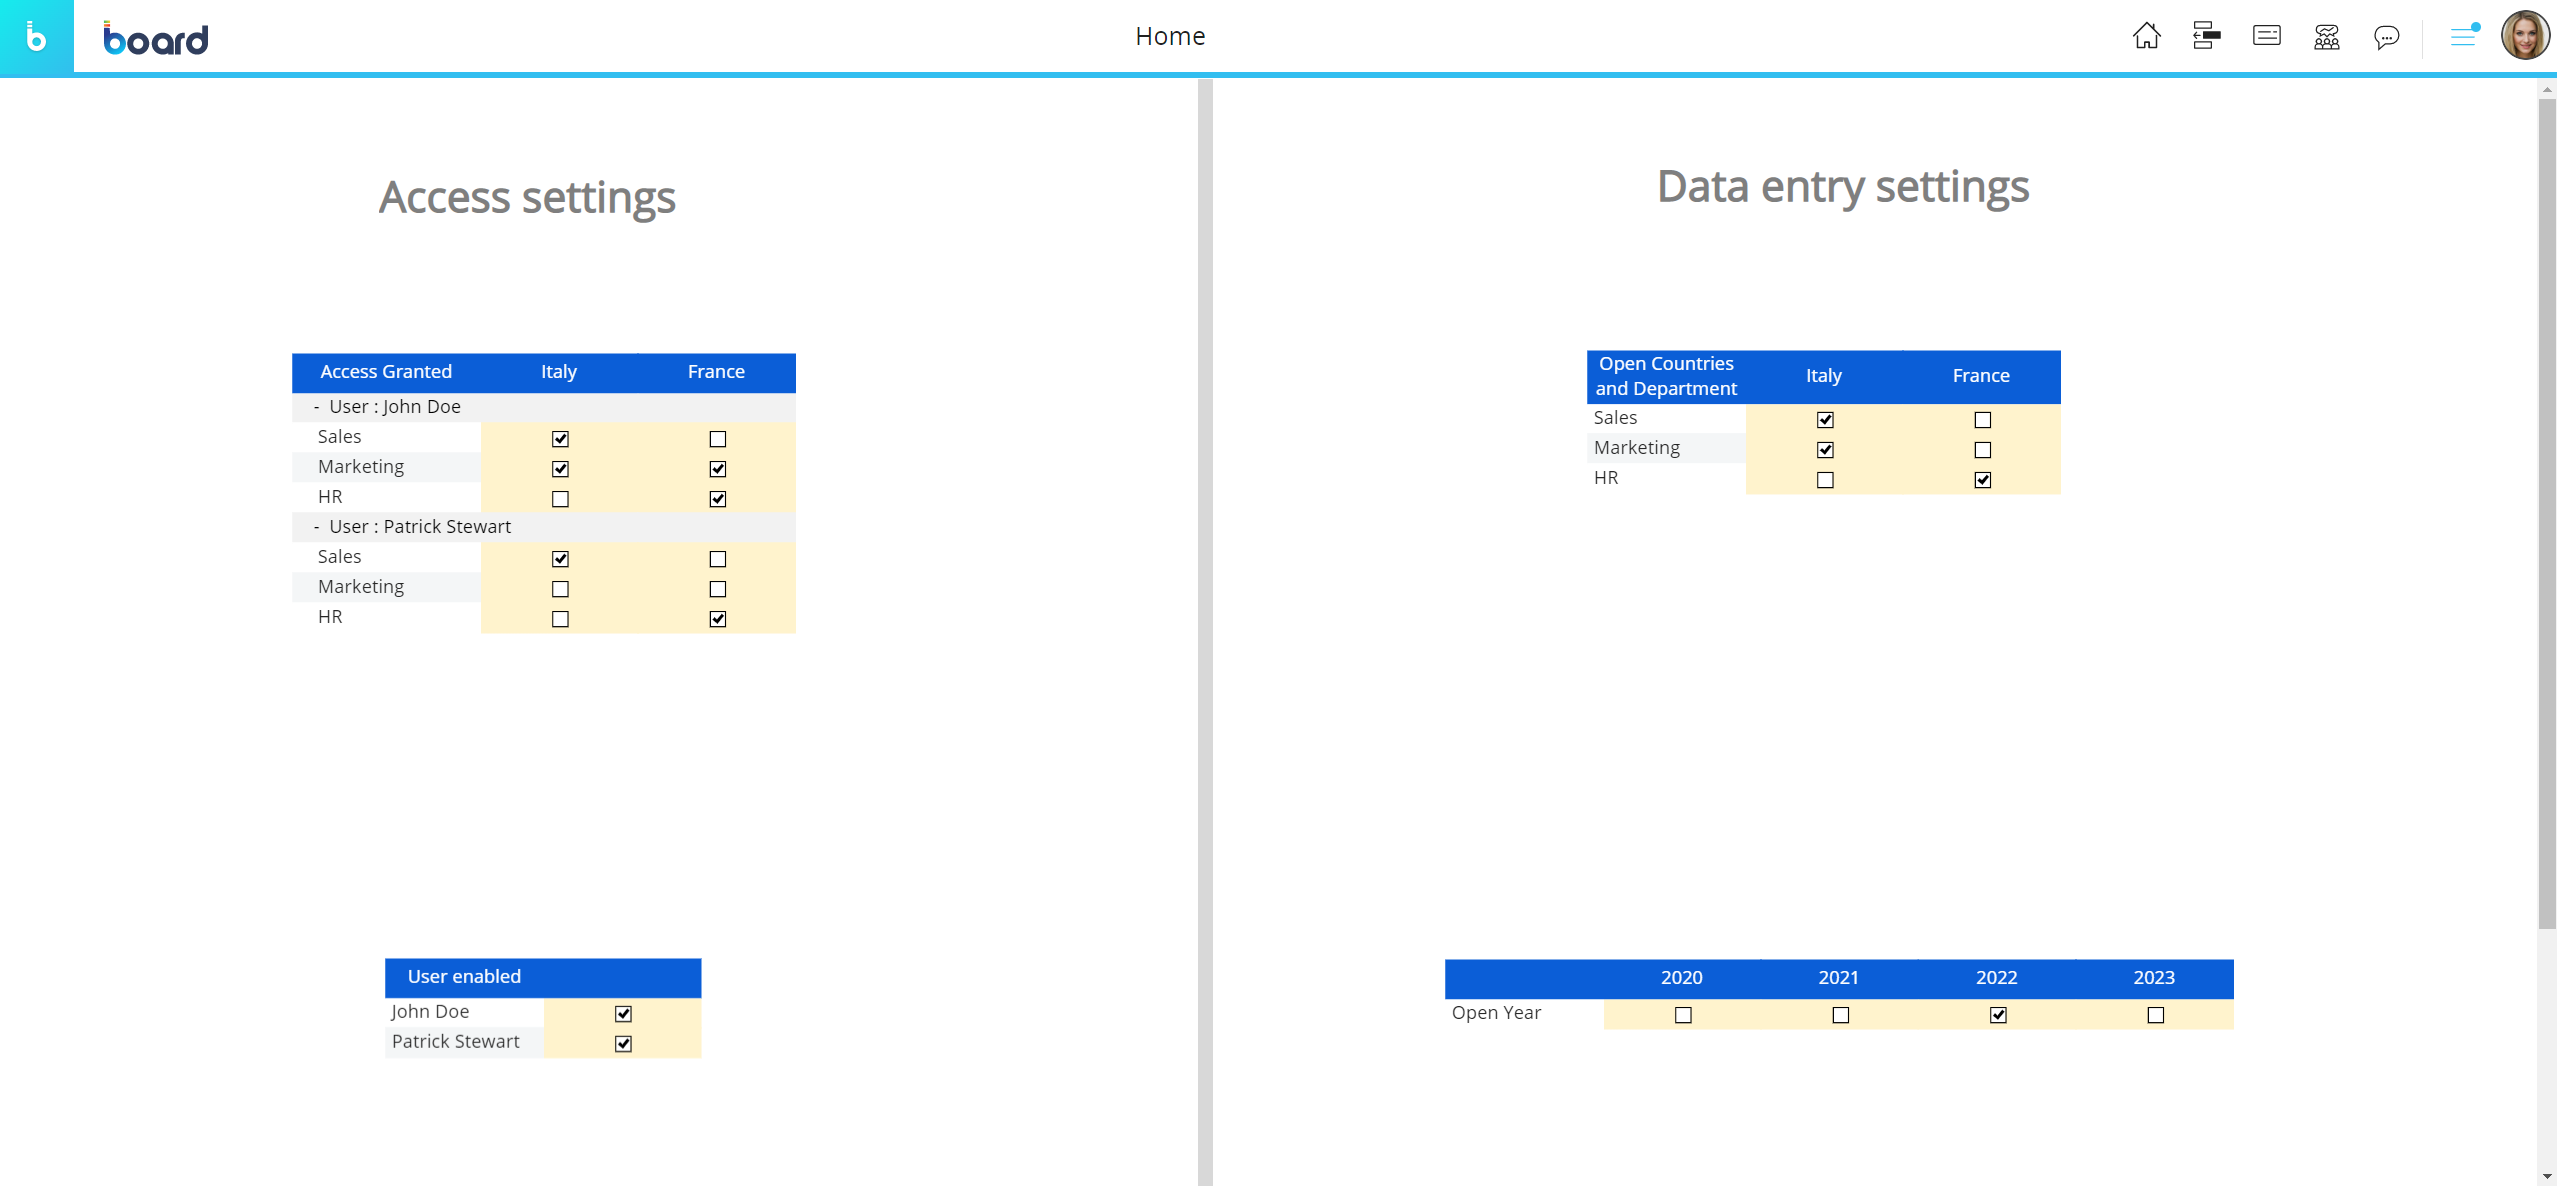
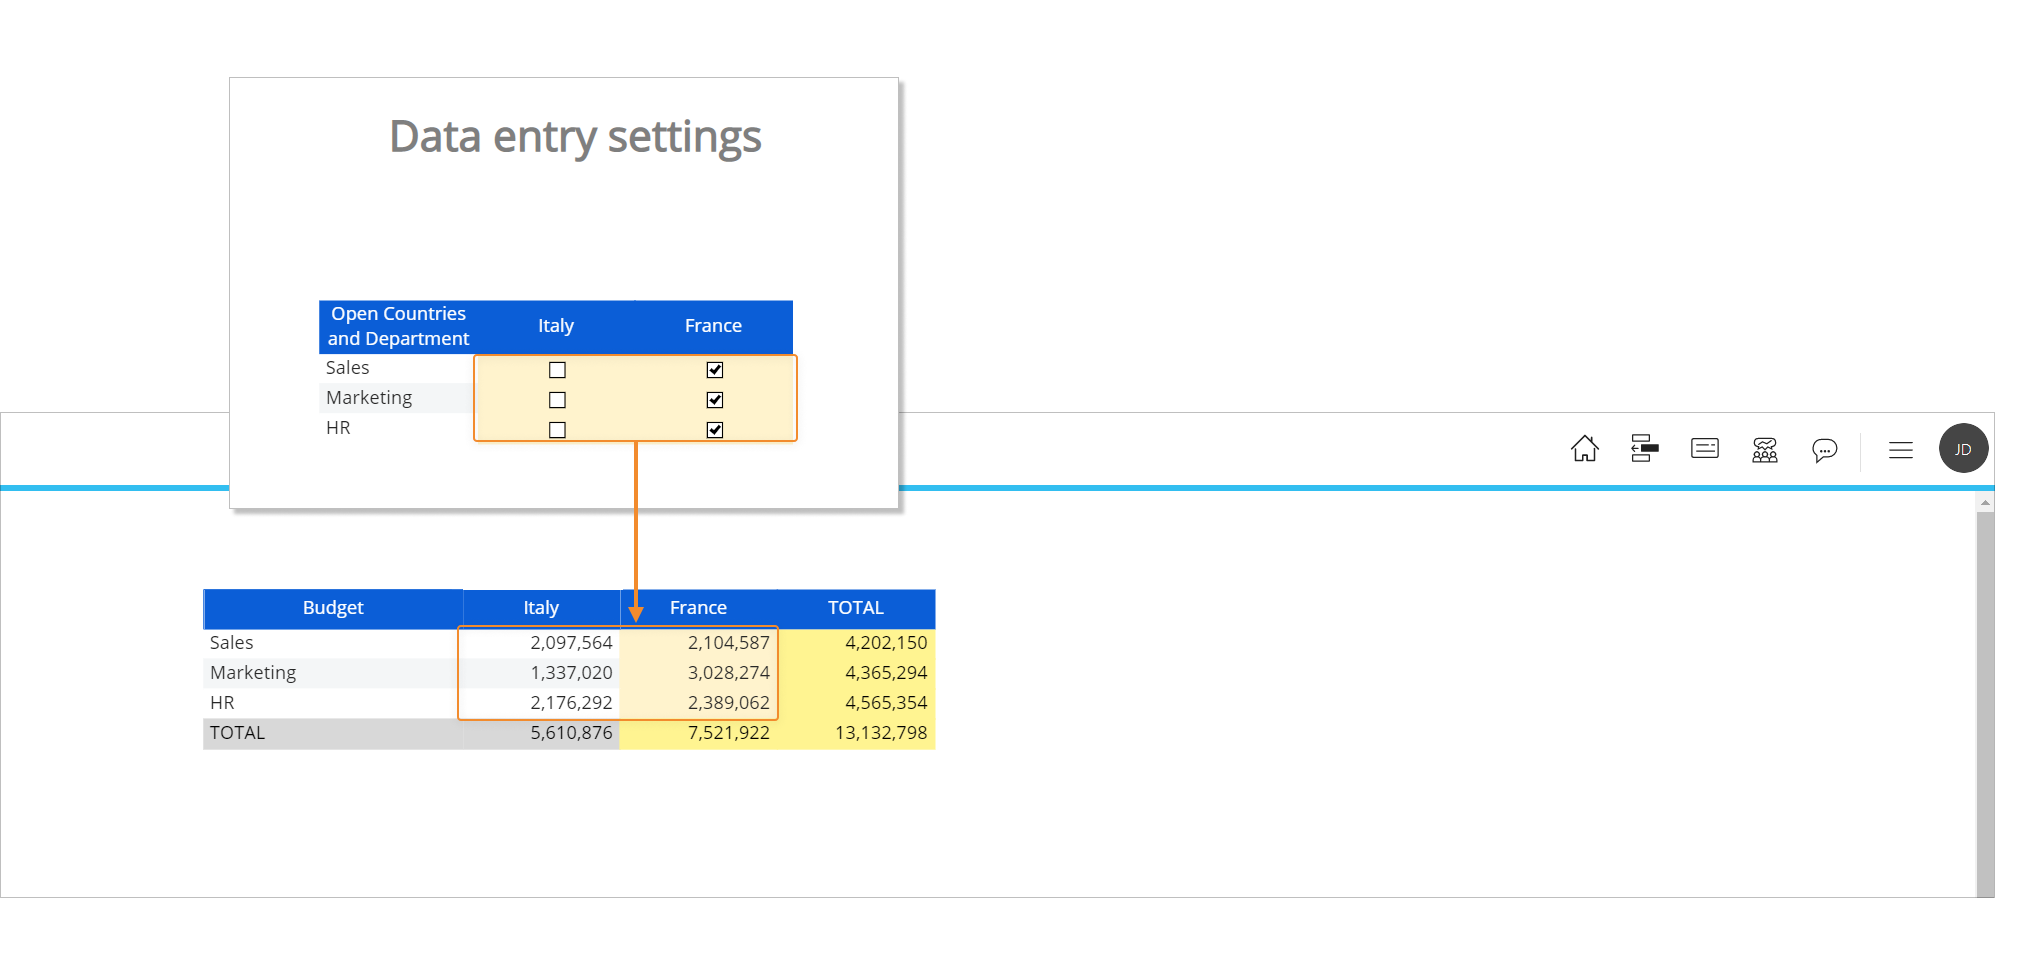
With the configuration shown above, the user John Doe can access specific combinations of the Actual and Budget Cubes (Sales and Marketing for Italy and HR for France). The following image shows the data that can be accessed by the user.

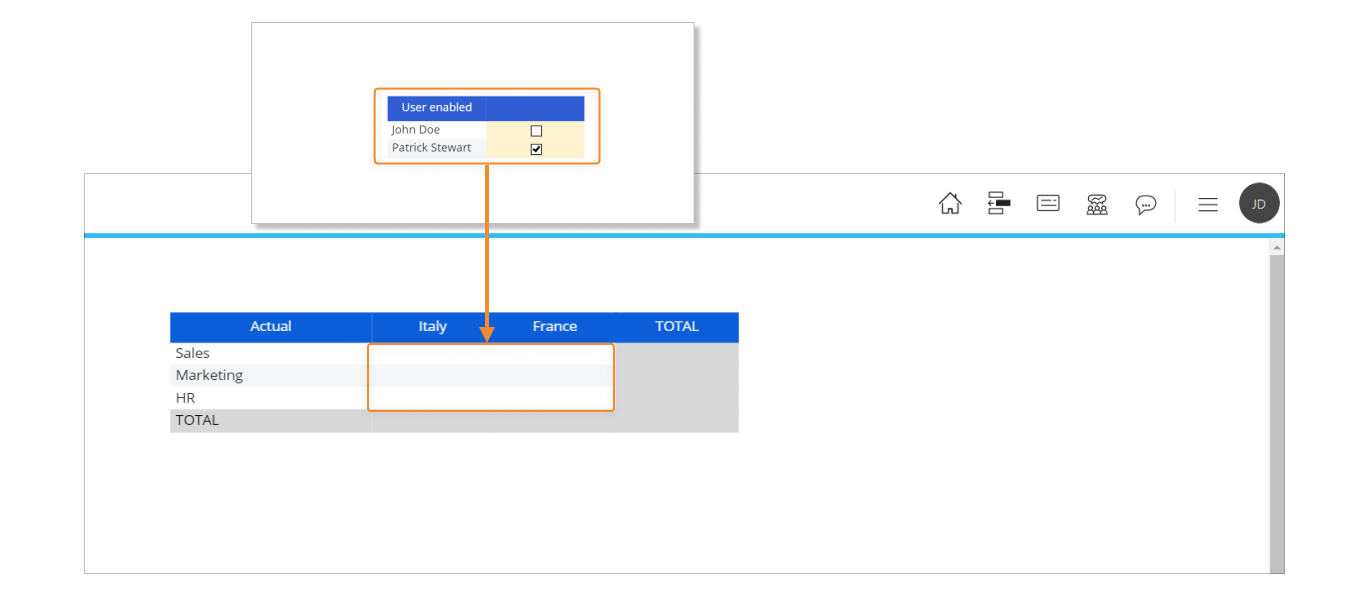
If we disable the user John Doe, he will not have access to any data stored in the Cube. If we refresh the Screen, no data will be shown anymore.
Now let's focus on the "Data entry settings" section of the administrative Screen. The upper Data Views in that section determines which combinations of Department and Country (the Entities in the structure of the Budget Cube) the user John Doe can perform data entry actions on.
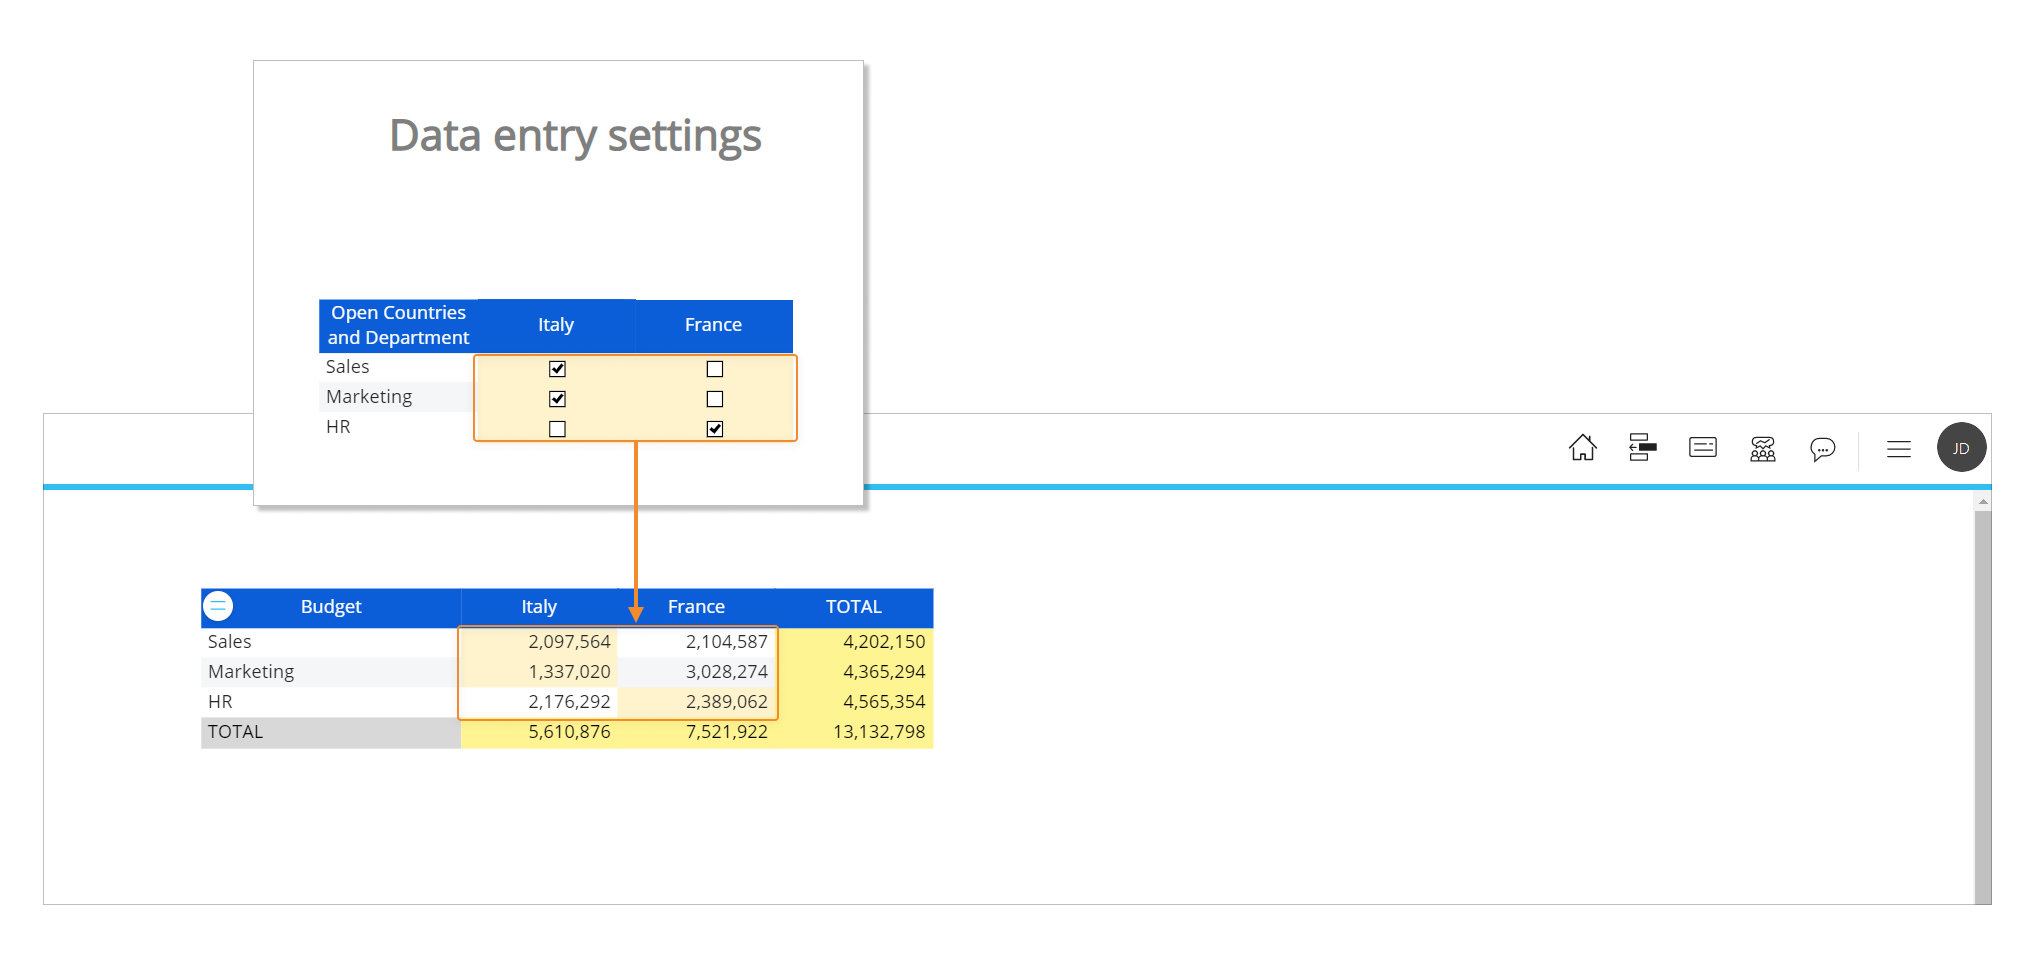
If we change permissions for the user, data entry-enabled cells will change accordingly as we can see in the following image.