Integrated ALM - Transporter improvements
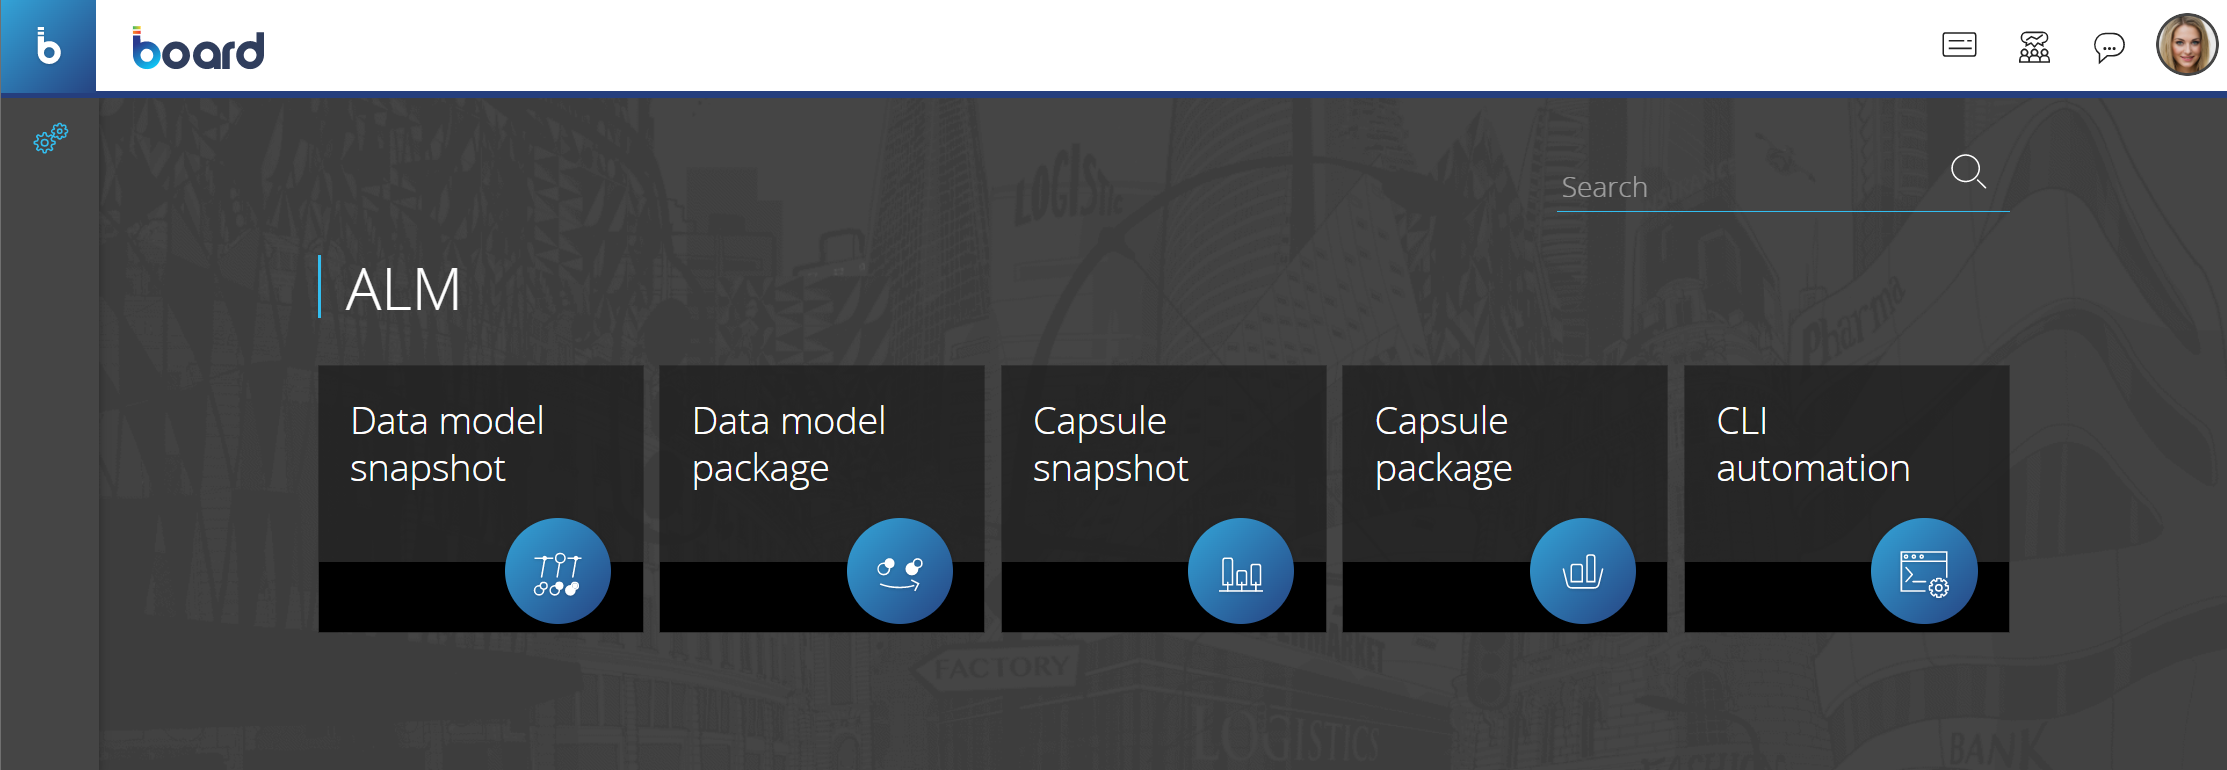
The Transporter section of the System Administration area has been renamed to ALM (Application Lifecycle Management) to reflect the new approach of Board towards an Integrated Lifecycle management system that allows Makers to efficiently manage both complex back-end (Data models) and complex front-end (Capsules) structures in large Board implementations in the same area. This is a huge step forward in providing a unified management experience for Makers, who can now manage the entire lifecycle of Board applications from a single location.
Other benefits of the new area include the following:
- The ability to perform impact analysis by comparing different Data models or Capsule folder structures, which will save Makers a significant amount of time and effort, as they can easily identify potential issues before they occur
- Complete automation of transport of both Data models and Capsule folder structures via CLI automation, which frees up valuable time and resources for Makers to focus on other aspects of their projects.
Aside from the improvement of the Data model transporter tools, and CLI automation, the largest enhancement of the new ALM area are the new Capsule snapshot and Capsule packages features.
The new Capsule snapshot and Capsule package features allow you to transfer Capsules from one Platform to another in an easier, more efficient, and more secure way. These new features simplify the process of transferring Capsules and Capsule folders in various situations such as transferring them from a development Platform to a production Platform.
Along with the process simplification and downtime reduction, the new features also provide comparison logs that allow you to compare the Capsules between Platforms and analyze the differences and impact that the transfer process may have on a Platform.
Capsule snapshot
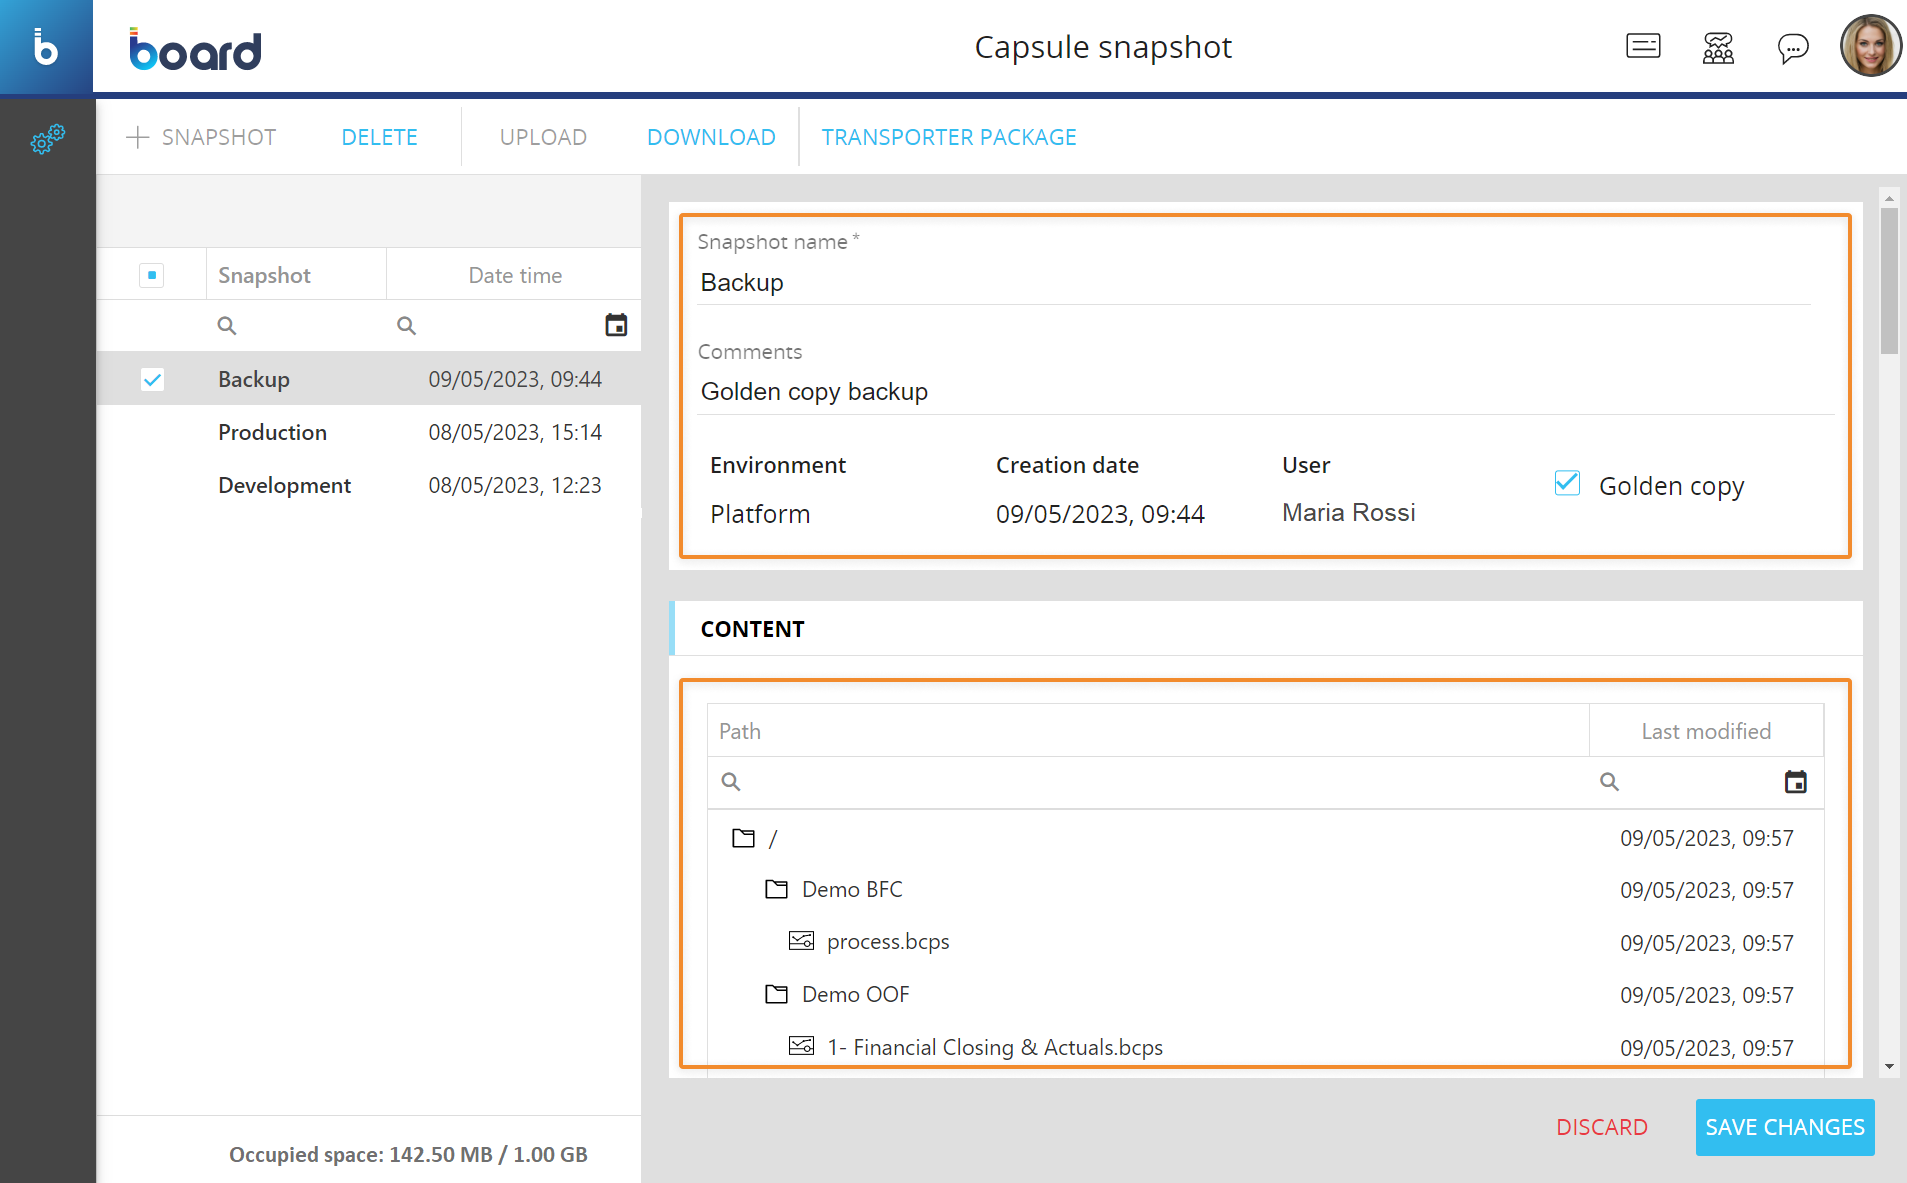
The Capsule snapshot page allows you to create and manage snapshots of all Capsule folders and Capsules of the Platform on which the Capsule snapshot action is performed.
A snapshot is essentially a backup of all Capsule folders and Capsules of a Platform. You can use snapshots to create a Transporter package in order to transport the Capsule folder structure and content from one Platform to another.
To access the Capsule snapshot section, access the System Administration area of the desired Platform and click on the Capsule snapshot tile. You will be taken to the Capsule snapshot page.
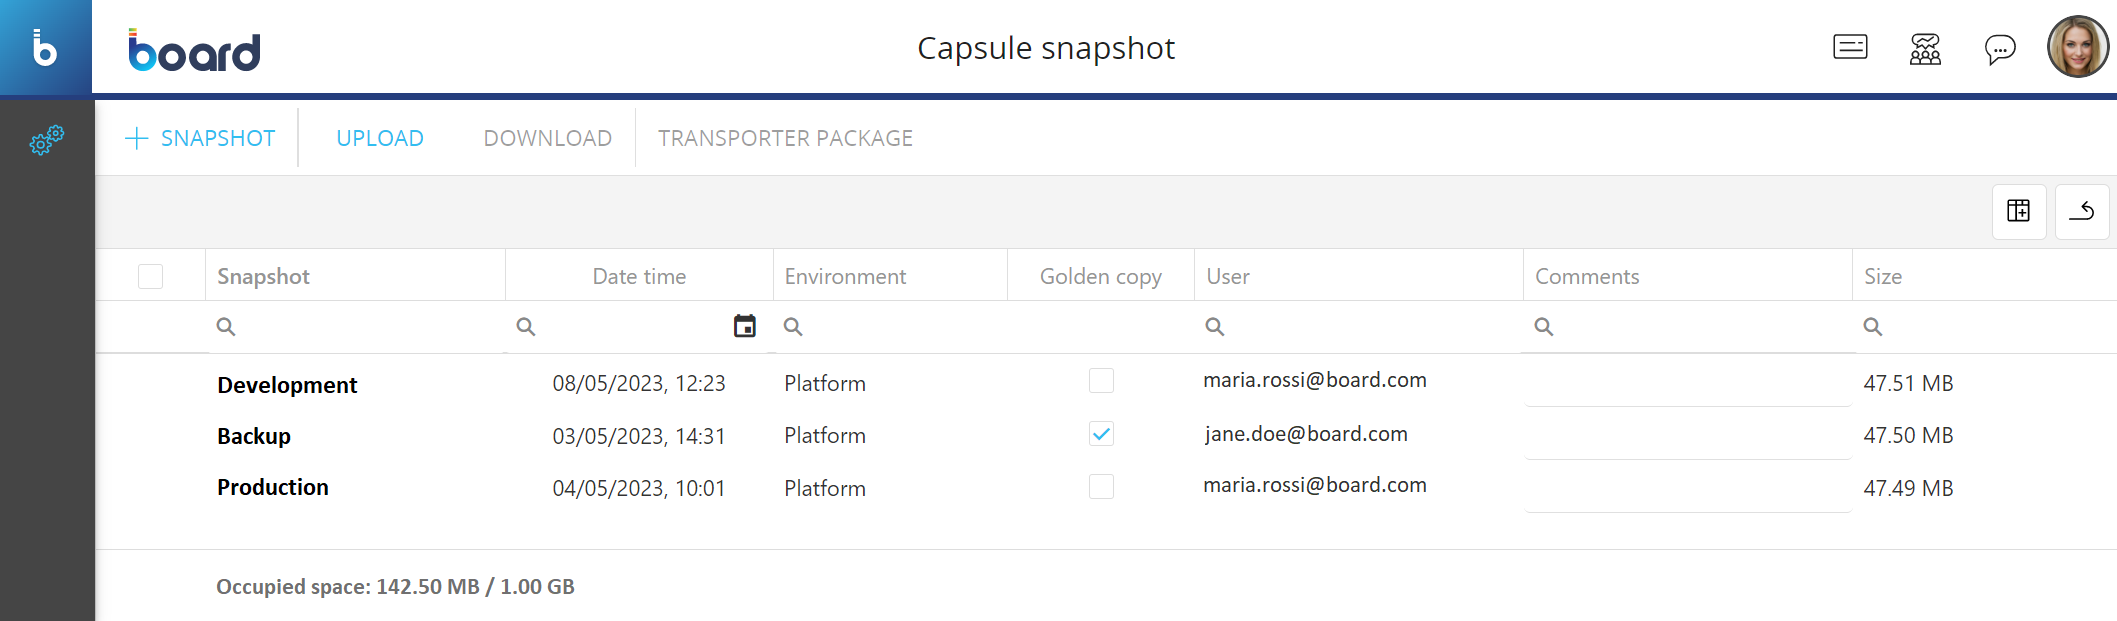
In the Capsule snapshot page you can see all existing snapshots and their main information: the table is sortable and searchable using the interactive header fields. You can also show or hide columns to your liking, by clicking the Column chooser button in the upper right corner of the table.
The table contains the following information:
- Snapshot. This column displays the name of each Capsule snapshot
- Date time. This column displays the date and time of the creation of each Capsule snapshot, in the following format: DD/MM/AAAA, HH:SS
- Environment. This column displays the name of the Platform environment where each Capsule snapshot was created (i.e. "Production" or "Development" etc.)
- Golden copy. This column displays if a snapshot has been flagged as a Golden copy or not, which prevents the Capsule snapshot from being automatically deleted
- User. This column displays the Account name of the user that created each Capsule snapshot
- Comments. This column displays additional comments on each Capsule snapshot. You can click on the desired column field to edit a comment
- Size. This column displays the total storage space in MegaBytes that each Capsule snapshot occupies on the Platform machine
Creating a Capsule snapshot
To create a Capsule snapshot, proceed as follows:
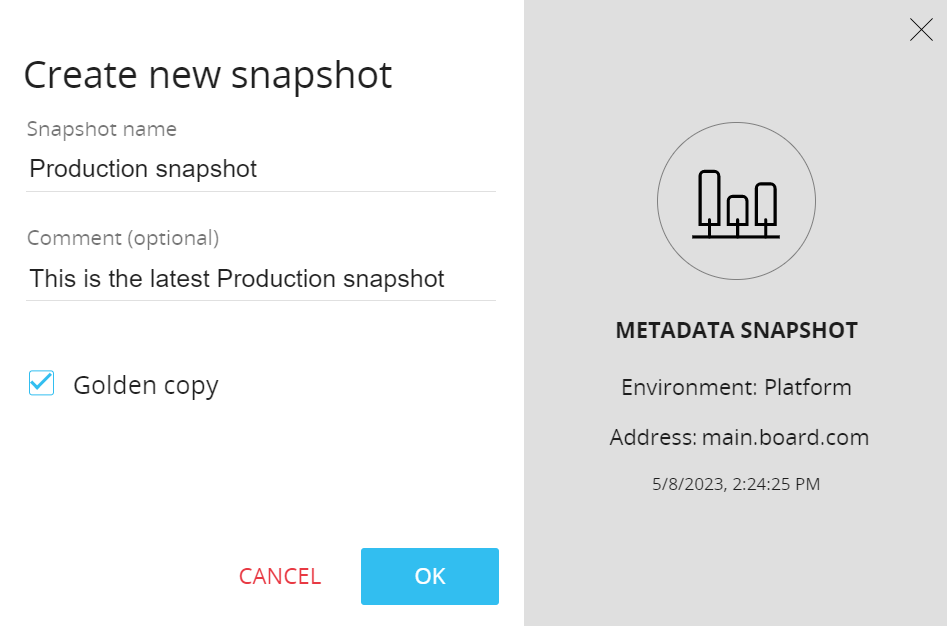
- From the Capsule snapshot section of the desired Platform, click on “+SNAPSHOT” in the upper left corner to bring up the "Create new snapshot" configuration pop-up window
- Enter the name of the snapshot in the "Snapshot name" field
- Enter your desired note or comment in the "Comment" field, if needed
- (Optional) Enable the "Golden copy" option to prevent the snapshot from being deleted automatically when the storage space limit is reached. This is also useful when you want to pin a backup snapshot that you can easily identify in case you want to perform a rollback
- Click on "OK" to save the snapshot
The newly created snapshot contains the full Capsule folder structure and content of the current Platform.
There is a storage space limit. Once it is reached and you try to create a new snapshot, Board will warn you and ask if you want to automatically delete the oldest snapshots to free up the necessary space for the new snapshot. Snapshots that have the "Golden copy" option enabled are excluded from the automatic deletion.
The occupied storage space displayed at the bottom left of the screen includes the sum of the storage space occupied by both Capsule snapshots and Capsule packages.
Managing a Capsule snapshot
The Capsule snapshot page allows you to perform the following management tasks on existing Capsule snapshots:
- Edit a Capsule snapshot
- Remove a Capsule snapshot
- Download a Capsule snapshot to your local computer.
- Upload a Capsule snapshot to the Platform you are working on
- Create a Transporter package
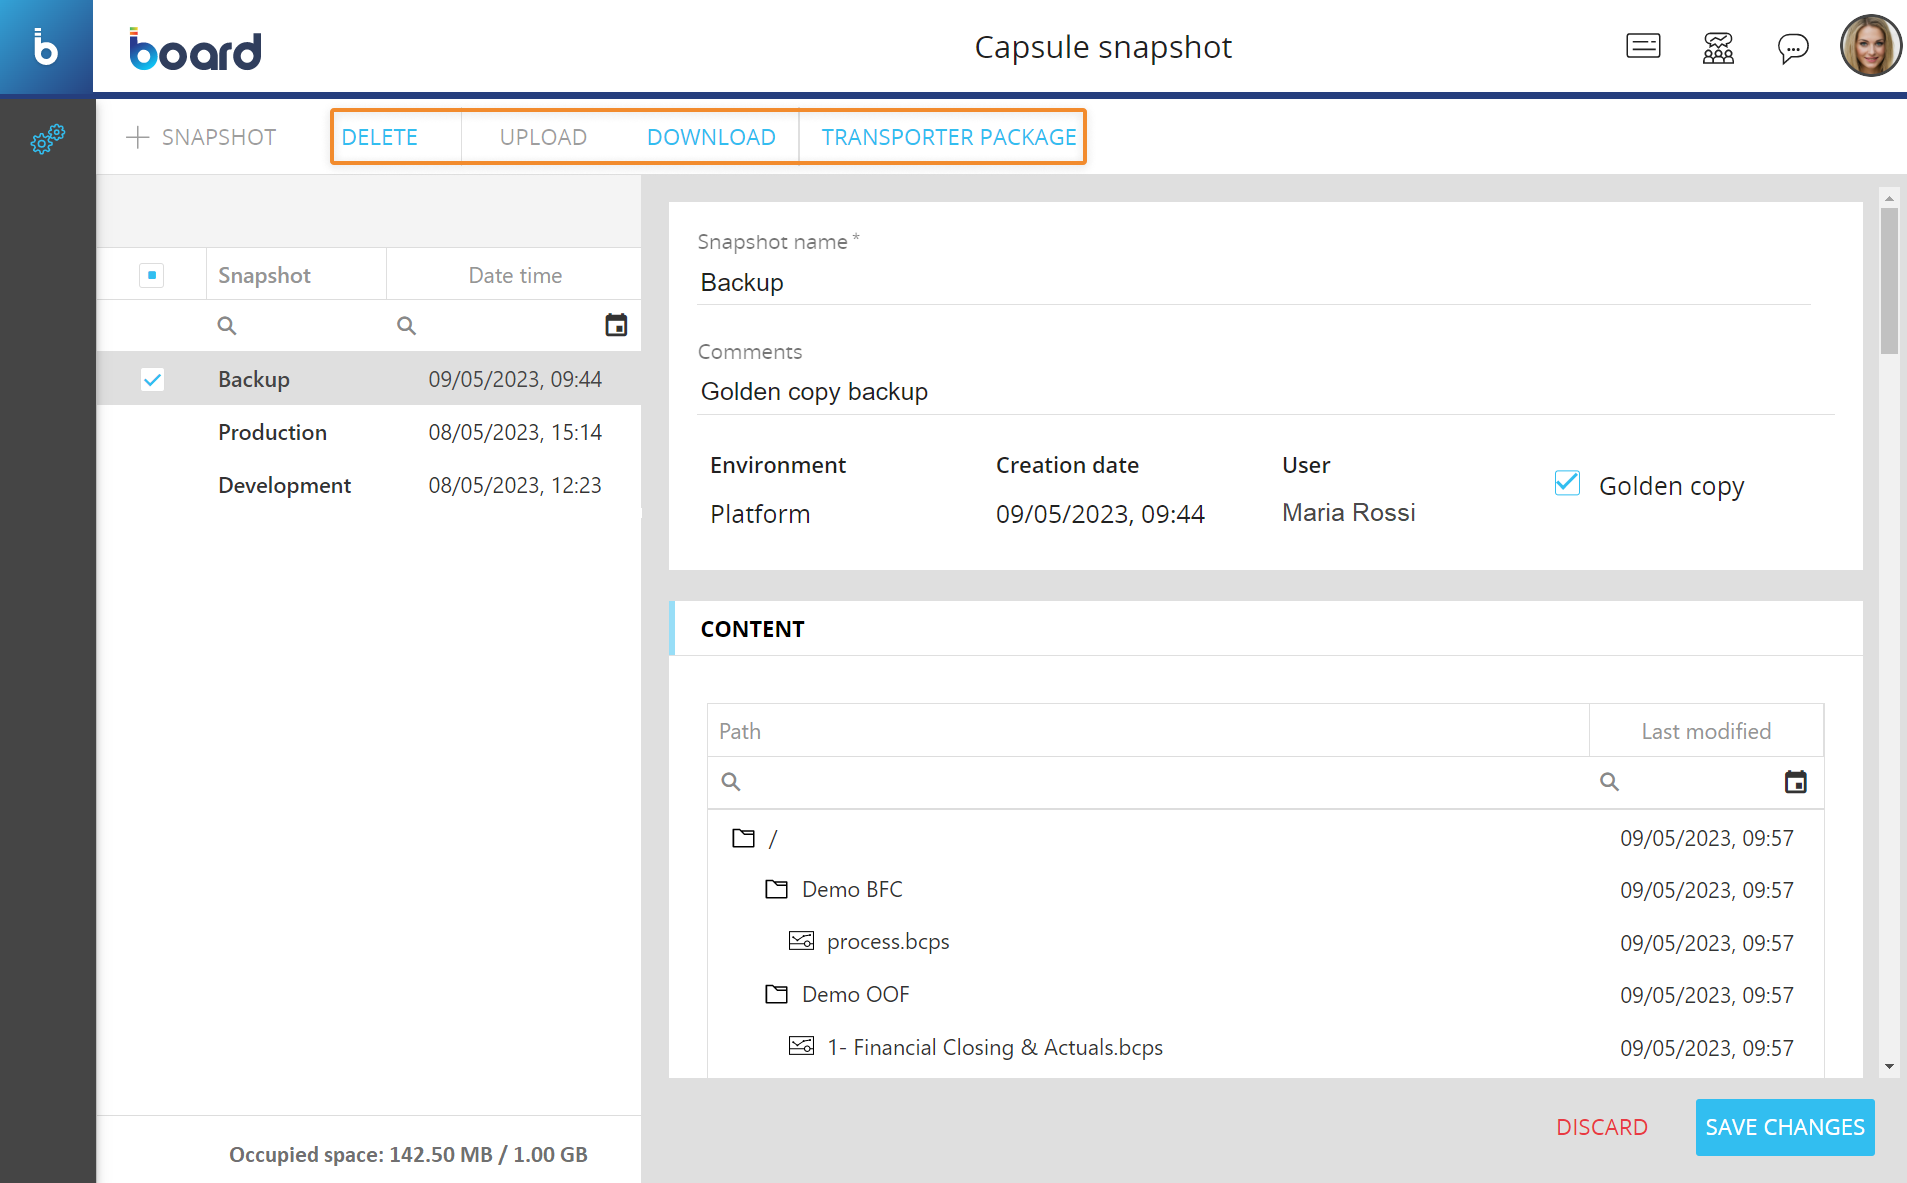
To edit a Capsule snapshot, select it to bring up the snapshot configuration panel and modify the desired options explained in the steps in the Capsule snapshot creation process above. Under the "CONTENT" menu, the snapshot configuration panel displays all the Capsules, Capsule folders, and their hierarchy that the selected snapshot contains.
To delete a Capsule snapshot, select the desired ones and then click on the "DELETE" button.
To download Capsule snapshots, select the desired ones and then click on the "DOWNLOAD" button. A .zip file containing the selected snapshots will be downloaded to your local machine.
To upload Capsule snapshots, click on the "UPLOAD" button and choose the .zip file containing the desired snapshots.
To create a Capsule transporter package, select the two desired snapshots and click on "+TRANSPORTER PACKAGE" to bring up the Capsule transporter package configuration panel. See the following Create a Capsule package section to learn how to create a transporter package.
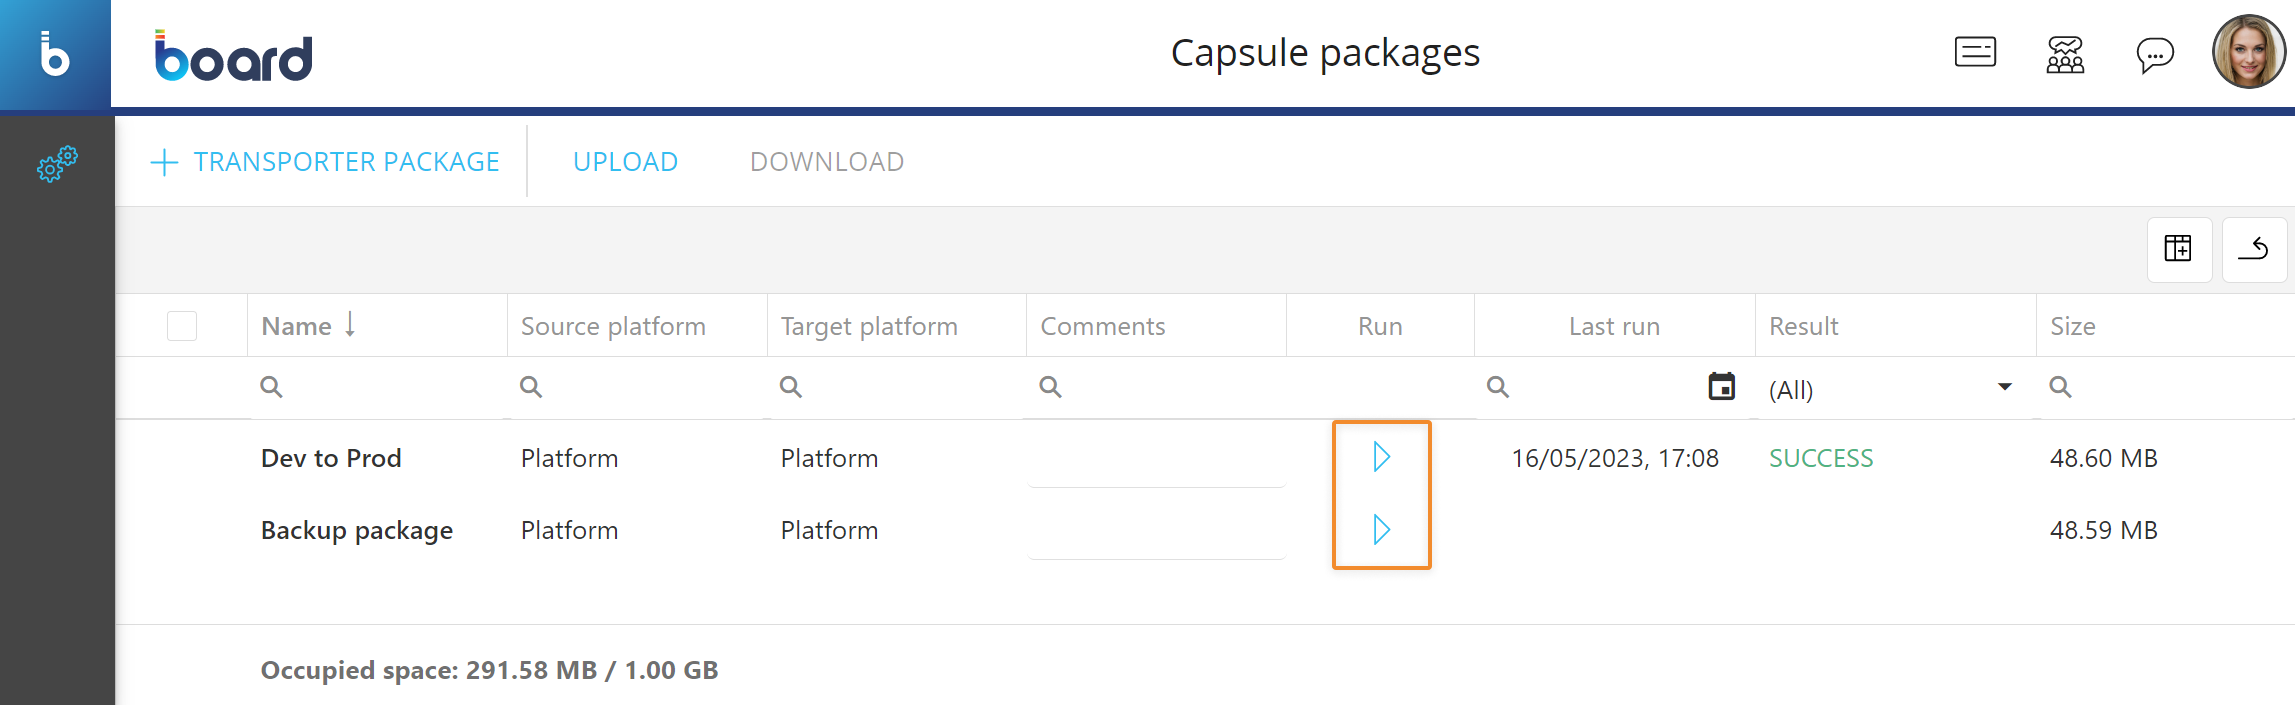
Capsule packages
The Capsule packages page allows you to create and manage Transporter packages that you can run to transport the Capsule folders and Capsules of a package to the current Platform. You can use this feature to transfer the Capsule folder structure from one Platform to another by creating a Capsule package on one Platform and then uploading and running the package on another Platform.
To access the Capsule packages section, access the System Administration space of the desired Platform and click on the Capsule packages tile. You will be taken to the Capsule packages page.
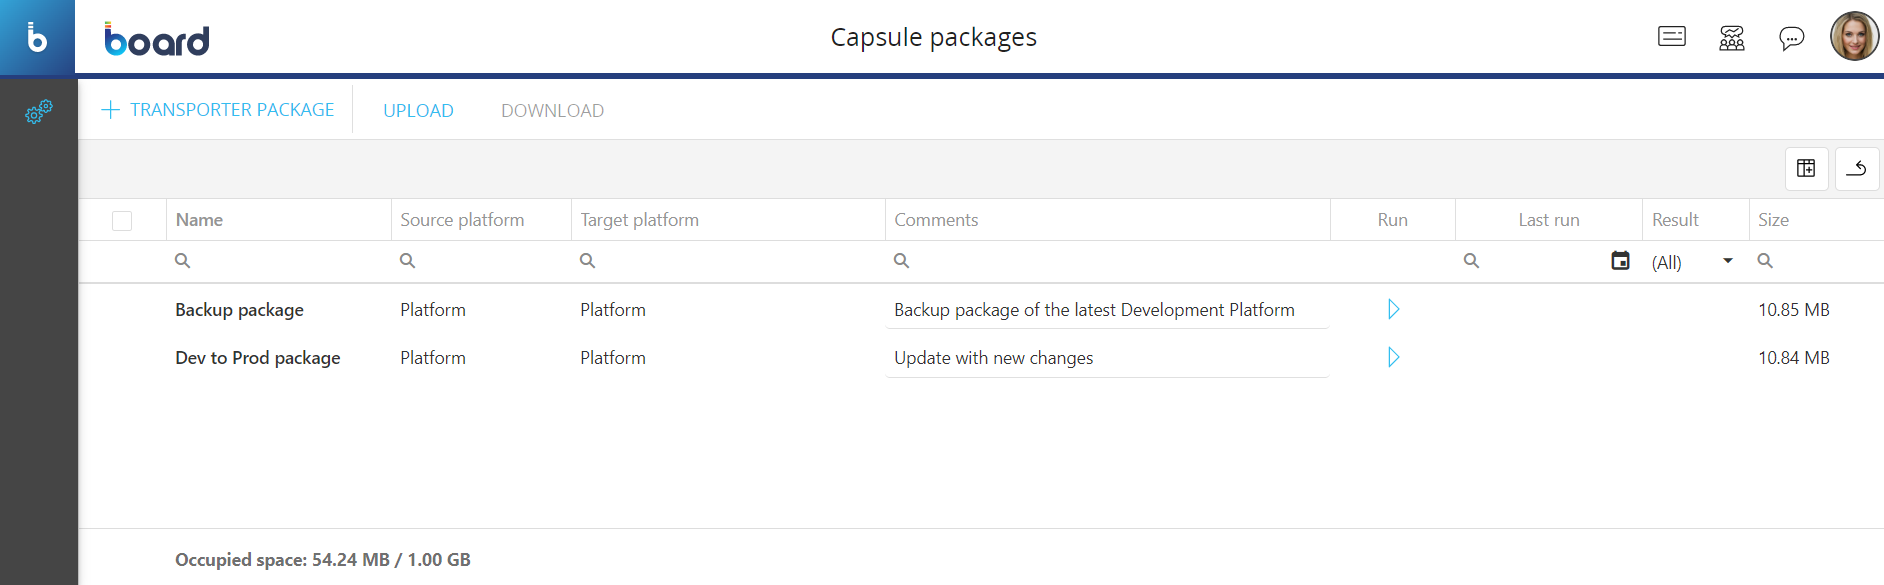
In the Capsule packages page you can see all existing Capsule transporter packages and their main information: the table is sortable and searchable using the interactive header fields. You can also show or hide columns to your liking, by clicking the Column chooser button in the upper right corner of the table.
The table contains the following information:
- Name. This column displays the name of each Capsule package
- Source platform. This column displays the name of the source environment where each Capsule package was created
- Target platform. This column displays the name of the target (current) environment where each Capsule package will be run
- Comments. This column displays additional comments on each Capsule package. You can click on the desired column field to edit a comment
- Run. This column displays a button that you can click to run a Capsule package
- Last run. This column displays the date and time of the last run of each Capsule package, in the following format: DD/MM/AAAA, HH:SS
- Result. This column displays the result of the last run of each Capsule package
- Size. This column displays the total storage space in MegaBytes that each Capsule package occupies on the Platform machine
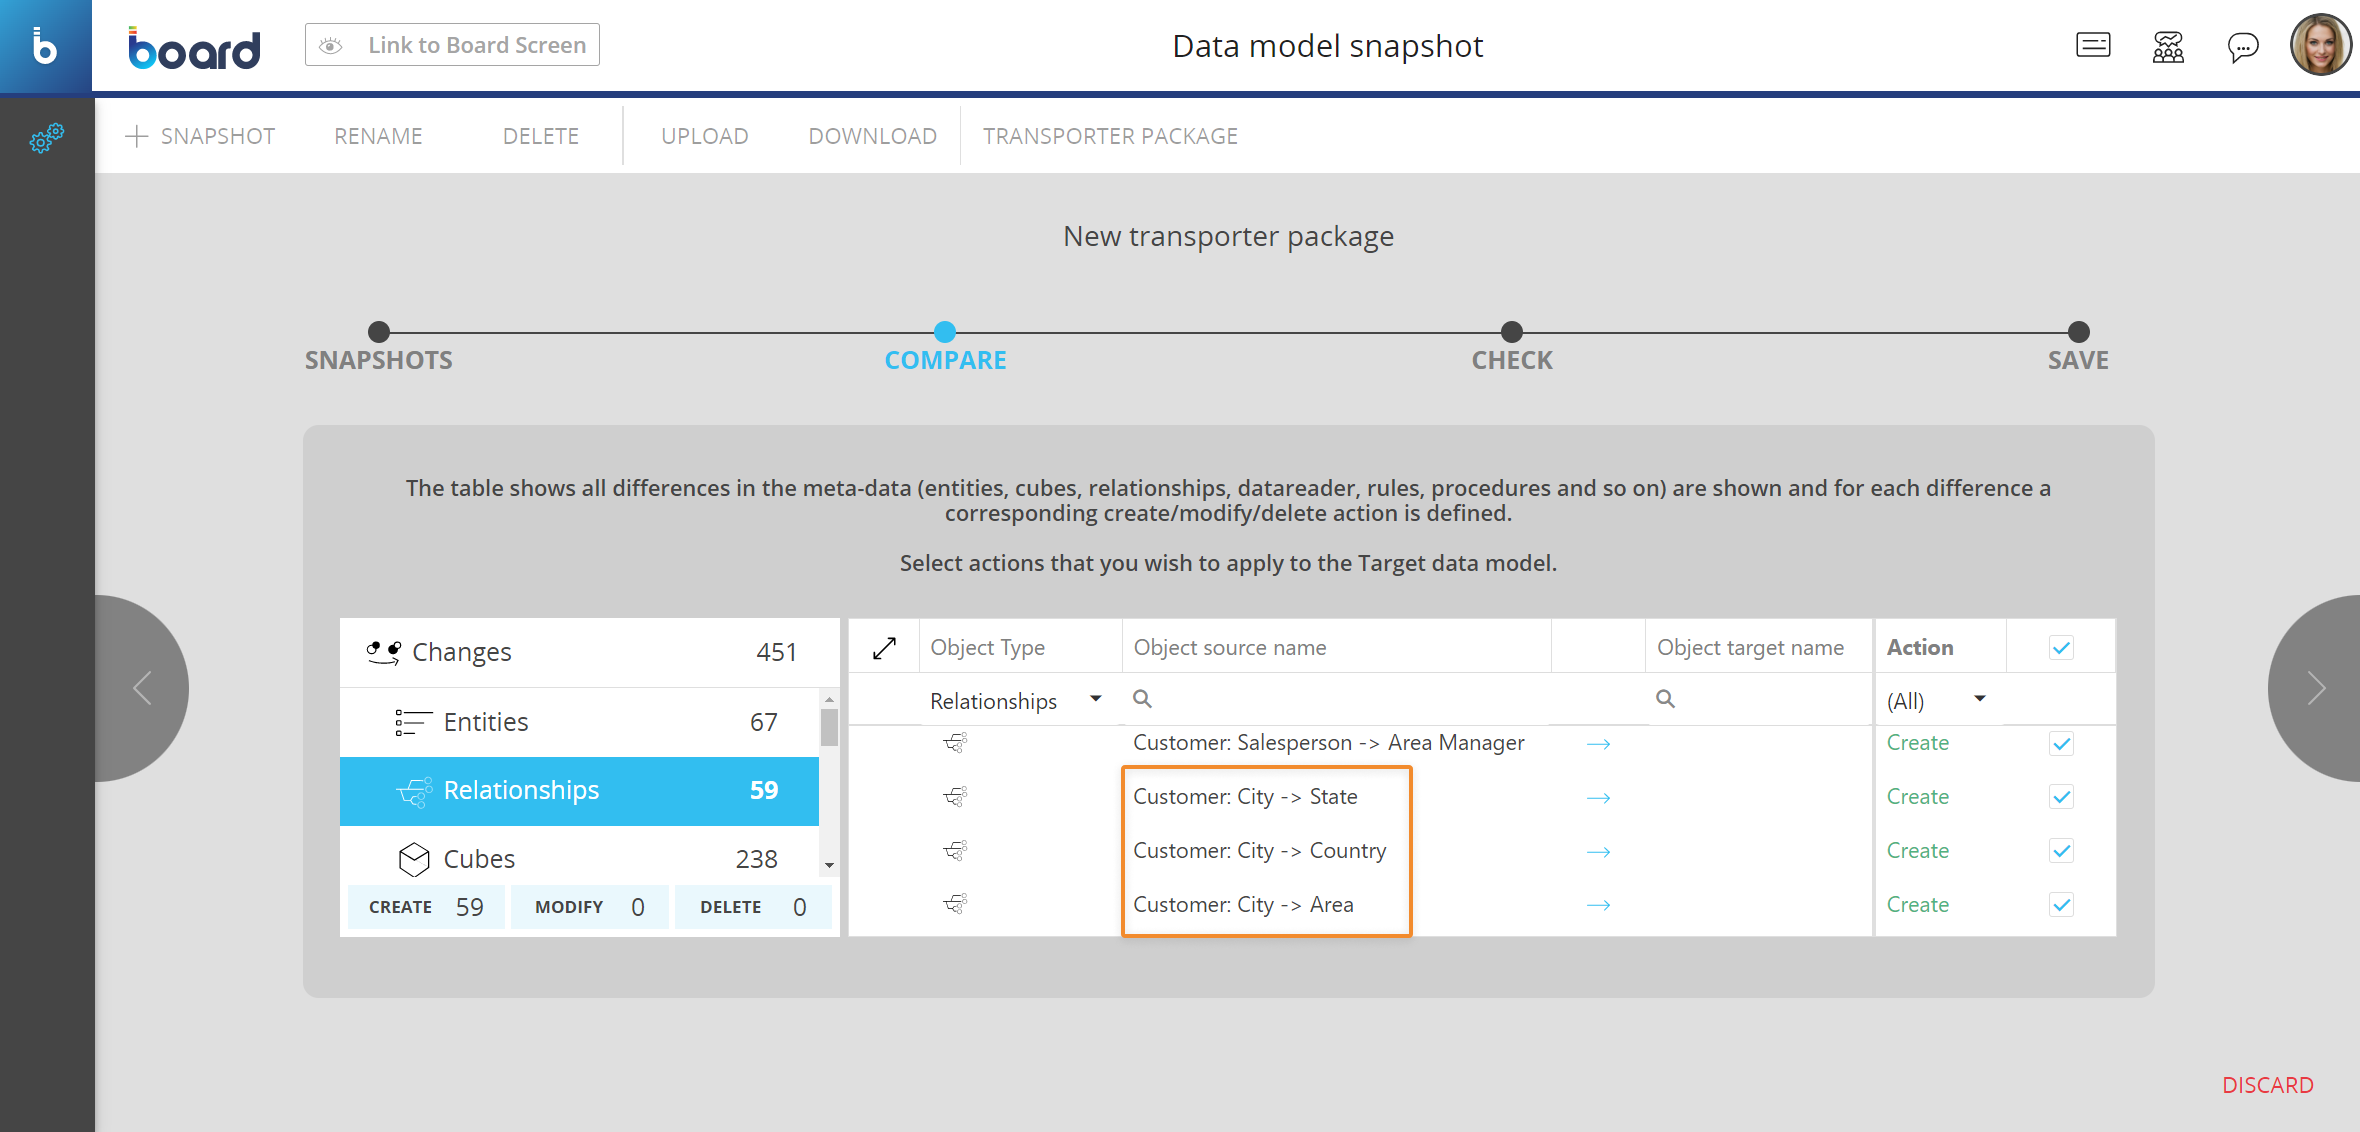
Creating a Capsule package
To create a Capsule package, proceed as follows:
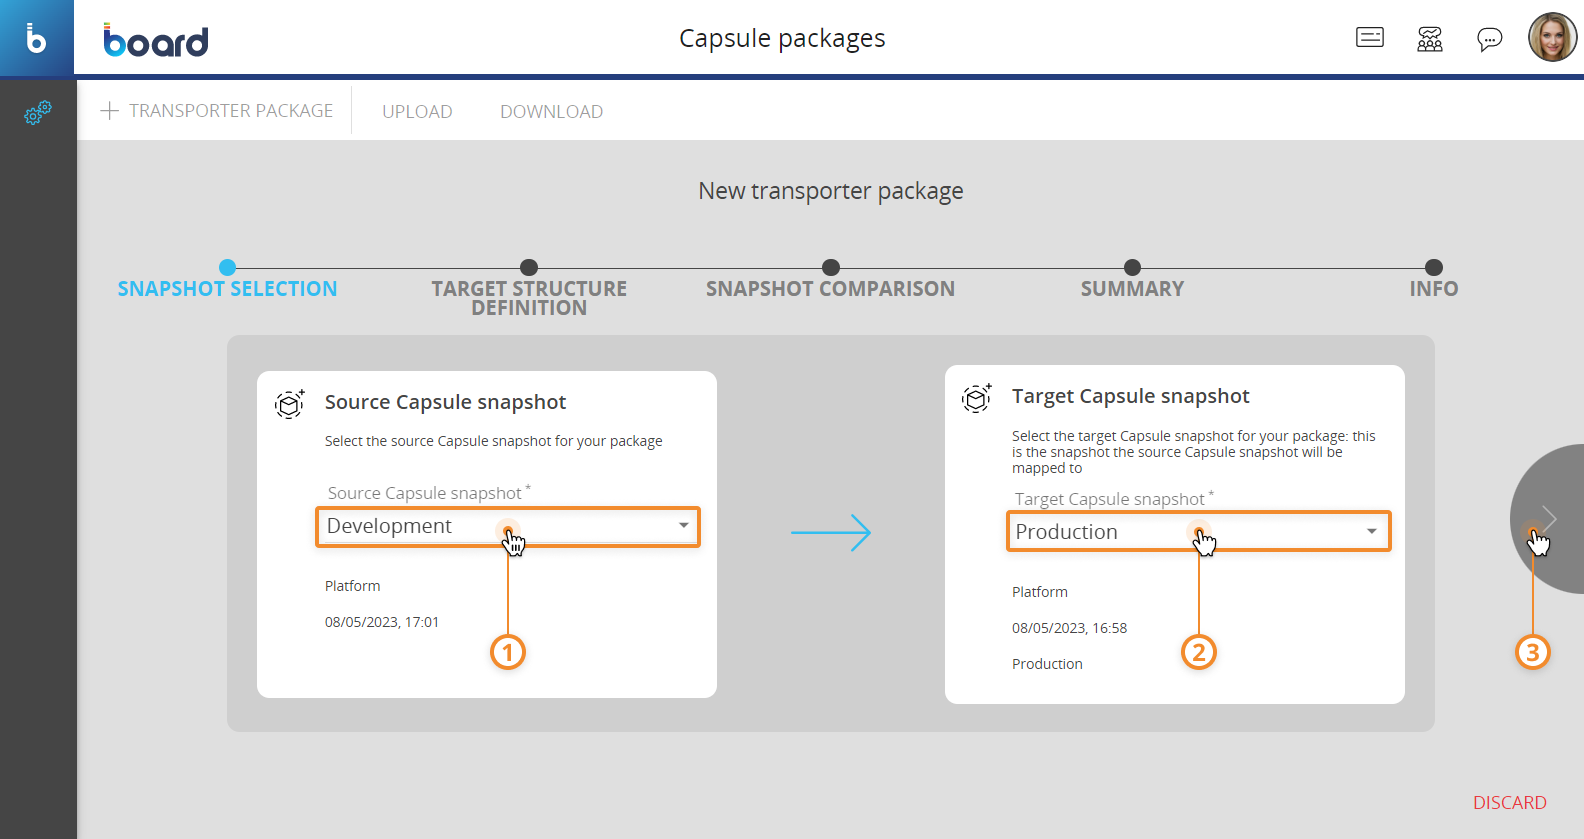
- From the Capsule packages section of the desired Platform, click on “+TRANSPORTER PACKAGE” in the upper left corner to bring up the "New transporter package" configuration panel. You can also do this by clicking on the same button in the Capsule snapshot page explained above.
- Snapshot selection. Here you must choose the source Capsule snapshot on the left drop-down list and then choose the target Capsule snapshot on the right drop-down list. You can click on the arrow in the middle to switch them
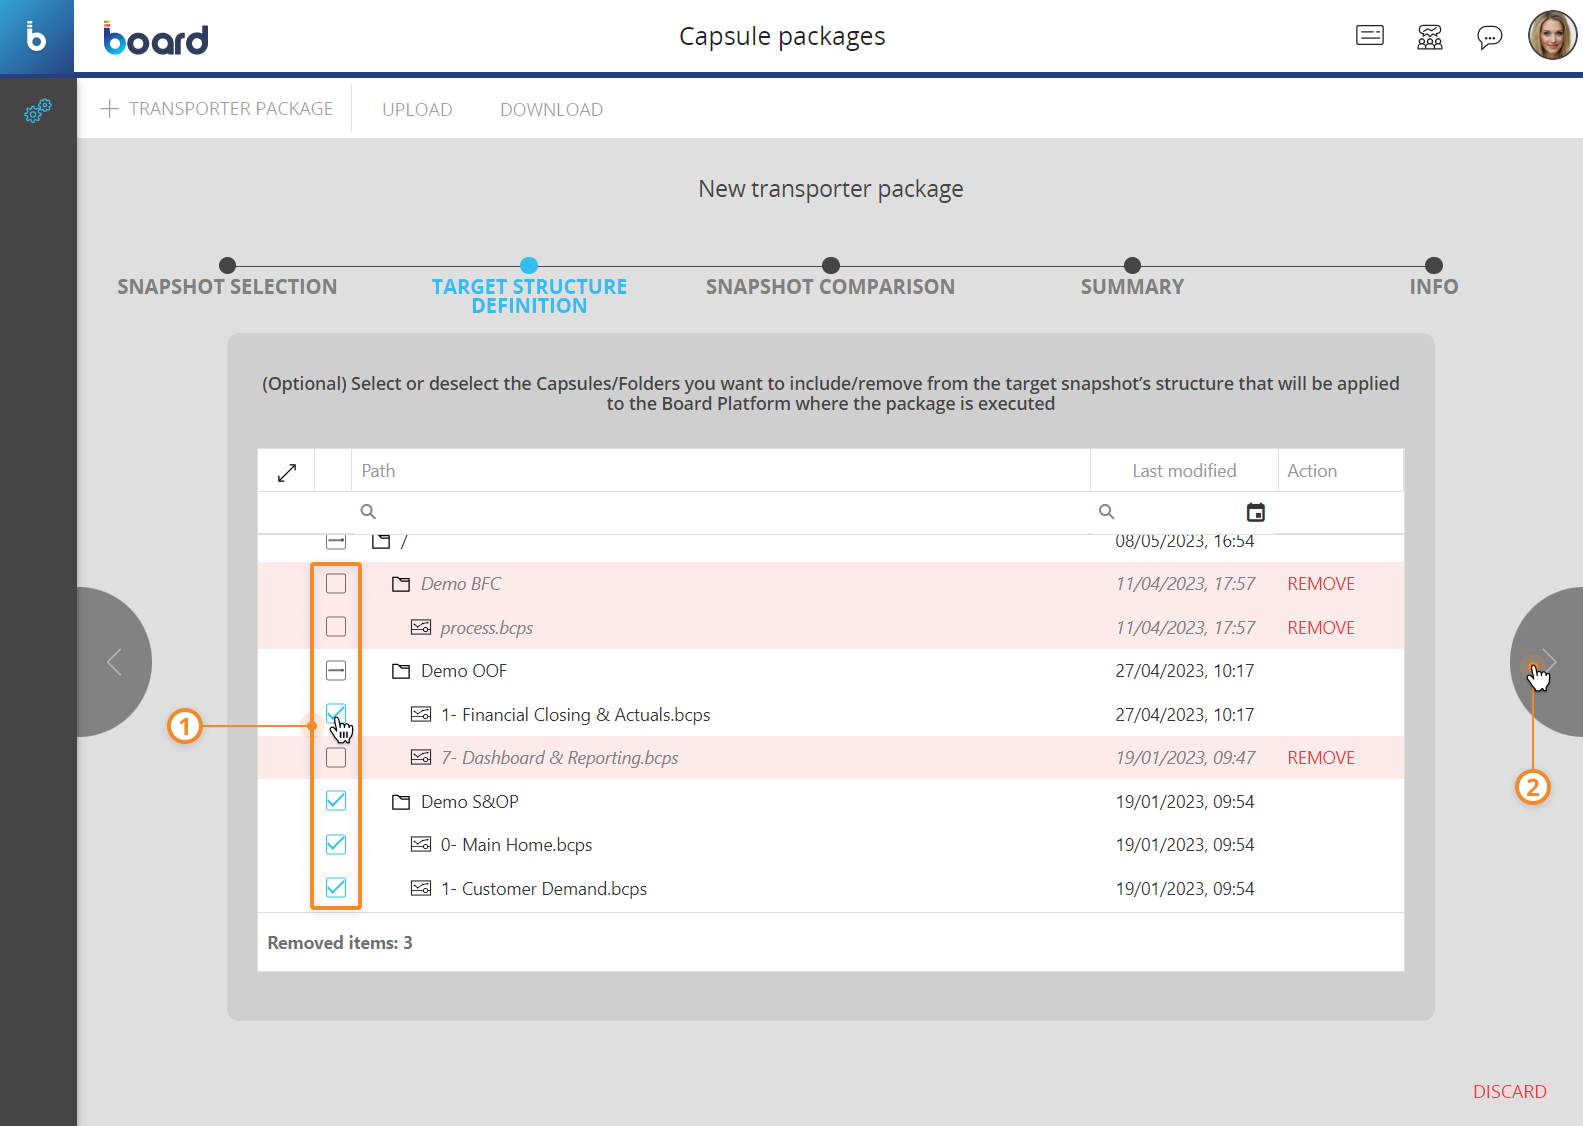
- Target structure definition. Here you can select or deselect the Capsules and Capsule Folders in the list that you want to include/remove from the target snapshot’s structure that will be applied to the Platform where the package is executed. Essentially, here you can clean the target structure, if needed.
The list displays the full structure of the target Capsule folders and Capsules along with a date and time that indicates the last time each Capsule folder and Capsule was modified
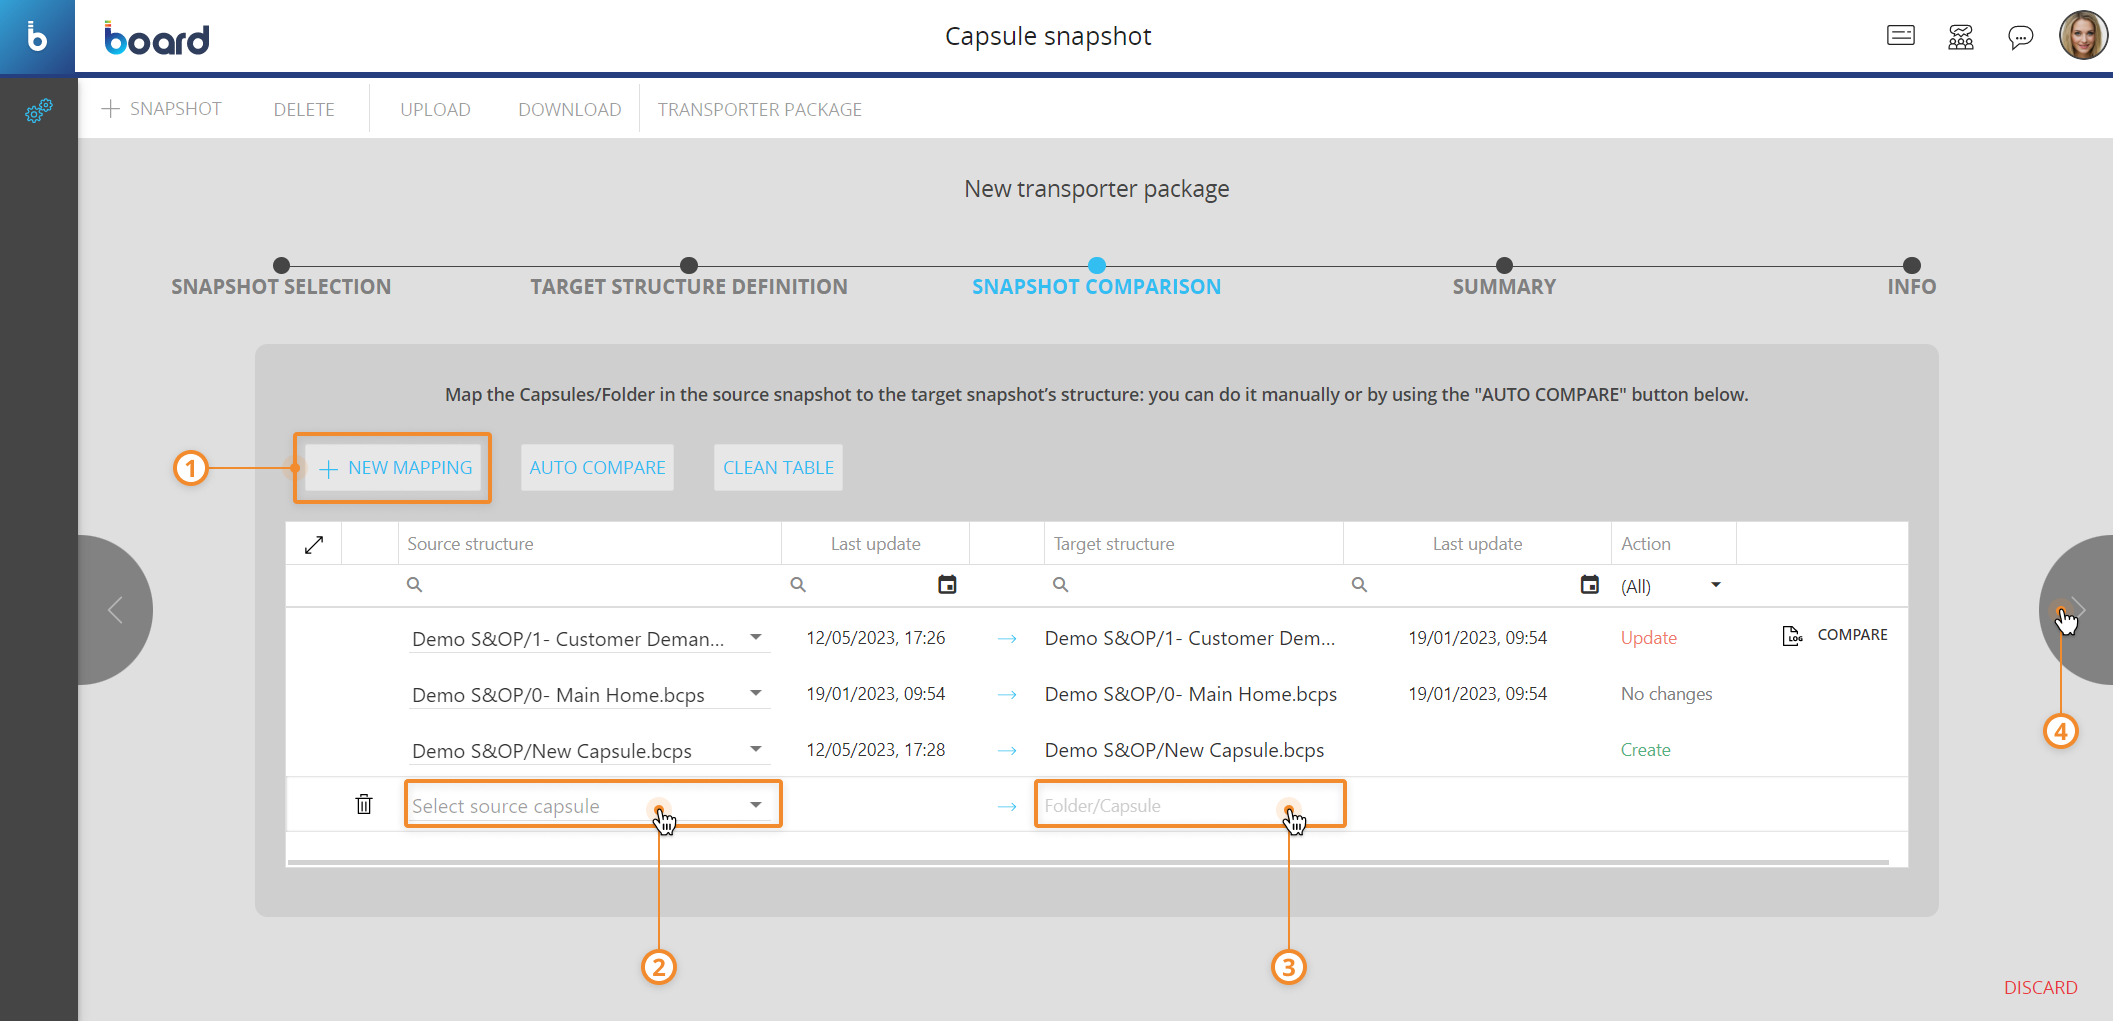
- Snapshot comparison. Here you must configure which Capsules you want to transfer from the structure of the source snapshot to the structure of the target snapshot. The mappings are displayed in a table view that contains the following information:
-
Source structure: This column shows the full path of each Capsule in the source structure
-
Last update: This column displays the date and time of the last time each Capsule of the source structure was modified
-
Target structure: This column displays the full path of each Capsule in the target structure
-
Last update: This column displays the date and time of the last time each Capsule of the target structure was modified
-
Action: This column displays if a target Capsule will be updated or created. The column will display "No changes" in the case where a Capsule is the same in both source and target structures and has the same "Last Update" dates
-
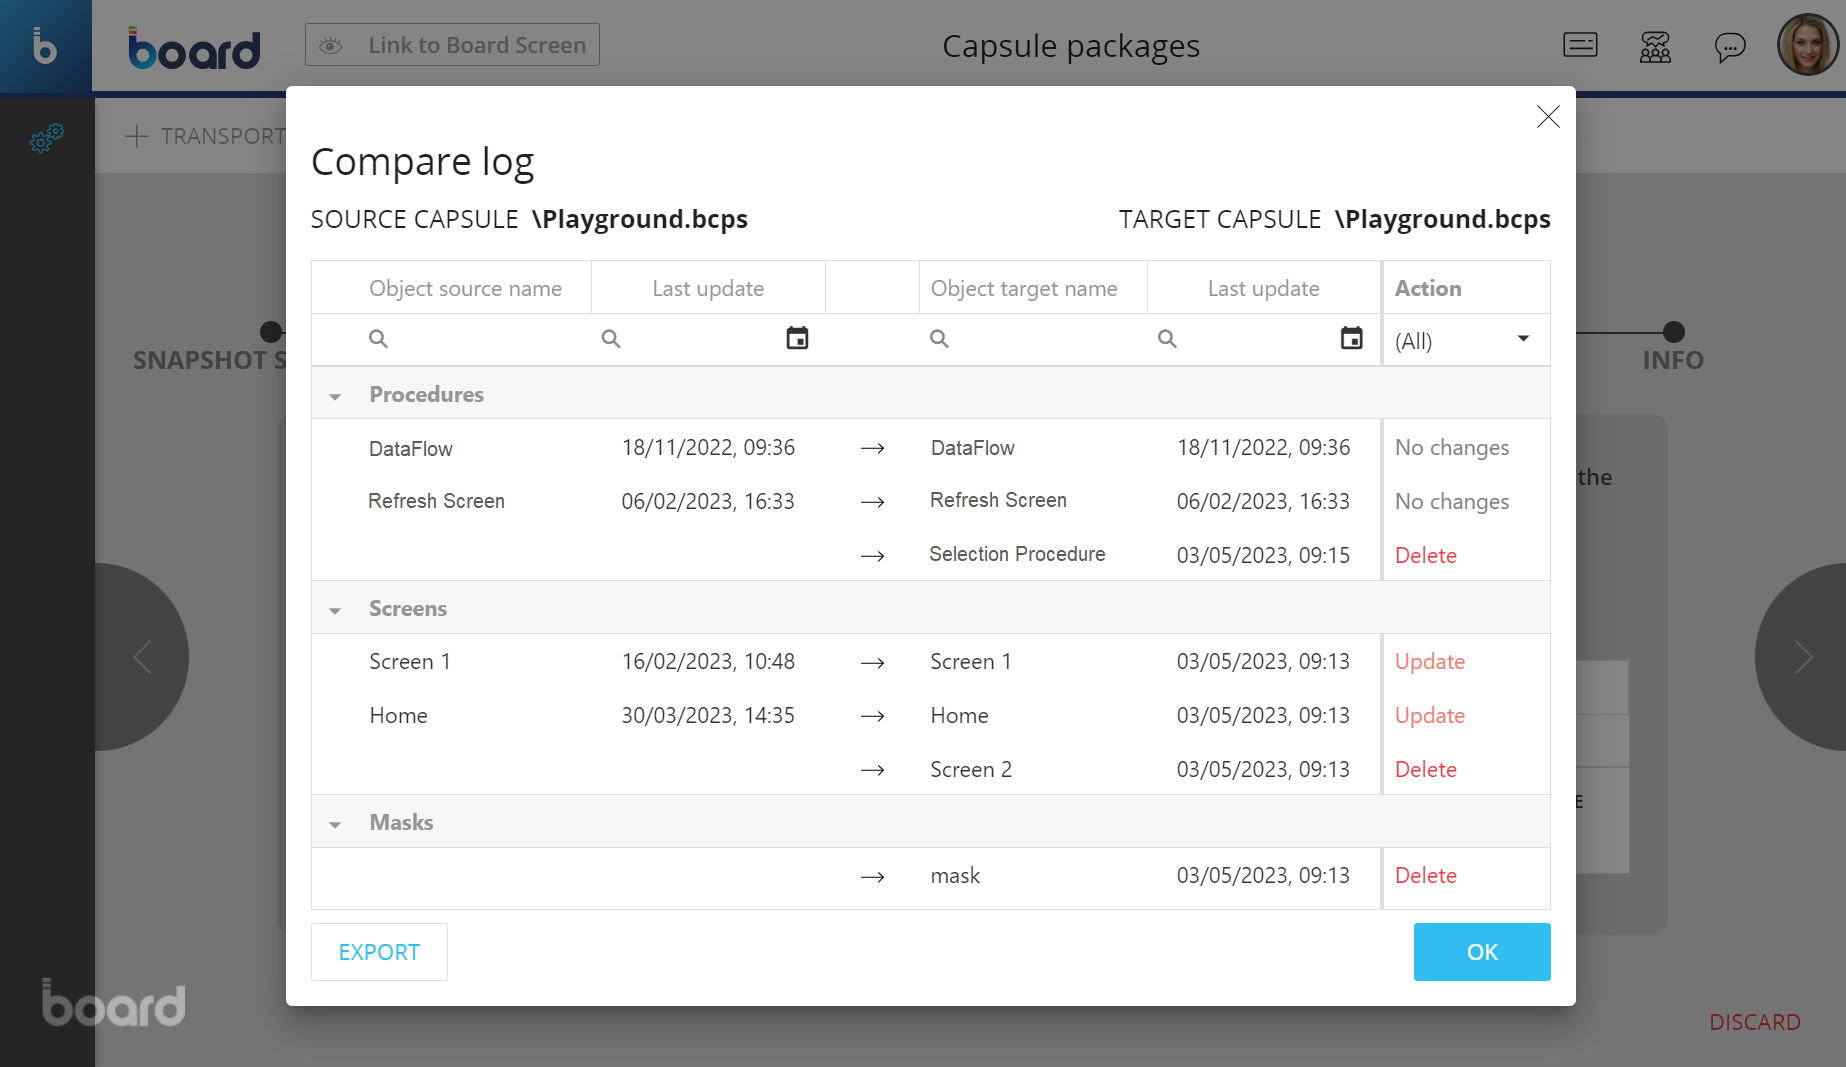
Comparison Log: This column displays a "COMPARE" button that you can click to open the "Compare log" pop-up window where you can check the differences between source and target Capsules, only in the cases where the Capsules in the target structure will be updated. The "Compare log" shows a table-view, similar to the source and target structure mappings one, which displays the name of the Screens, Procedures, Masks, and images that will be created, deleted, or updated in the Capsules of the target structure.
You can configure the mappings between source structure and target structure in the following ways:
- Auto compare. You can click on the "AUTO COMPARE" button to copy the entire source structure to the target structure. Board will automatically compare the two structures and update the Capsules of the target structure that have the same name and are located in the same Capsule folders as in the source structure, and add any Capsules and Capsule folders that do not currently exist in the target structure
You can manually edit, delete or add a mapping row after performing the Auto compare feature.
- Manual mapping. You can click on the "+NEW MAPPING" button to add one or more rows which you can manually configure to specify the Capsules you want to transfer. To do this, proceed as follows:
- Click on the "+NEW MAPPING" button to add a mapping row
- From the "Select source capsule" drop-down list on the left, choose the source Capsule that you want to transfer
- Click on the "Capsule/Folder" field to open a drop-down list where you can choose a target Capsule that you want to update/substitute (the Action column field will display the "Update" value) or choose a Capsule folder where you want to transfer the source Capsule (the Action column field will display the "Create" value).
In addition, you can manually enter the target path and change the name of the target Capsule in the "Capsule/Folder" field. You can enter the path and name in the following format: CapsuleFolder/CapsuleSubFolder/CapsuleName.bcps
In the cases where you are transporting the structure of a Development environment to a Production environment, it is highly recommended not to manually create a Capsule folder structure in the target Production environment that is different from the Development environment and therefore has not been tested.
You can click on the "CLEAN TABLE" button to delete all the mappings from the table.
-
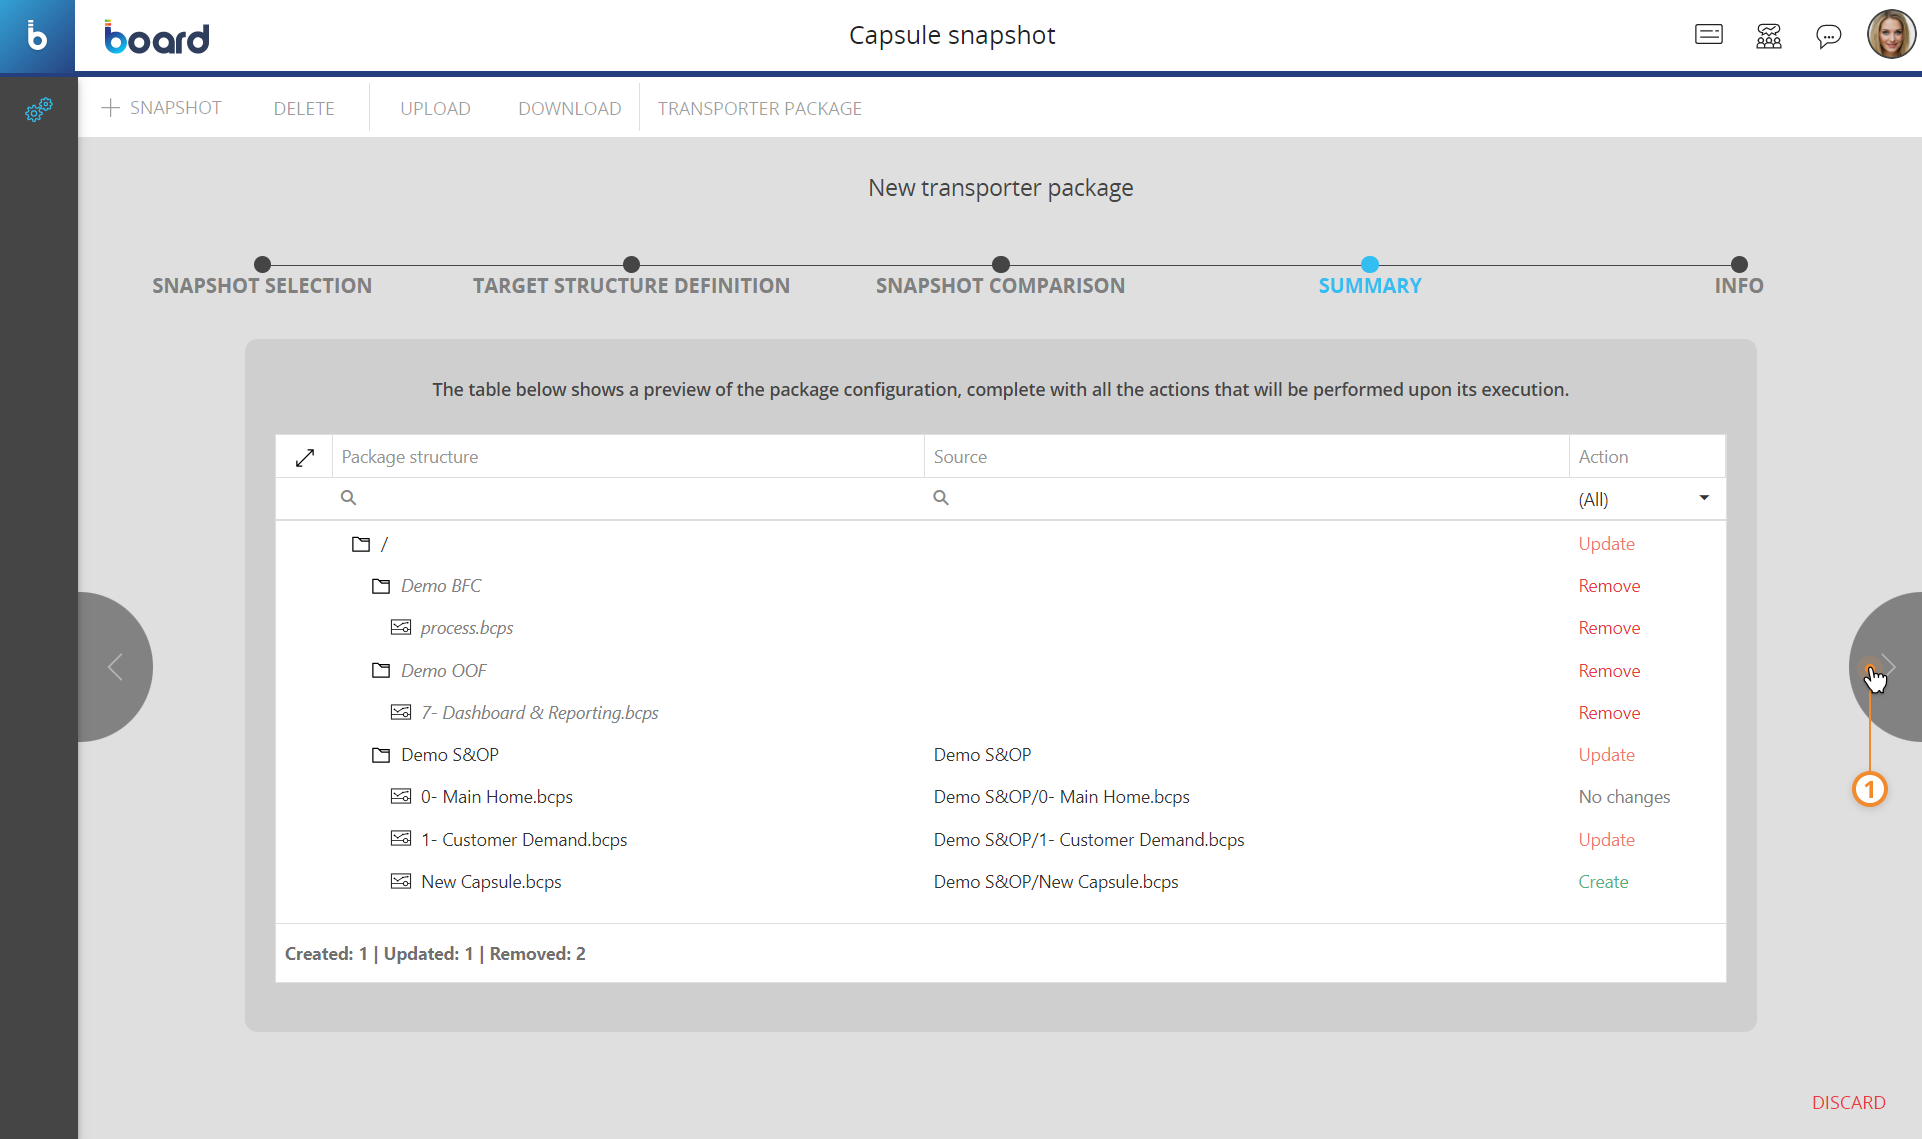
- Summary. Here you can check a preview of the package configuration. Board displays a table that contains the following information:
- Package structure: This column displays the structure of the target after the mapping configuration
- Source: This column displays the names of the Capsule folders and Capsules of the source structure that have been mapped to the Capsule folders and Capsules of the target structure
- Action: This column displays the type of action that will be performed on each Capsule and Capsule folder when you execute the package in the target Platform. The actions can be Create, Update, Remove, or No changes.
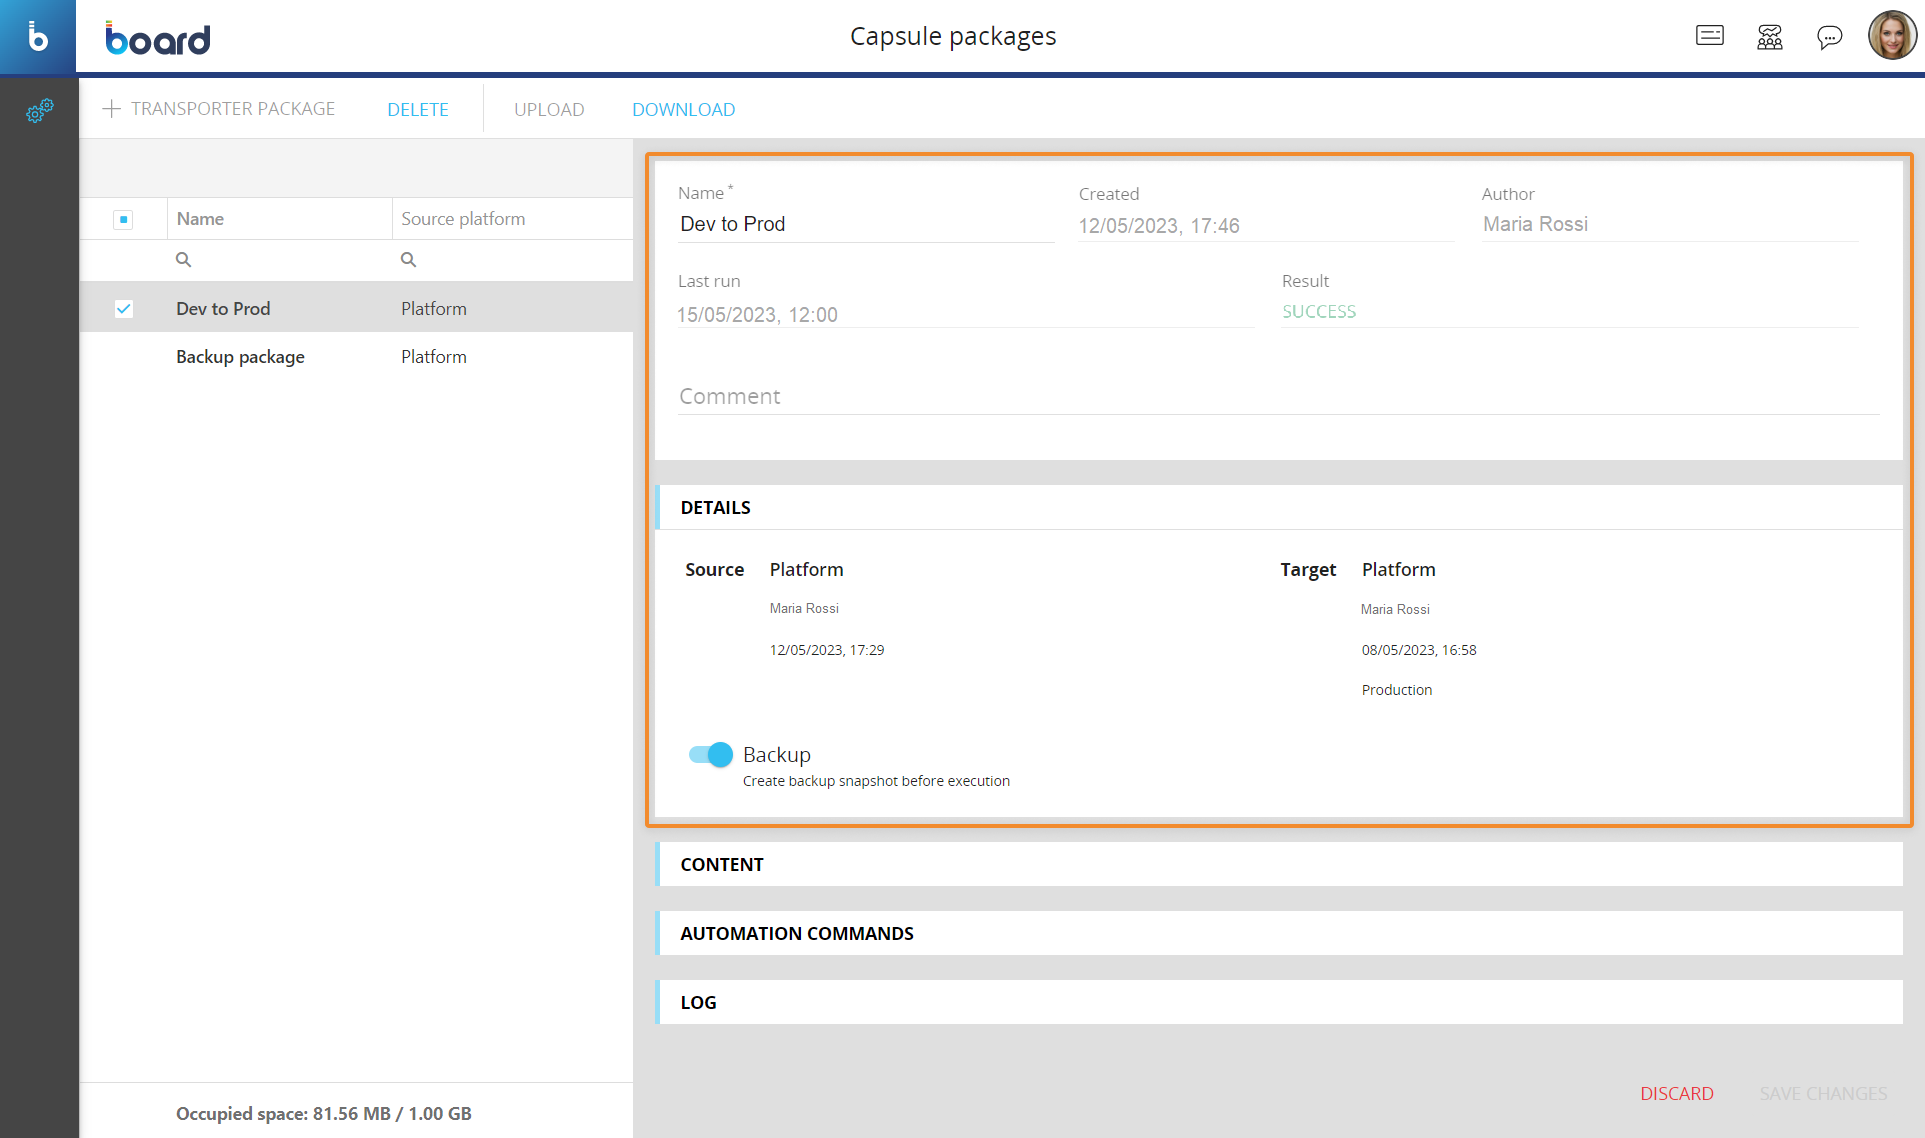
- Info. Here you must enter the name of the package in the "Name" field and add any additional comments in the "Notes" field. You can also enable the "Backup" option, which automatically creates a snapshot of the Capsule folder structure of the current Platform when you run the current Capsule package.
If the storage space limit is reached, Board will automatically delete the oldest snapshots to free the necessary space for the new snapshot. The snapshots that have the "Golden copy" option enabled are excluded from the automatic deletion.
-
Click on "SAVE CHANGES" to save the Capsule package
Managing a Capsule package
The Capsule packages page allows you to perform the following management tasks on existing packages:
- Edit a Capsule package
- Remove a Capsule package
- Download a Capsule package to your local computer.
- Upload a Capsule package to the Platform you are working on

To edit a Capsule package, select it to bring up the package configuration panel and modify the desired options explained in the steps in the Capsule package creation process.
The package configuration panel displays additional information under the following menus:
- CONTENT. This menu contains a table that displays the Capsule folder structure of the selected package
- AUTOMATION COMMANDS. This menu contains the commands that you can use to run the package via the CLI Automation
- LOGS. This menu contains a log that provides information about the execution of the package.
To delete Capsule packages, select the desired ones and then click on the "DELETE" button.
To download Capsule packages, select the desired ones and then click on the "DOWNLOAD" button. A .trsp file that contains the selected packages will be downloaded to your local machine.
To upload Capsule packages, Click on the "UPLOAD" button and choose the .trsp file containing the Capsule folder structure of the package.
Running a Capsule package
To run a Capsule package, proceed as follows:
- From the Capsule packages page, click on the button under the "Run" column of the desired Capsule package to run it
- Board will perform a pre-execution check where it will list any possible warning or error messages. You may find these messages in the following cases:
- The Capsule package action on a Capsule displays the value "Update", but that Capsule does not exist in the current Platform. The Capsule package will create that Capsule in this case
- The Capsule package action on a Capsule displays the value "Create", but that Capsule already exists in the current Platform. The Capsule package will overwrite that Capsule in this case
- The Capsule package action on a Capsule displays the value "No changes", but that Capsule is different in the current Platform. The Capsule package will overwrite that Capsule in this case
- The Capsule package action on a Capsule displays the value "No changes", but that Capsule does not exist in the current Platform. The Capsule package will create that Capsule in this case
- The Capsule package action on a Capsule displays the value "Remove", but that Capsule does not exist in the current Platform. The Capsule package will not do anything in this case

You cannot run a Capsule package if there are errors during the pre-execution check.
- Click on "RUN PACKAGE" to run the package execution
The configured Capsule folder structure and content of the package will be applied to the current Platform after you run a successful execution of the package.
Other enhancements
CLI automation - The CLI automation feature now includes the commands for the creation of a Capsule snapshot and the execution of a Capsule package. In addition, the feature now includes a command to create a Data model snapshot as well.
You can find the syntax of the new CLI commands in the "CLI automation" section of the System Administration area.
Data model package - The "Transporter package" has been renamed to "Data model package", various bugs have been fixed, its performance has been improved and it has been enhanced in the following way:
- Transportable elements. In addition to the Data model elements listed here, the Data model package can now transport the following elements:
- API queries. These Data model elements are created in the API queries section of the Data model
- Azure AutoML scenarios. These Data model elements are created in the Azure ML section of the Data model. They are transported along with all their information (i.e. execution results, logs etc.).
AzureML forecast scenarios that are undergoing the training phase can be included in a Data model package, but they will not be transported when that Data model package is executed. Specific warning messages will appear when you try to create or execute a Data model package that includes an AzureML forecast scenario that is currently in the training phase
- Sparsity transport. The Cube sparsity is now correctly realigned when Cubes are transported. For example, you might have the following Cubes in the source Data model: Cube1, Cube2, and Cube3 which have the associated Sparsity1, Sparsity2, and Sparsity3 respectively. When you transport only Cube1 and Cube3, the Sparsities in the target Data model will now be aligned and associated correctly as Sparsity1 and Sparsity3 respectively, whereas before Cube3 would be associated with Sparsity2 instead of Sparsity3
- Cube and Entity identifiers. Newly created Cubes and Entities will always be assigned new identifiers (Physical name and IDX for Cubes, and Physical name and Export name for Entities), instead of being assigned those that were previously associated with Cubes and Entities that had been deleted
For example, if you create Cube 1, Cube 2, and Cube 3, their Physical names would be V0001, V0002, and V0003, respectively. If you delete Cube 2 and then create a new Cube 4, the Physical name assigned to it would be V0004, instead of V0002 which was previously used by the deleted Cube 2 - Relationship transport. You can now transport single parts of a Relationship tree instead of having to transport the whole tree. The package execution actions for the Relationships will mainly be "Create" or "Delete", while an "Update" action will appear only when the Normalize action has been performed on a Relationship
- Log. The execution log content has been enriched with the following information:
In addition, the log of each Update action during the creation of the Data model package now contains more detailed information about changes that have been made to the properties of the transported elements. The information is displayed with the following syntax [PropertyName] ([OldValue] -> [NewValue])
In the case of changes made to the properties of list elements, only the name of the list will be logged. For example, in the case of changes made to Row templates, the log will display only the value "Formats".- Timestamp: This column displays the date and time of the execution of each action
- Level: This column displays the log level of each action
- Username: This column displays the Account name of the user that executes the package
- DataModel: This column displays the name of the Data model on which each action is performed
- ActionType: This column displays the type of each action that is performed
- ObjectType: This column displays the type of each Data model object on which an action is performed
- ObjectName: This column displays the name of each Data model object on which an action is performed
- Message: This column displays a message about the execution of each action
- Package consistency check messages. New consistency checks have been introduced before the execution of a Data model package after you run it. As a result, you may encounter new warning or error messages in certain situations, which typically arise when you make changes to the target Data model that cause misalignments with the source Data model. The following messages might appear when running a package:
- Error message when you try to transport a Relationship associated with an Entity that does not exist in the target Data model
- Error message when you try to transport a Relationship where one "more aggregate" Entity is related to two or more "less aggregate" Entities
- Error message when you try to transport an Entity that has the same physical name but a different "Export Name" value in the target Data model or vice versa
- Error message when you try to transport a Cube that has the same physical name but a different "Idx" value in the target Data model or vice versa
- Error message when the package tries to create an Entity, Cube, Data reader, Procedure or Rule that has the same display name as an existing one in the target Data model
- Error message when the package tries to create or update a Cube whose Structure in the Data model will contain two Entities that are part of the same branch of a Relationship
- Warning message when you try to transport an RDB (Rolap) Cube with sparse dimensions in its Structure, which are not supported. These dimensions will be automatically transformed into dense dimensions