Creating a Pager Object
This topic describes how to add a new Pager Object to a Screen or a Container and its specific properties.
To create a new Pager Object, you need to access a Screen in Design mode.
Once you're in the Screen editing page, locate the Pager Object from the Screen Objects list in the left panel, then drag and drop it onto your Screen or Container.
The Pager Object, just like every other Object, can be moved, resized, duplicated via copy/paste and easily aligned with other Objects on the Screen.
See Configure Screen Objects for more details.
When you create a Pager Object, it is initially empty. The next step is to associate it with an Entity.
To do so, select the Object and choose an Entity from the dropdown menu in the contextual right panel of the Screen editing page.
If the Multiple Data models mode is enabled on the Screen, an additional dropdown menu will allow you to select the Data model containing the Entity to be associated with the Pager.
Once associated with an Entity, the Pager becomes immediately operational and can be used to apply selections right away.
See Pager properties and settings for more customization options.
Resetting a selection made on a Pager only affects the Entity associated with it and the less aggregated Entities on the same Relationship tree. Selections made on other Entities are retained.
Resetting a selection made on a Pager returns the Entity associated with it to the state defined by the Screen selection.
See Selection application sequence (Select at runtime) to know more about the order in which Board executes selections on each Screen.
If you apply a selection with one or more Pagers in Design mode and save the Screen, that selection will not be applied to the Screen in Play mode by default. To achieve that, you will have to set a default member for each Pager. See next paragraph for more details about the Set default member button.
We highly recommend not to use the Pager Object and the Selector Object on the same Screen when they are associated with Entities on the same Relationship tree.
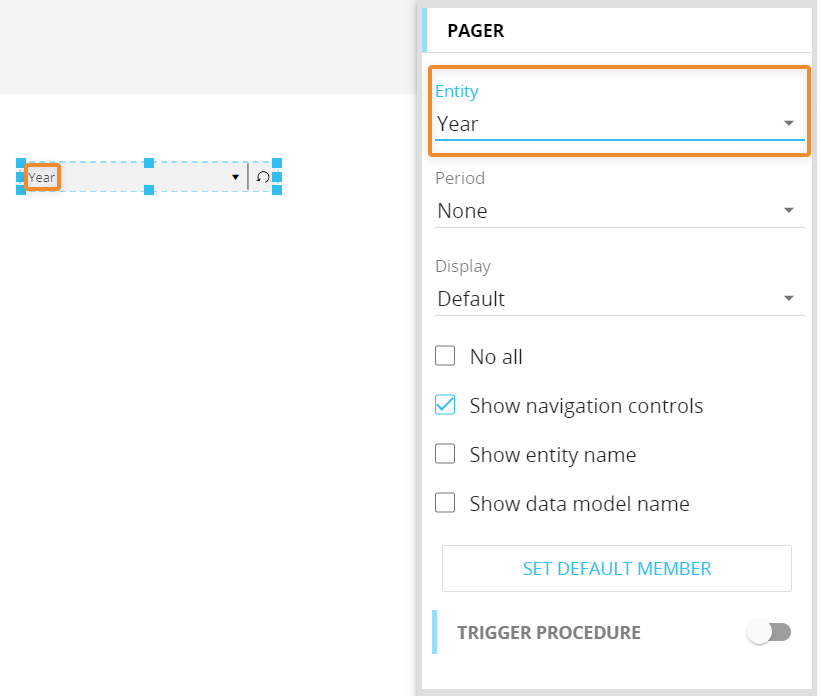
Pager properties and settings
Pager properties are available from the contextual right panel of the Screen editing page once the Object is selected.
The Object supports all options common to all Screen Objects.
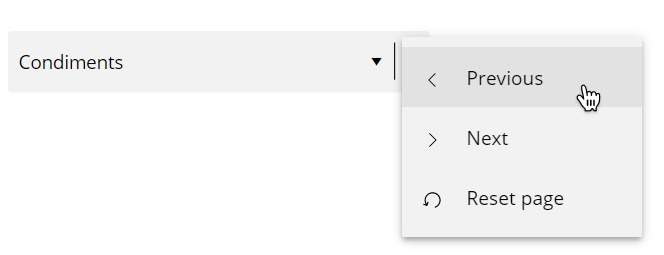
Properties specific to the Pager Object are highlighted in the following image and explained below:
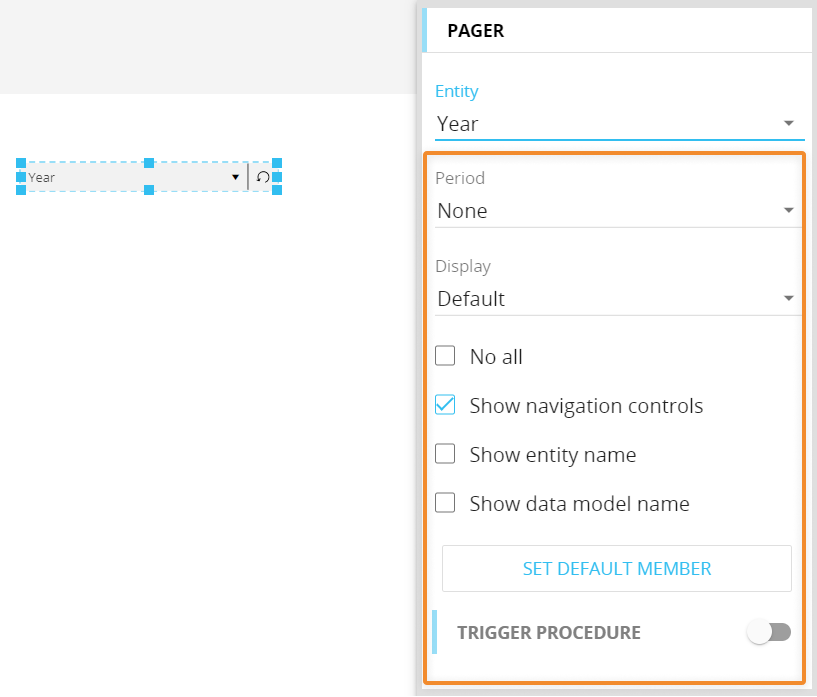
- Period (only for Time Entities). Automatically applies a dynamic selection on the selected member (time period). As the period changes over time, the selection will adapt accordingly.
The following options are available:- None. No time period is set as default
- Current period. Sets the current time period (day/weekday/week/month/quarter/fiscal year/year) as default, based on the system date.
For example, if you're configuring the selection on the Month Entity and the current date is January 7, 2022, the "January 2022" member will be selected. - Previous period. Sets the time period prior to the current one (day/weekday/week/month/quarter/fiscal year/year) as default, based on the system date.
For example, if you're configuring the selection on the Month Entity and the current date is January 7, 2022, the "December 2021" member will be selected. - Last period. Sets the last time period (day/weekday/week/month/quarter/fiscal year/year) in the Time Entity as default.
For example, if you're configuring the selection on the Month Entity and the last member in it is "December 2022", that member will be selected by default.
If the Current period, Previous period or Last period options are applied, the reset selection icon (![]() ) is hidden on the Pager Object.
) is hidden on the Pager Object.
- Display. Defines which information about Entity members should be displayed in the Pager: default (as configured in the Entity settings menu in the Data model), code, description or both
- No all. If enabled, forces a Pager to have at least an item selected at any time. If no default member is defined, the member that occurs first in alphabetical or numerical order is automatically selected based on its code or description
- Show navigation controls. If enabled, displays the "previous" icon (
 ) and the "next" icon (
 ) after the dropdown menu.
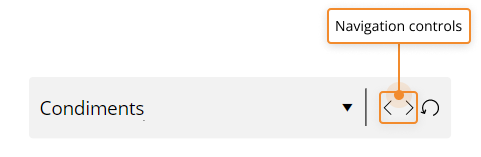
If the option is disabled, those icons will be displayed in a floating panel that can be accessed by clicking on the three dots icon ( ) on the right side of the Pager.
- Show entity name. Displays the Entity name right before the selected member
- Show data model name. Displays the Data model name right before the selected member. If the "Show entity name" option is enabled, the Data model name is displayed before the Entity name
- Set default member (Button). This button allows you to choose a member of the associated Entity and set it as default for the Pager. That member will be automatically selected each time the Screen is opened, both in Design and Play mode.
Click the button to open the configuration window and choose the desired default member.
The Trigger Procedure feature
The Trigger Procedure feature is a property of the Pager Object which allows to trigger the execution of a Procedure whenever the end user selects a member.
This feature can be used, for example, to link the member lists of two independent Pagers. Let's consider a Screen having two Pagers associated with two Entities belonging to different Relationship trees, such as Cost Center and Account, and a Procedure that selects Accounts based on a Cube which maps Accounts to Cost Centers (i.e. a Cube dimensioned by Account and Cost Center).
By enabling the Trigger Procedure feature on the Pager associated with the Cost Center Entity, when the user selects a Cost Center, the member list displayed in the Pager associated with the Account Entity will automatically update to show only those Accounts determined by the Cost Center/Account Cube.
To set a Procedure trigger on a Pager, proceed as follows:
- Click the toggle on the right to activate the feature
- Select the Procedure location, Capsule or Data model
- If the Data model location has been selected, pick a Data model from the list
- Select the desired Procedure from the dropdown menu. You can easily review the Procedure structure by clicking the Edit Procedure button (
 ) on the right
 - Save the Screen
The following two options can be applied the Trigger Procedure feature:
- Disable Screen refresh after execution. Disables the refresh of all Screen Objects associated with a Layout when the user makes a selection on the Pager.
If you enable this option, be sure to include a Refresh Screen action in the Procedure triggered by the Pager in order to always show updated data.
- Trigger also after the Pager is reset. Triggers the Procedure execution also when the Pager selection is reset via the reset selection icon (
 ).
).
Interacting with the Pager Object in Design mode
In Design mode, the Pager Object provides the same interactive features available in Play mode.
Be aware that, if you apply a selection using a Pager in Design mode and save the Screen, that selection will not be applied to the Screen in Play mode by default. To achieve that, you will have to set a default member for each Pager using the Set default member button. See previous paragraph for more details.
Learn more about: