Azure AutoML Integration
Board's predictive analytics capabilities have been greatly enhanced with the new seamless integration of Azure's Automated Machine Learning (Azure AutoML). By leveraging the power of Azure's machine learning capabilities and advanced algorithms, Board allows users to generate accurate predictions and make informed data-driven decisions.
You can feed historical data from Board to Azure AutoML through a Layout and then build, train, and deploy machine learning models in Azure that you can use to run forecast scenarios based on that data. The training is seamlessly done in the background and the result of the forecast is automatically retrieved from Azure and stored in the desired target Cube.
You can find the new feature in the "Azure ML" tile inside the new "Analytics" tile of the desired Data model. In addition, the new tile contains the B.E.A.M. Forecasting and Clustering features as well.
The user must have an appropriate Board license to be able to view and access the Analytics tile.
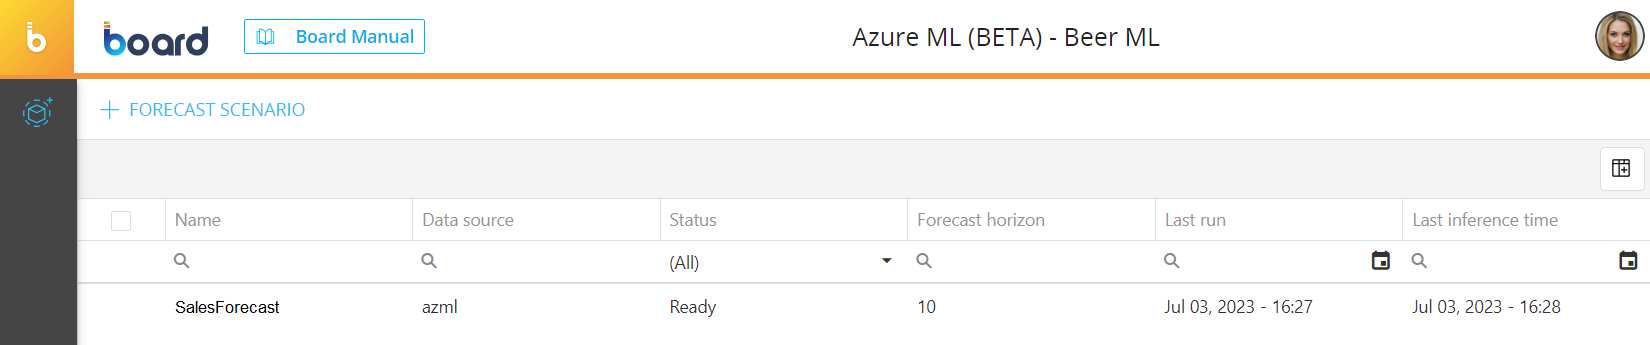
In the Azure ML page you can see all existing forecast scenarios and their main information: the table is sortable and searchable using the interactive header fields. You can also show or hide columns to your liking, by clicking the Column chooser button in the upper right corner of the table.
The table contains the following information:
- Name. This column displays the name of each forecast scenario
- Data source. This column displays the name of the Azure AutoML Data source connection used by each forecast scenario
- Status. This column displays the status of the training of each forecast scenario
- Forecast horizon. This column displays the forecast horizon of each forecast scenario
- Last run. This column displays the date and time of the last run of each forecast scenario, in the following format: Month DD, YYYY - HH:MM
- Last inference time. This column displays the date and time of the last inference phase run of each forecast scenario, in the following format: Month DD, YYYY - HH:MM
Data source connection
In order to use the Azure AutoML features, you must have an Azure subscription. More specifically, the following is required:
- Service Principal. This is an Azure account that is used to automatically authenticate to Azure ML services.
The Service Principal must have the following permissions:
- Permission to read/write from/to the Blob storage
- Permission to create Endpoints
- Permission to deploy models
- Permission to launch AutoML processes. - Blob storage. This is an Azure storage where the training dataset and the MLTable files will be uploaded.
The Blob storage must be public.
- Azure ML Workspace. This serves as a logical container for your machine-learning experiments, models, and other related resources.
- Azure ML compute cluster. This is a collection of multiple Azure virtual machines that reside within the Azure ML Workspace explained above and are used to train and develop the forecast models
- Virtual machine quota. This is a set of hardware configurations and computational resources of your Azure virtual machines that are used for inference calls to the Azure AutoML Endpoints
You must have enough quota needed to handle inference calls to Endpoints.
- Board Cloud license. This is the type of Board license needed to be able to use the Azure AutoML features.
Azure AutoML is not available for On-premise Board licenses.
Once the requirements above are satisfied, you can create a Data source connection to the Azure ML cloud. To do that, proceed as follows:
- Go to the Data sources tile in the System Administration area
- Click on "+DATA SOURCE CONNECTION" in the upper left corner to bring up the configuration panel
- Enter a name for the new connection in the "Name" field and choose "Azure AutoML" from the "Type" drop-down list
- Enter the following Azure AutoML cloud information:
- Tenant ID. Here you must enter the Tenant ID, which is a unique identifier assigned to your Azure Active Directory (ADD) tenant.
- Client ID. Here you must enter the Client ID of your ADD service
- Client Secret. Here you must enter the Client secret for the authorization of the entered Client ID
- (Optional) Subscription ID. Here you must enter the Subscription ID which is a unique identifier associated with your Azure subscription. This is the workspace where all the necessary Azure AutoML resources are located. If not specified, the default subscription will be chosen
- (Optional) Resource group. Here you must enter the name of the Resource group, which is a sub-section of the Subscription. If not specified, the first available Resource group will be chosen
- (Optional) Workspace name. Here you must enter the name of the Azure ML Workspace. If not specified, the first available Workspace will be used. The associated storage account is automatically recognized
- (Optional) Container name. Here you must enter the name of the Blob storage container where the training data and experiment outputs are stored. If not specified, the first available Blob container in the Workspace will be used
- Cluster. Here you must enter the name of the Azure compute cluster within the Workspace that will be used to train and develop the models
- Virtual machine size. Here you must enter the Azure Virtual Machine size which specifies the hardware configuration and computational resources allocated for the inference calls to the Endpoints
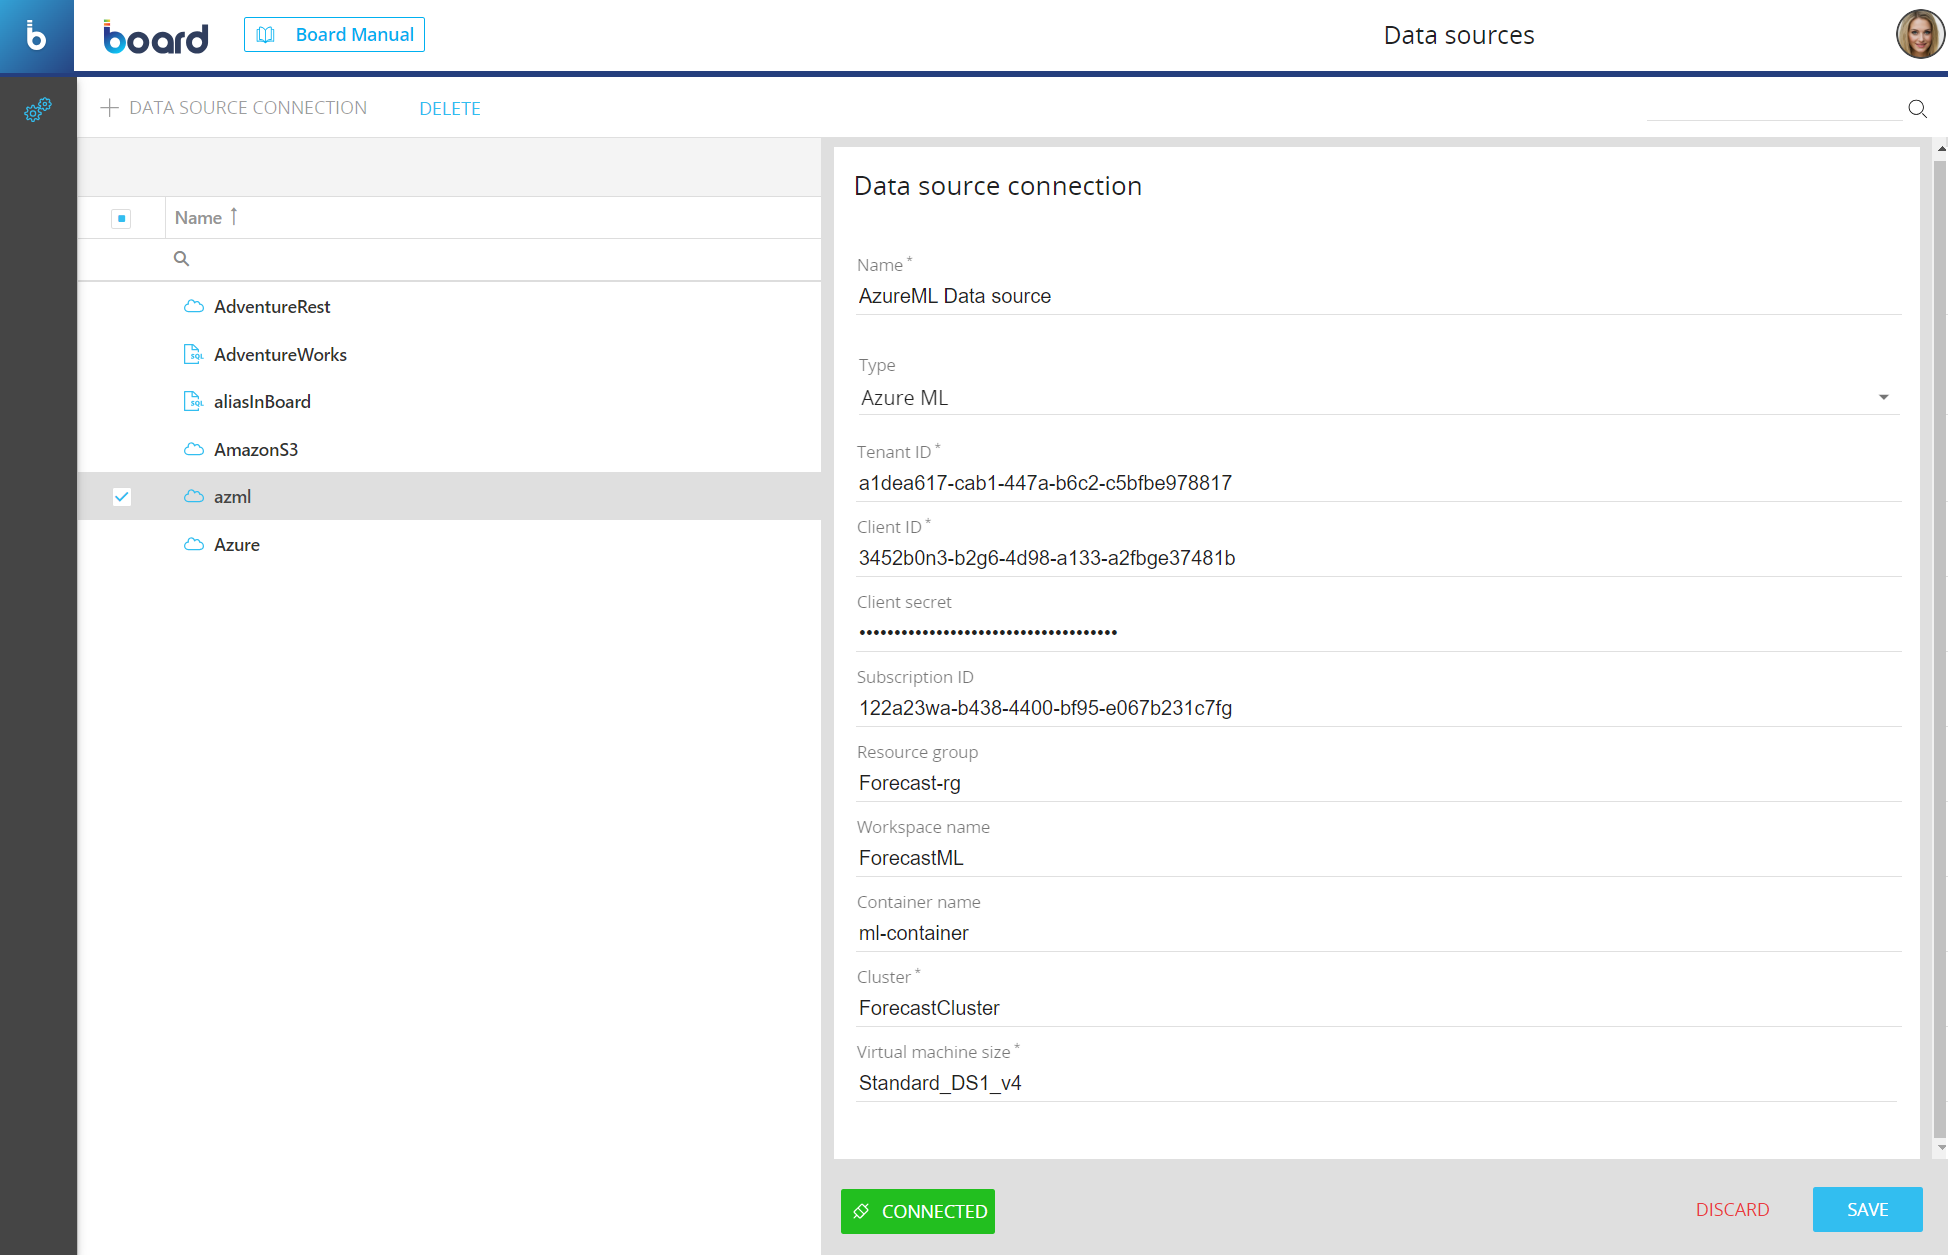
- Click on "TEST CONNECTION" to check if the connection works and then click on "SAVE" to save the Data source
Once the Data source is correctly configured, you can start using it in the new Azure ML page.
Creating a new Azure AutoML scenario
To create a new Azure AutoML forecast scenario, proceed as follows:
- Go to the Analytics tile of the desired Data model in the Data model area and then click on the Azure ML tile
- Click on "+FORECAST SCENARIO" in the upper left corner to bring up the configuration panel
- Enter the name of the Scenario in the "Scenario name" field
- Choose an existing Azure ML cloud Data source from the "Data source connection" drop-down list
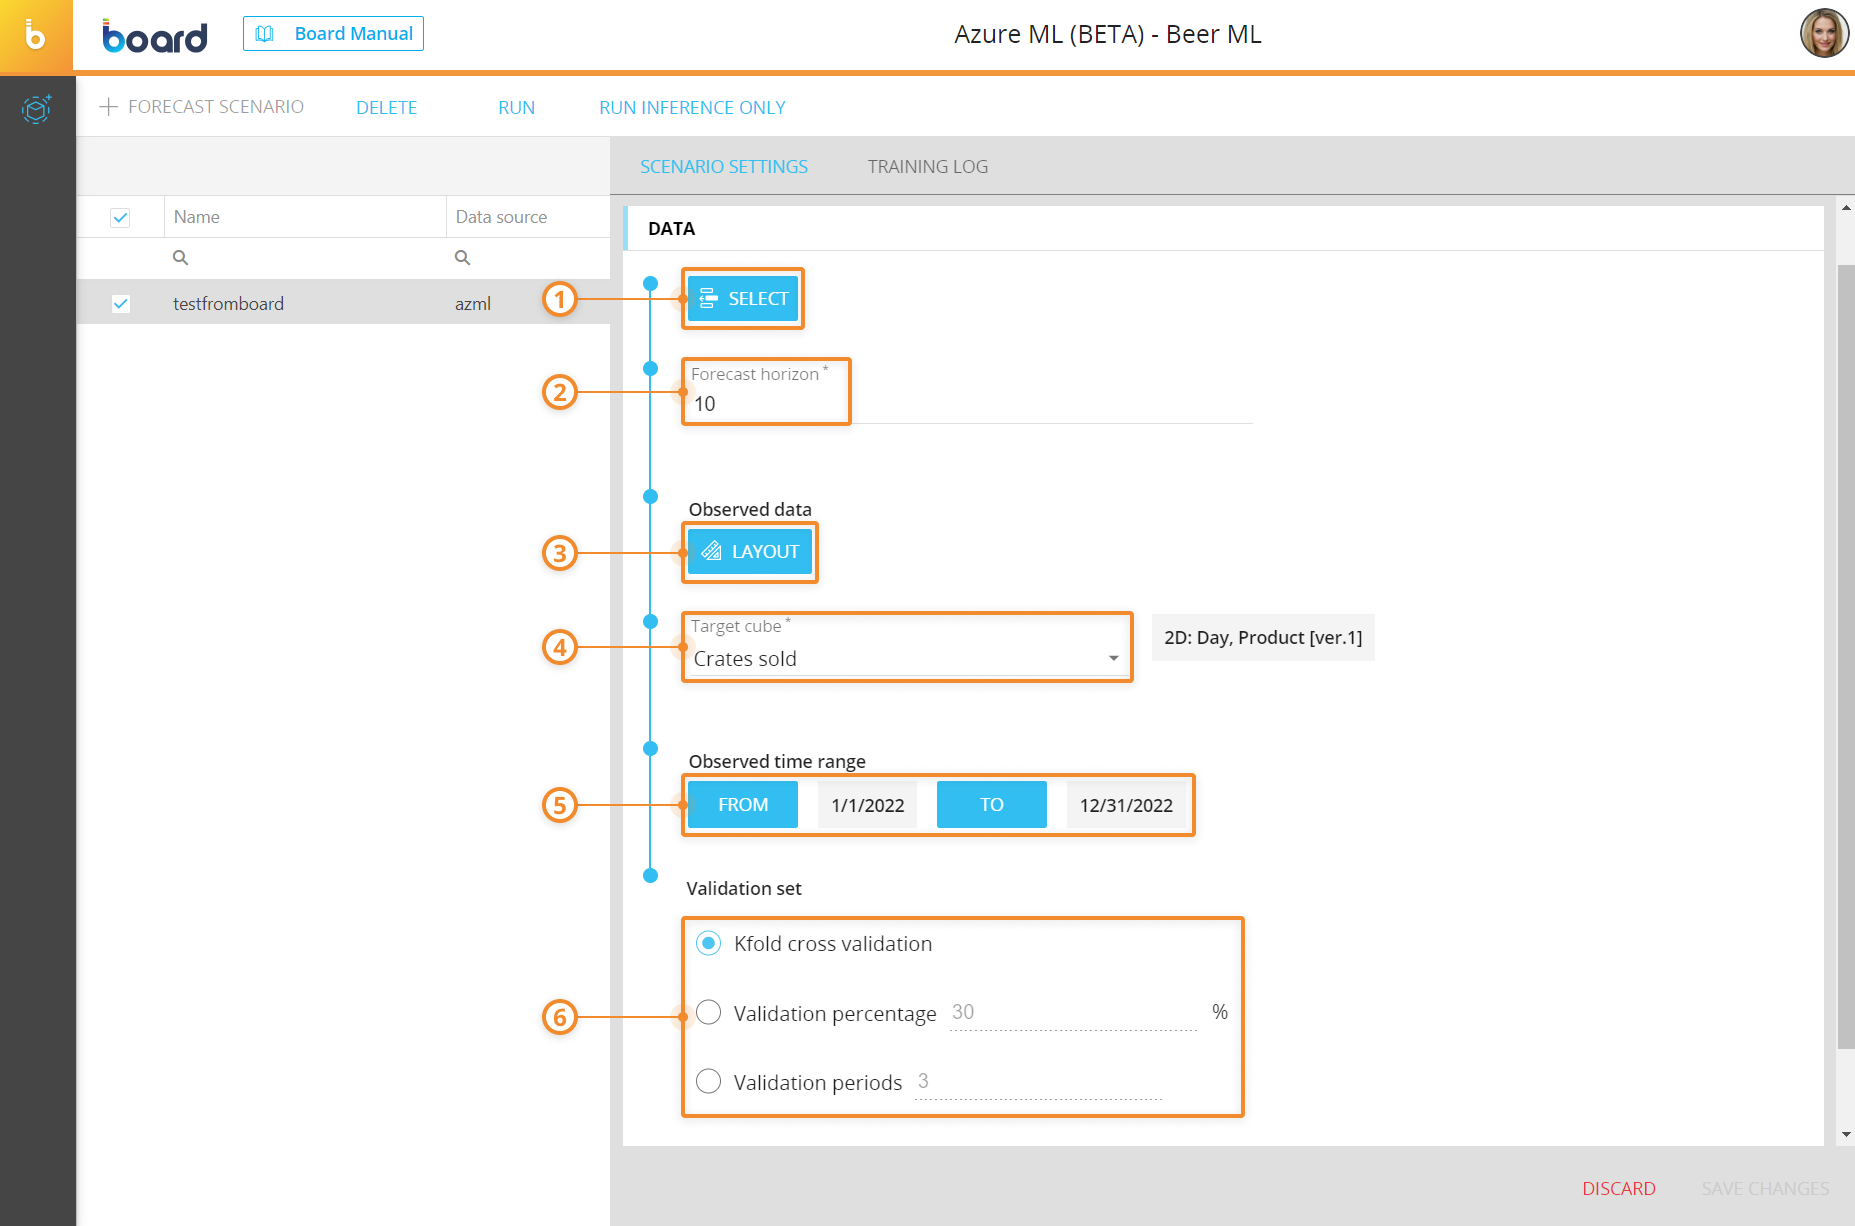
- Configure the following options under the "DATA" menu:
- (Optional) SELECT. Here you can click on the "SELECT" button to apply a selection. In this case, the forecast analyzes the time series only related to members included in the selection
- Forecast horizon. Here you must enter the number of time periods you want to forecast. For example, if you are doing a monthly forecast, you can enter "1" to forecast only one future month
The type of time period depends on the time Entity in the Structure of the target Cube. The time period can only be Day or Month.
- Observed data. Here you must click on the "LAYOUT" button to configure the Layout that contains the historical data set. Here you should enter the Data Blocks that will be analyzed by the forecasting algorithms, which include the main observed data and the covariates
- Target Cube. Here you must choose the target Cube that will contain the result of the forecast scenario after it is run. The target Cube is usually the one that contains the main observed data
Except for the time Entity, all other Entities in the Structure of the target Cube are used as time series identifiers. While all other Data Blocks in the Layout are used as covariates.
- Observed time range. Here you can click on the "FROM" and "TO" buttons to choose the start and end of the observed time range. The default values for the start and end of the time range are "First loaded period" and "Last loaded period" respectively, which cover the values of the observed data by starting from the oldest to the newest.
- Validation set. Here you must choose one of the following validation options, which determines the set of historical data that will be used as a test to validate the forecast accuracy:
- Kfold cross validation. This type of validation uses the Kfold cross method, which divides the dataset into K equally sized subsets, or folds. The model is then trained and evaluated K times, each time using a different fold as the validation set and the remaining folds as the training set
- Validation percentage. This type of validation uses the indicated percentage size of the historical dataset
- Validation periods. This type of validation uses the indicated periods of the historical dataset
- Choose the preferred competition models that will be used for the training in the field under the "COMPETITION MODELS TRAINING" menu. You can also click on "All" to select all competition models
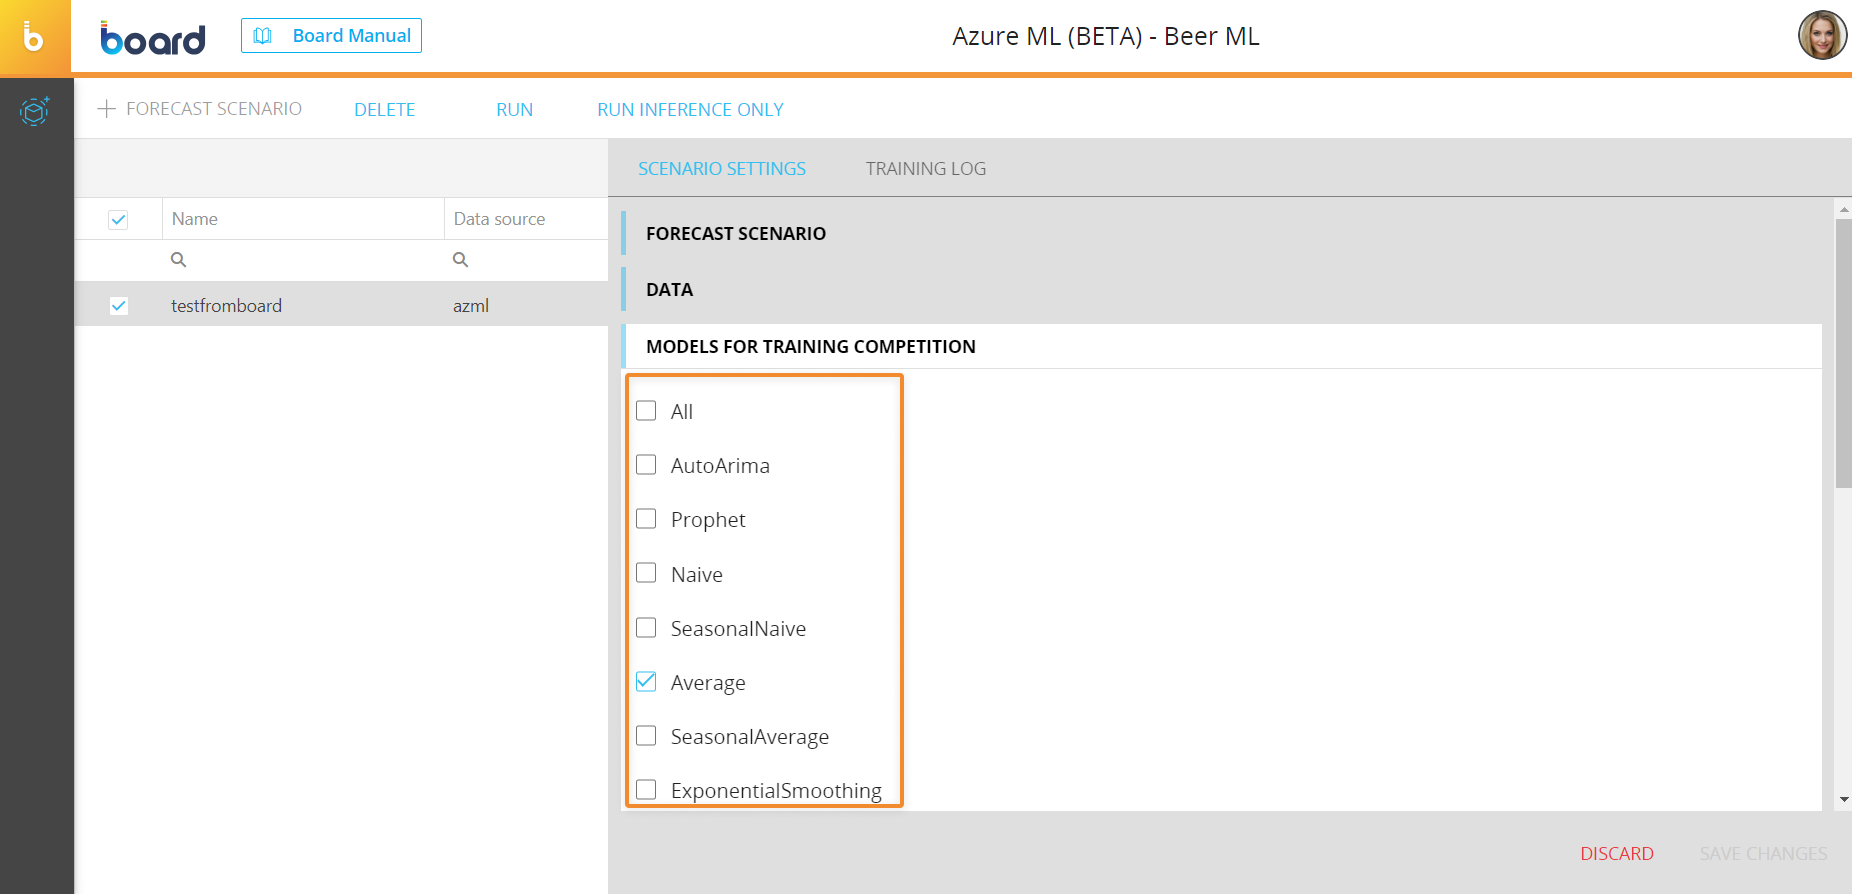
By selecting "All", Azure ML will also include any custom models created directly in your Azure ML Workspace.
The more models you include, the more time is required to complete the training process.
- Click on "SAVE CHANGES" to save the forecast scenario.
Managing and running Azure ML forecast scenarios
You can perform different actions on one or more existing Azure ML forecast scenarios by selecting them and clicking on the different buttons that appear above the forecast scenario list.
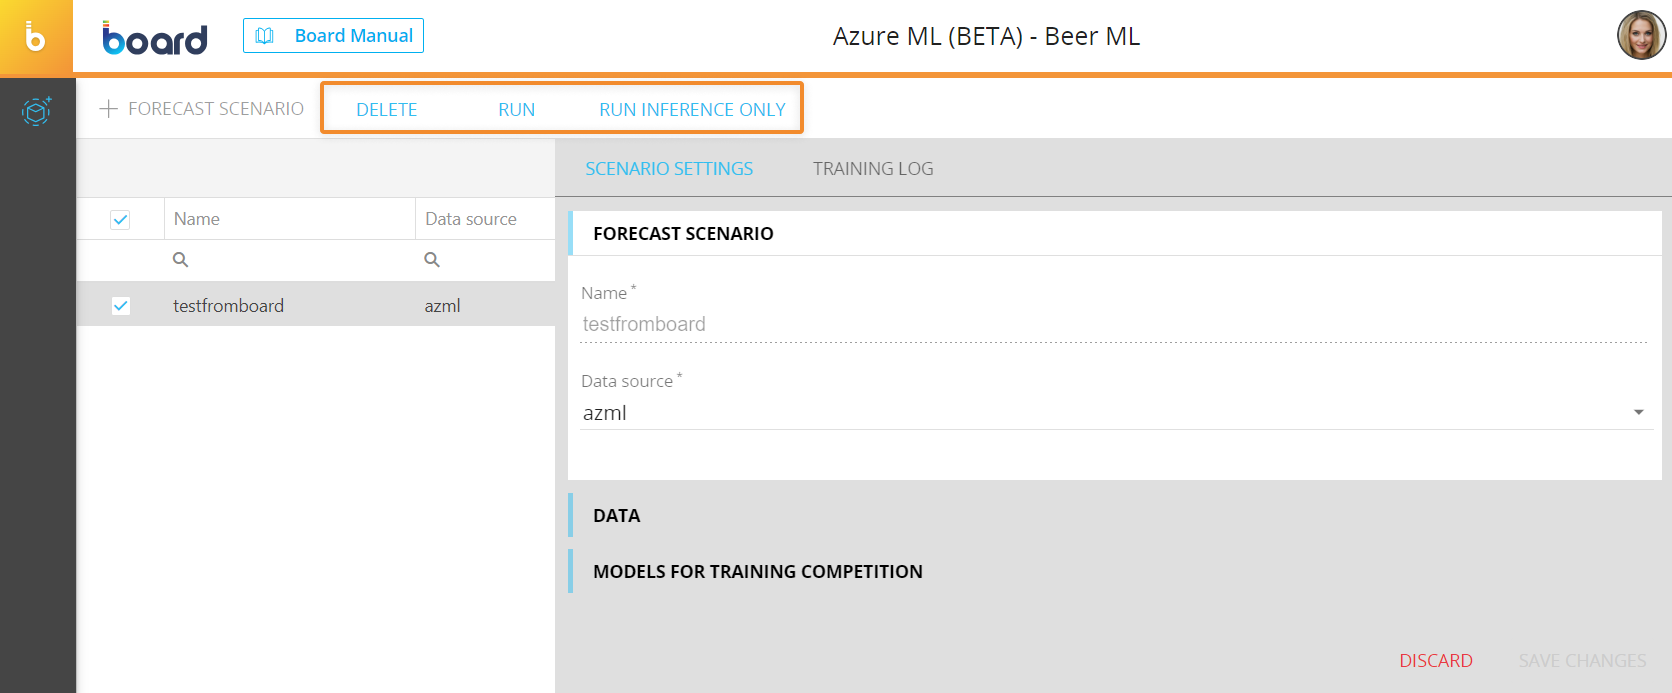
The available actions are described below:
- To delete one or more forecast scenarios, select them and click on the "DELETE" button
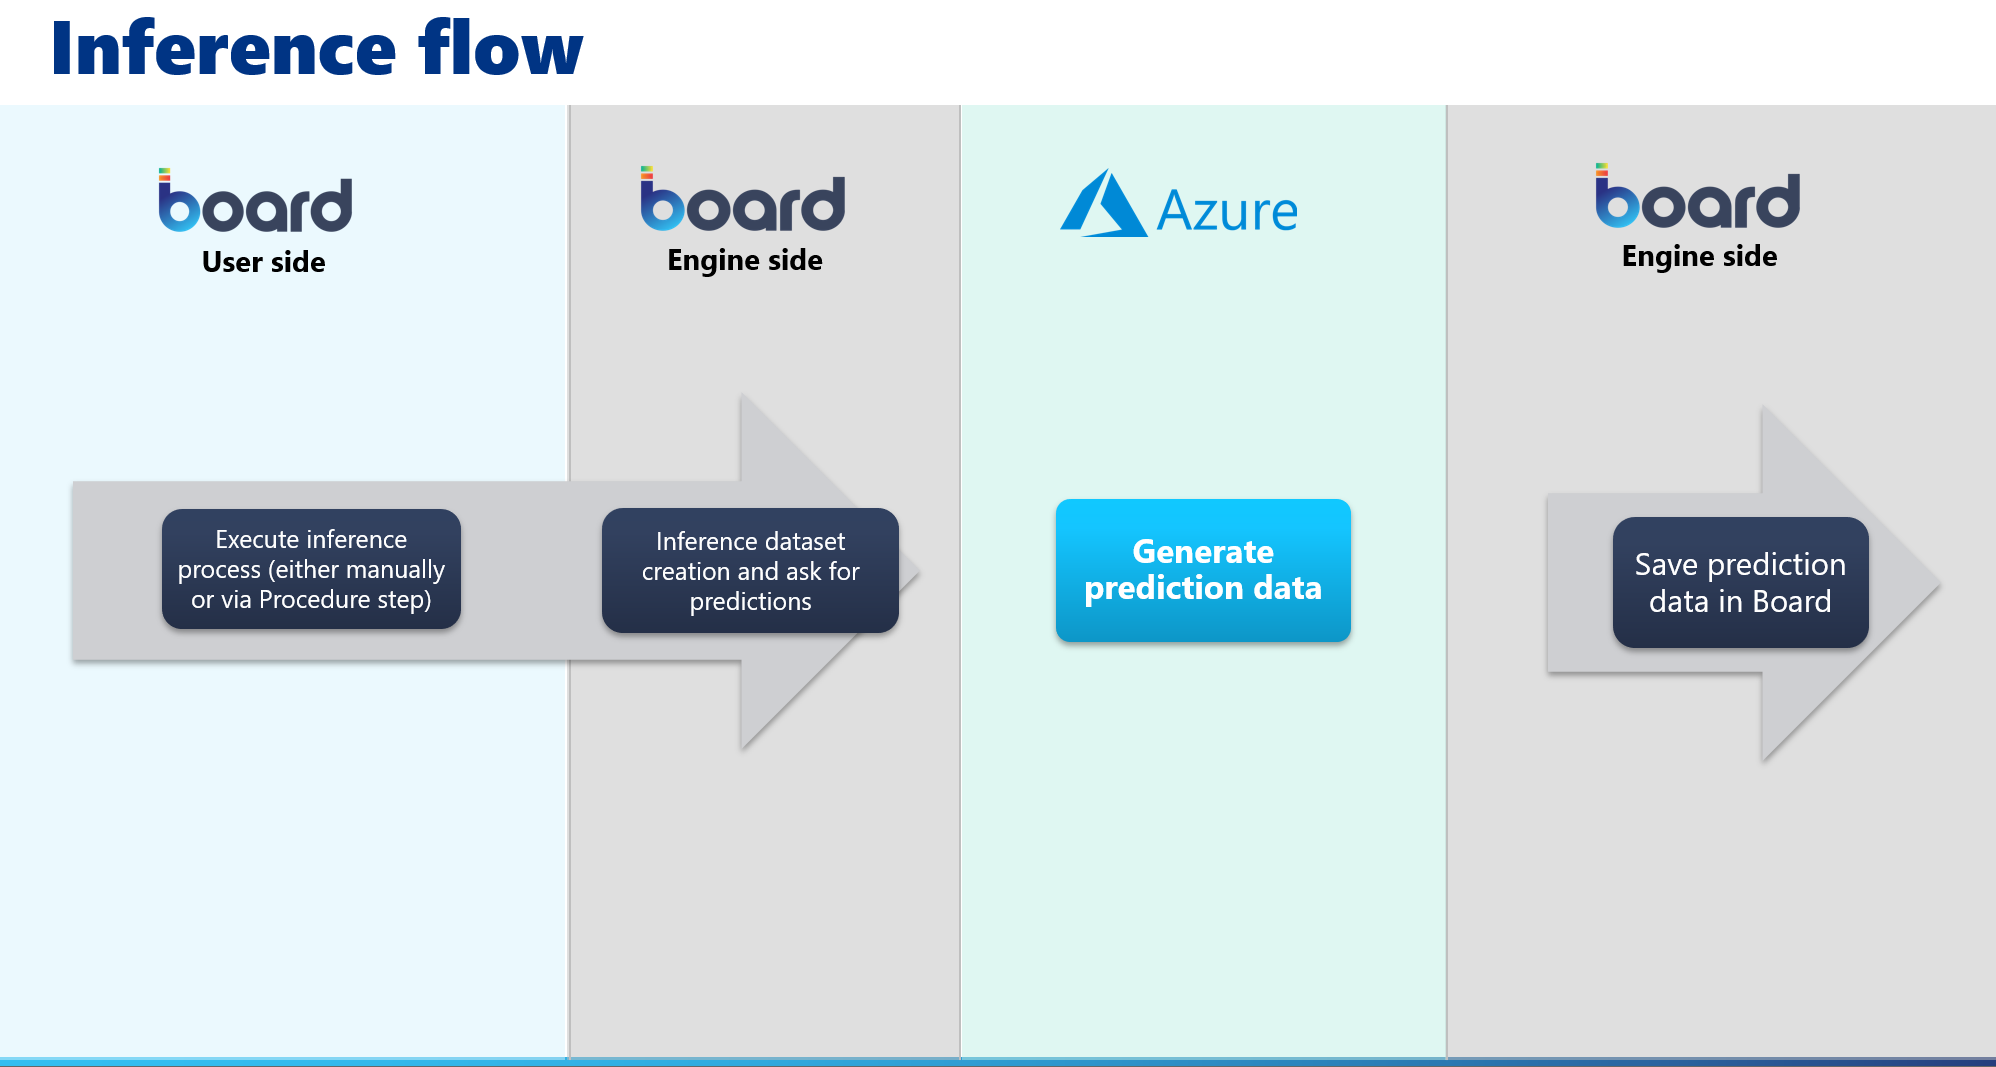
- To run a forecast scenario with the training phase, select the desired one and click on "RUN". This will execute the training process and first inference phase, which are done in the following macro steps:
- Connection to the indicated Azure ML workspace and Blob storage
- Serialization of the time series of the Board Layout and creation of the MLTable. The MLTable name will be in the following format: BoardScenarioName (i.e. BoardSalesForecast)
The MLTable is created in the following way:
- An MLTable column is created for each Entity that is in the Structure of the target Cube
- An MLTable column is created to contain the values of the target Cube
- An MLTable column is created for each covariate Data Block - Upload of the historical data, configured in the Board Layout, in the automatically created MLTable Data asset, in the "Data" area of the Azure ML Workspace
- Creation of the Azure ML training experiment and automated ML job, in the "Jobs" area of the Azure ML Workspace. The job name will be in the following format: BoardScenarioNameXP-AAAAMMDDHHMMSS (i.e. BoardSalesForecastXP-20230704100953)
- Execution of the training job by initiating the competition of the selected models based on the forecast scenario configuration
- Creation of an Azure ML Environment that contains the necessary dependencies
- Creation of an Azure ML Endpoint in the "Endpoints" area of your Azure ML Workspace, where the winning model is deployed. The Endpoint name will be in the following format: board-ScenarioName (i.e. board-SalesForecast)
- Execution of the first inference phase on the created Azure ML endpoint
The first inference phase is executed based on the forecast horizon configured in the forecast scenario.
- Retrieval of the inference phase result (prediction) and storage in the target Cube
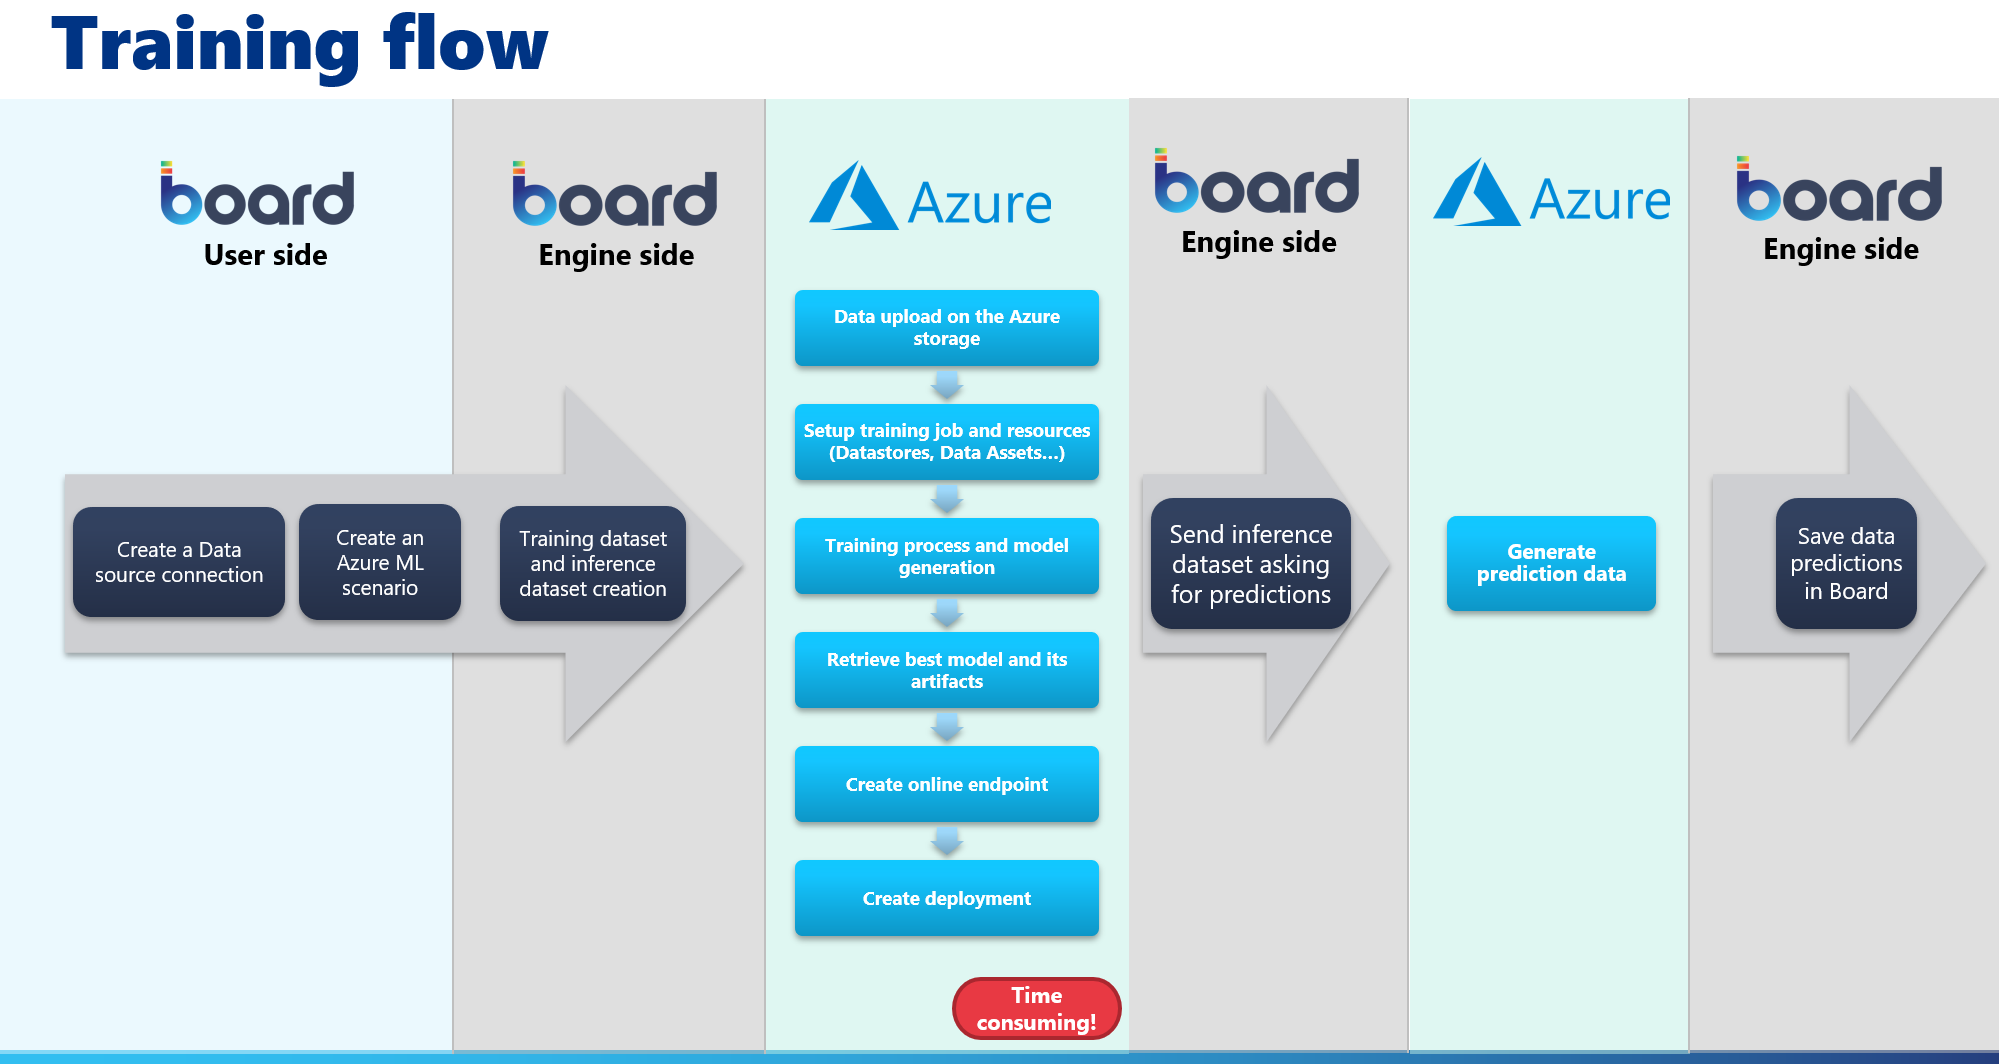
The training phase in Azure is the process that requires the most time to complete. The time required heavily depends on the size of your historical dataset and the selected competition models.
In the case where you perform a retraining phase, all related resources in Azure ML will be deleted and recreated based on the new forecast scenario configuration.
A pop-up window that shows the progress of this process appears when you click on the "RUN" button. You can click on the "X" button to hide the pop-up window.
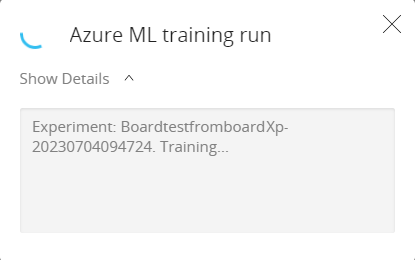
However, the whole process explained above is still seamlessly executed in the background and you can check its progress in the Running tasks area.

Once the process is finished, the user will receive a notification near the Top Menu.
You can also check each step of the training process by selecting the forecast scenario and clicking on the "TRAINING LOG" tab in the forecast scenario configuration panel. Click on "RELOAD LOG" to refresh the log details
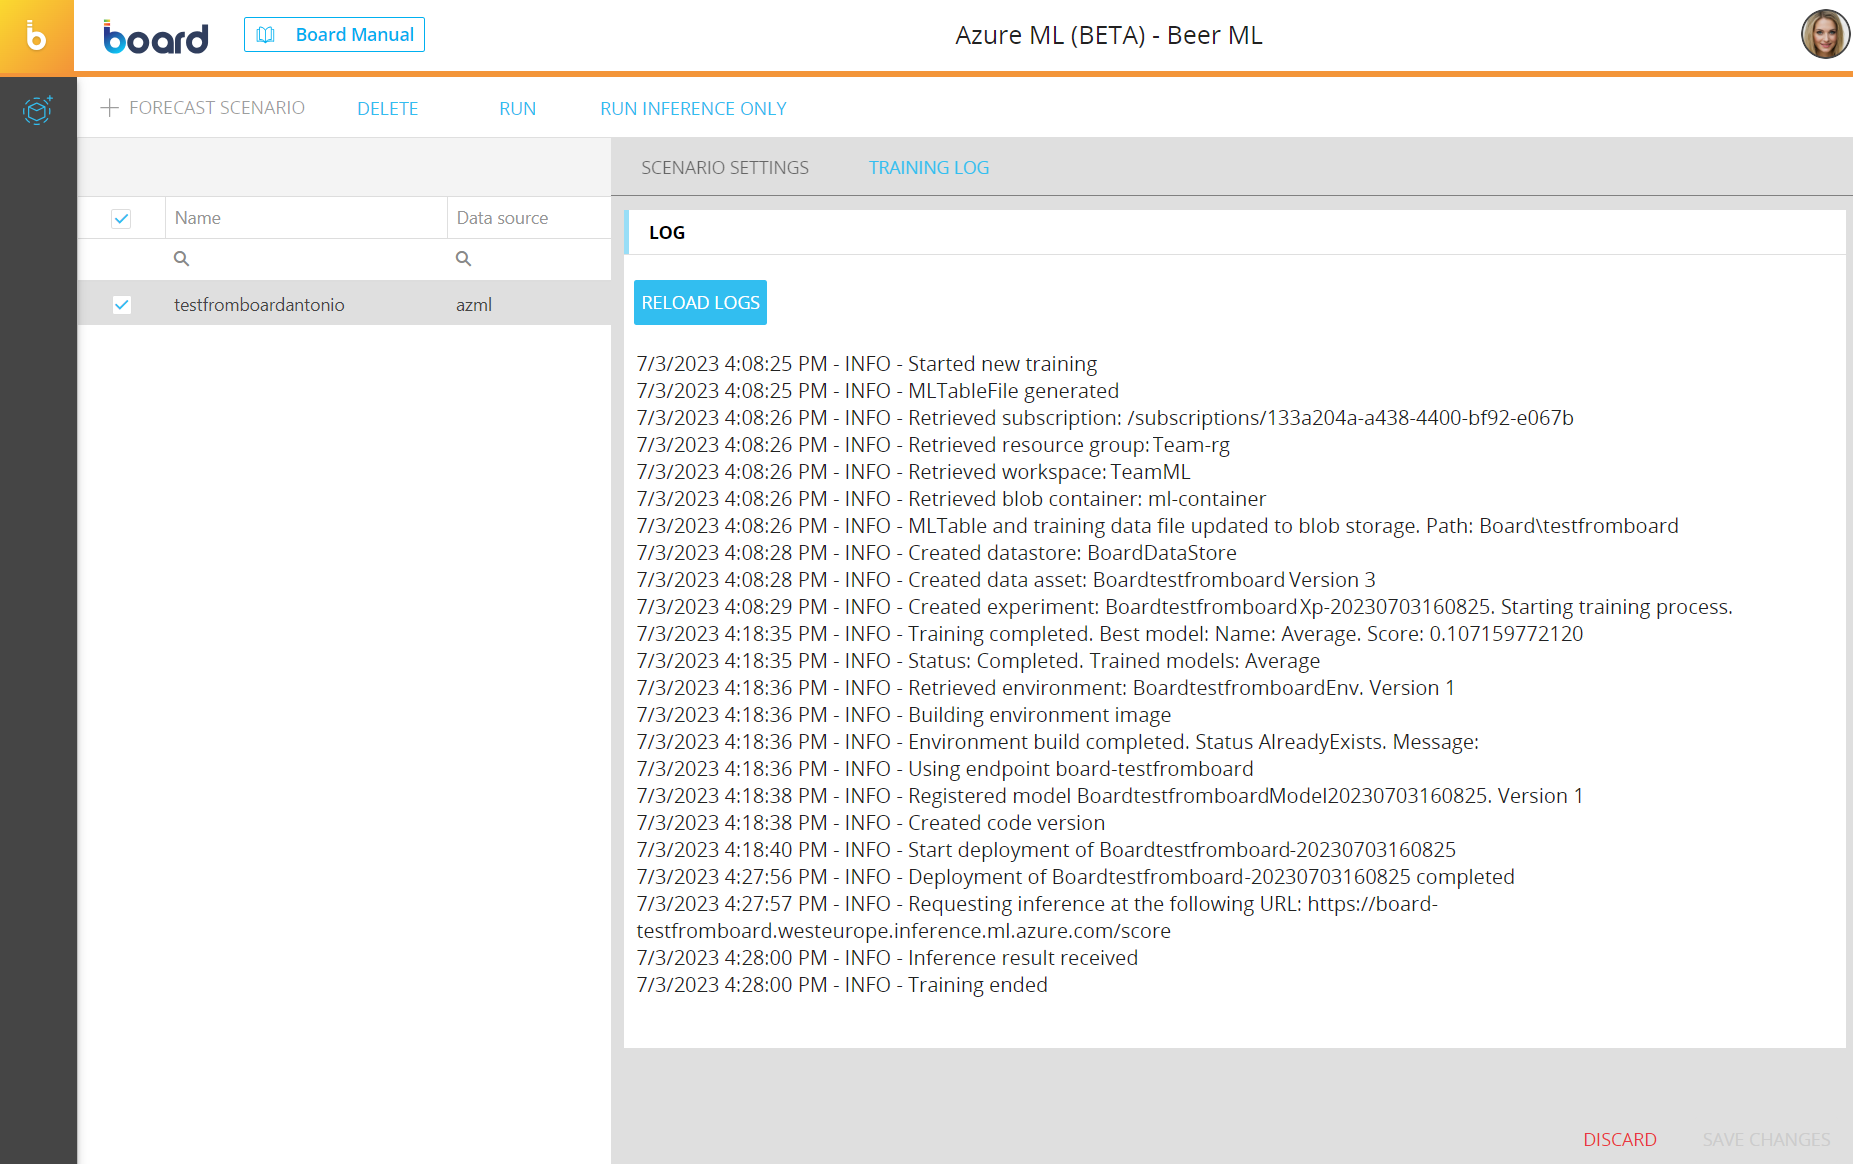
Board automatically checks the progress of the training phase every 20 seconds in order to notify the user when it is completed.
- To run a forecast scenario without the training phase, select the desired one and click on "RUN INFERENCE ONLY". A pop-up window that shows the progress of this process will appear. You can click on the "X" button to hide the pop-up window, however, the whole process is still seamlessly executed in the background and you can check its progress in the Running tasks area. Once the process is finished, the user will receive a notification near the Top Menu.
The "RUN INFERENCE ONLY" button will be enabled only after the training process has been performed at least once.
Board data is serialized in the same way as in the training process. The MLTable is created in the following way:
- An MLTable column is created for each Entity that is in the Structure of the target Cube
- An MLTable column is for the target Cube
- An MLTable column is created for each covariate Data BlockNew time series cannot be used for inference calls. In case there are new time series, you must perform the training phase again, otherwise the result of the inference call will be zero.
To edit a forecast scenario, select it to bring up the scenario configuration panel and modify the desired settings explained in the paragraph above.
Analytics Procedure steps
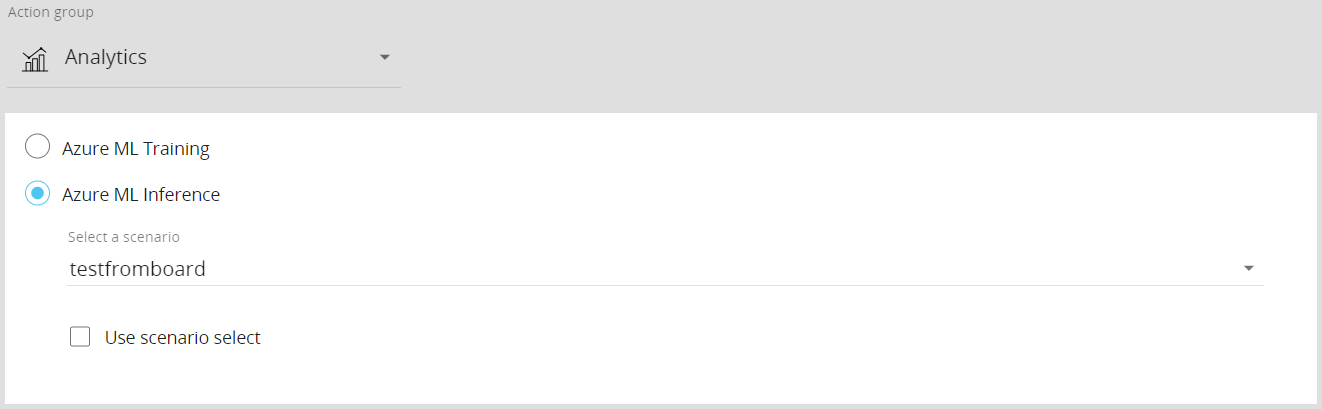
You can run existing Azure ML forecast scenarios from the new dedicated Procedure steps under the new "Analytics" Action group.

The Analytics Action group offers the following steps:
- Azure ML Training. This step allows you to run a previously configured Azure AutoML forecast scenario by performing the training process first and then running an inference.
To configure this step, select the desired scenario from the “Select a scenario” drop-down list.
Enable the “Use scenario selection” option to discard the currently active selection and apply the selection configured in the chosen scenario. If the option is disabled, the forecast will consider only the data related to the members in the active selection at the time when the step is executed.
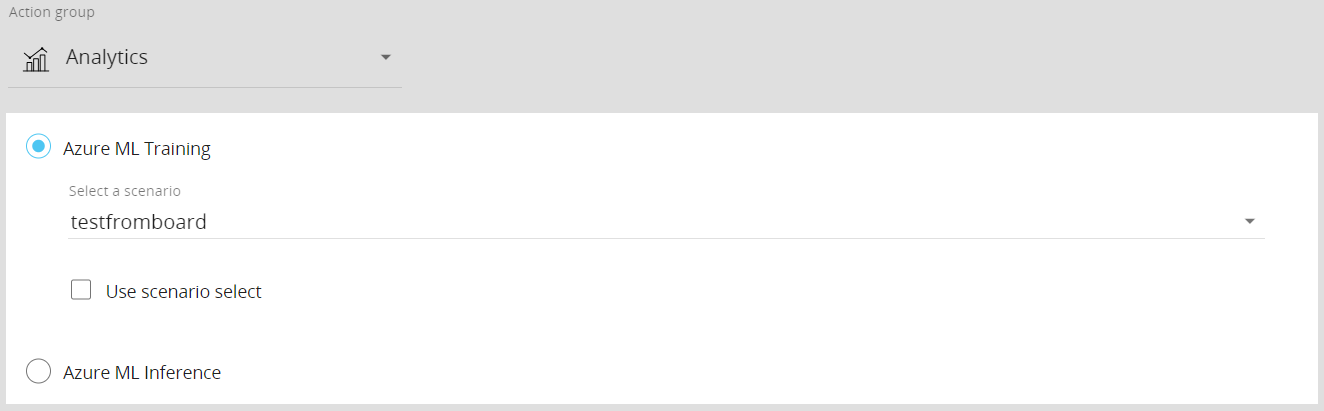
- Azure ML Inference. This step allows you to run the inference phase of a previously configured Azure AutoML forecast scenario based on the latest training phase performed.
The training phase for the selected scenario must have been performed at least once to be able to run inferences only.
To configure this step, select the desired scenario from the “Select a scenario” drop-down list.
Enable the “Use scenario selection” option to discard the currently active selection and apply the selection configured in the chosen scenario. If the option is disabled, the forecast will consider only the data related to the members in the active selection at the time when the step is executed.