Data sources
This topic describes the Data sources section, the information it provides, and its features.
Data source connections allow you to retrieve data from various Data sources through Data reader protocols in order to populate the desired Cubes of a Data model.
In this section, you can create new Data source connections or edit already existing ones.
All Data source connections created within a Platform are stored here.
You can also create Data source connections during the configuration of a Data reader protocol.
To access the Data sources section, access the System Administration space of the desired Platform and click on the Data sources tile. You will be taken to the Data sources page.
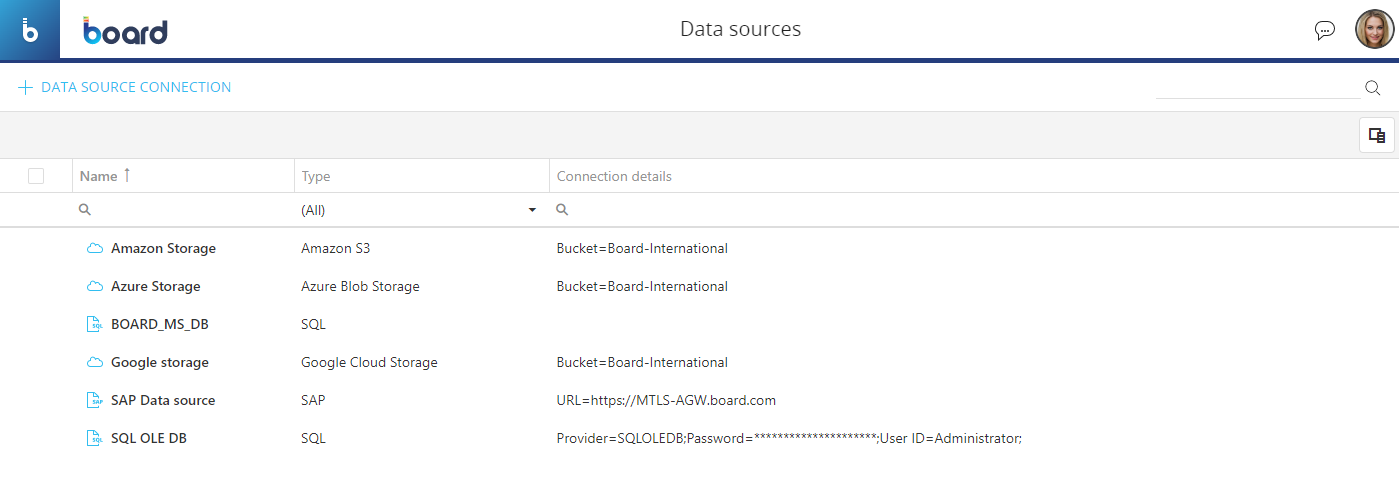
In the Data sources page, you can see all existing Data sources and their main information: the table is sortable and searchable using the interactive header fields. You can also show or hide columns to your liking, by clicking the Column chooser button in the upper right corner of the table.
The table contains the following information:
- Name. This column displays the name of each Data source connection
- Type. This column displays the type of each Data source connection
- Connection details. This column displays specific details about the connection of each Data source
Creating a Data source connection
The type of Data source connections that you can create are the following:
- SQL (which can be OLE-DB or ODBC)
- SAP
- Amazon S3
- Azure Blob Storage
- Google Cloud Storage
Creating a SQL connection
You can create two types of SQL connections:
- OLE-DB
- ODBC
The configuration options vary depending on the type of connection you choose.
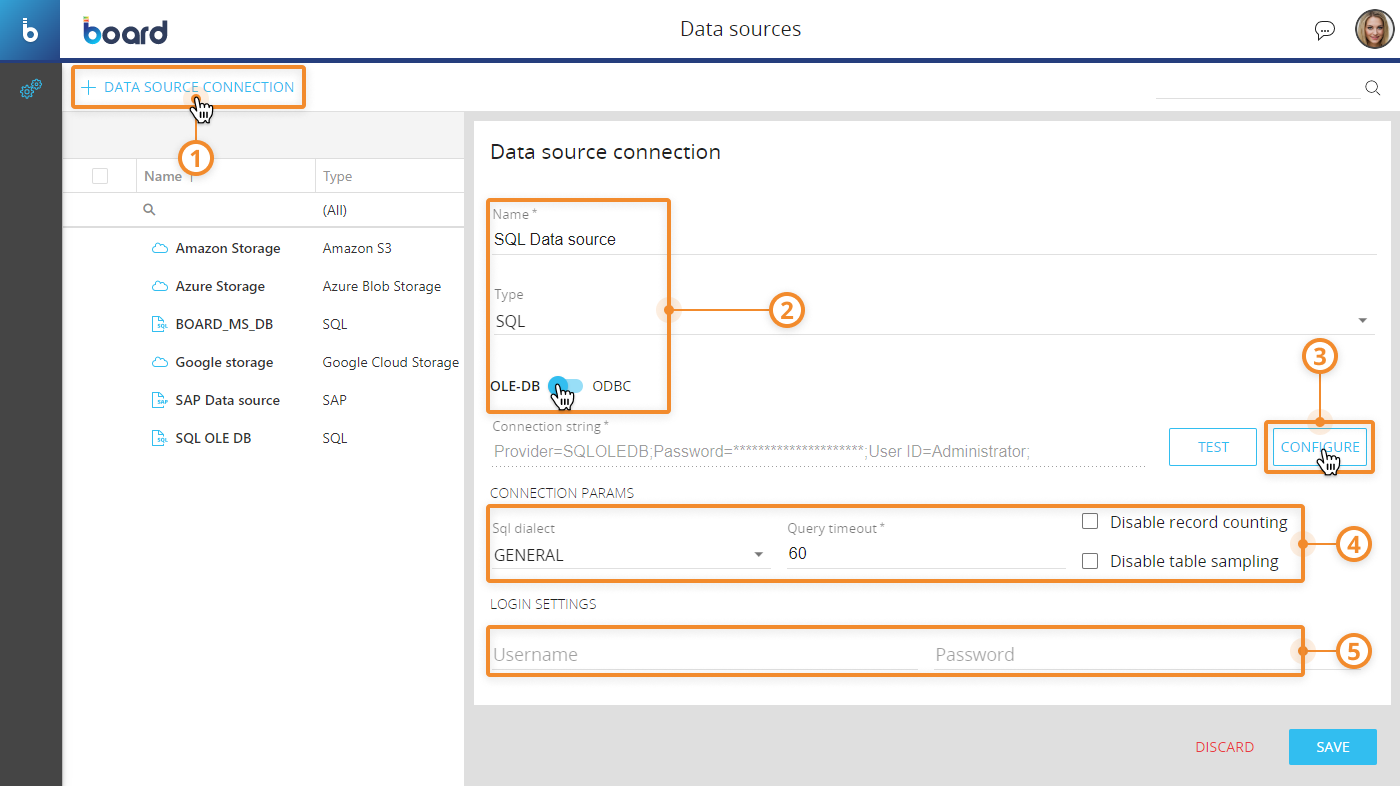
To configure an OLE-DB connection, proceed as follows:
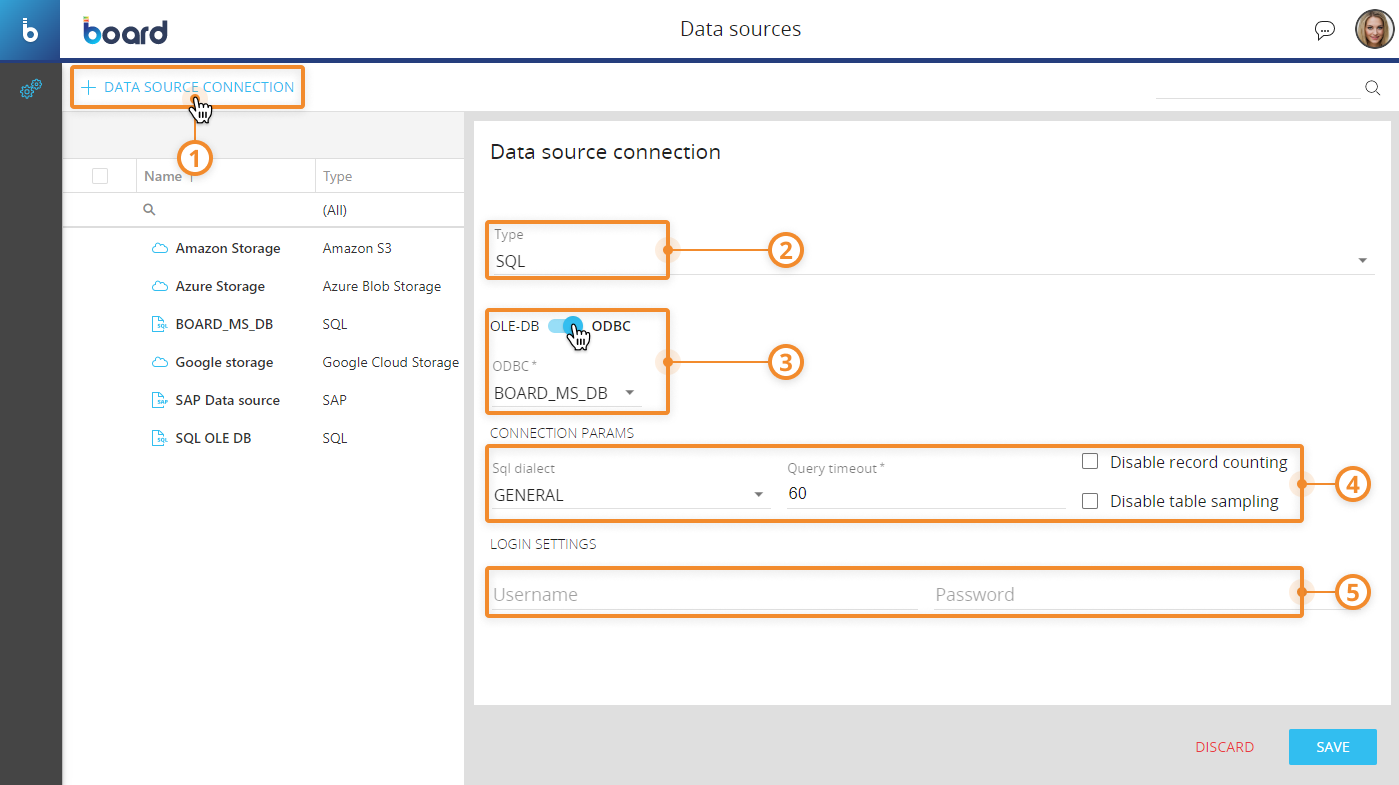
- From the Data sources section of the desired Platform, click on “+DATA SOURCE CONNECTION” in the upper left corner to bring up the configuration panel
- Enter a name for the new connection in the "Name" field and choose "SQL" from the "Type" drop-down list. The "OLE-DB" option below should be enabled by default, if not, click on the toggle to enable it
- Configure the connection string by clicking on the "Connection string" field or on the "CONFIGURE" button at the end of the row. A pop-up window for configuring the connection string will then appear. The connection parameters depend on the provider you want to connect to. Click the "SAVE" button when you're done.
Once you have finished to configure the connection string, you can click on the "TEST" button at the bottom left to test the configured connection.
- Configure the SQL dialect for queries. This can be changed to match whichever database type is in use: if the database you are connecting to is not listed, set the type to "General".
The following properties are available:- Query timeout: set of waiting seconds. When you're using an ODBC database, such as Microsoft SQL Server, there may be delays because of network traffic or heavy use of the ODBC server. Rather than waiting indefinitely, you can specify how long to wait before the database engine produces an error.
If you set a low query timeout value, some queries on the ODBC data sources may always time out: be sure to check the queries you need and set the query timeout value accordingly.
- Disable record counting: Enable/disable counting of affected rows in a query. If disabled, the data reading process completion percentage is not available during the protocol execution
- Disable table sampling: Enable/disable sampling on the Database
- Query timeout: set of waiting seconds. When you're using an ODBC database, such as Microsoft SQL Server, there may be delays because of network traffic or heavy use of the ODBC server. Rather than waiting indefinitely, you can specify how long to wait before the database engine produces an error.
- Enter the credentials in the respective "Username" and "Password" fields. The credentials are required and are defined on the SQL server that you want to connect to
- Click on "SAVE CHANGES" to save the Data source configuration.
To configure an ODBC connection, proceed as follows::
- From the Data sources section of the desired Platform, click on “+DATA SOURCE CONNECTION” in the upper left corner to bring up the configuration panel
- Choose "SQL" from the "Type" drop-down list and enable the "ODBC" option by clicking on the toggle below
- Choose the preferred ODBC SQL server from the "ODBC" drop-down list. The name of the Data source connection will be the same as the chosen ODBC SQL server name.
The ODBC data sources that are displayed in the drop-down list are those configured in the environment where Board is installed. To add new ODBC data sources, proceed as follows:- For Board cloud installations:
- Access the Admin Tool (also known as Administration portal) of the desired Platform
- Click on the "DATA PIPELINE" button in the menu on the left to access the Data Pipeline section
- Click on the "CLOUD DATA PIPELINE PORTAL" button to access the Data Pipeline portal and then log in. You can use the credentials displayed in the Data Pipeline section of the Admin Tool if you are logging in for the first time
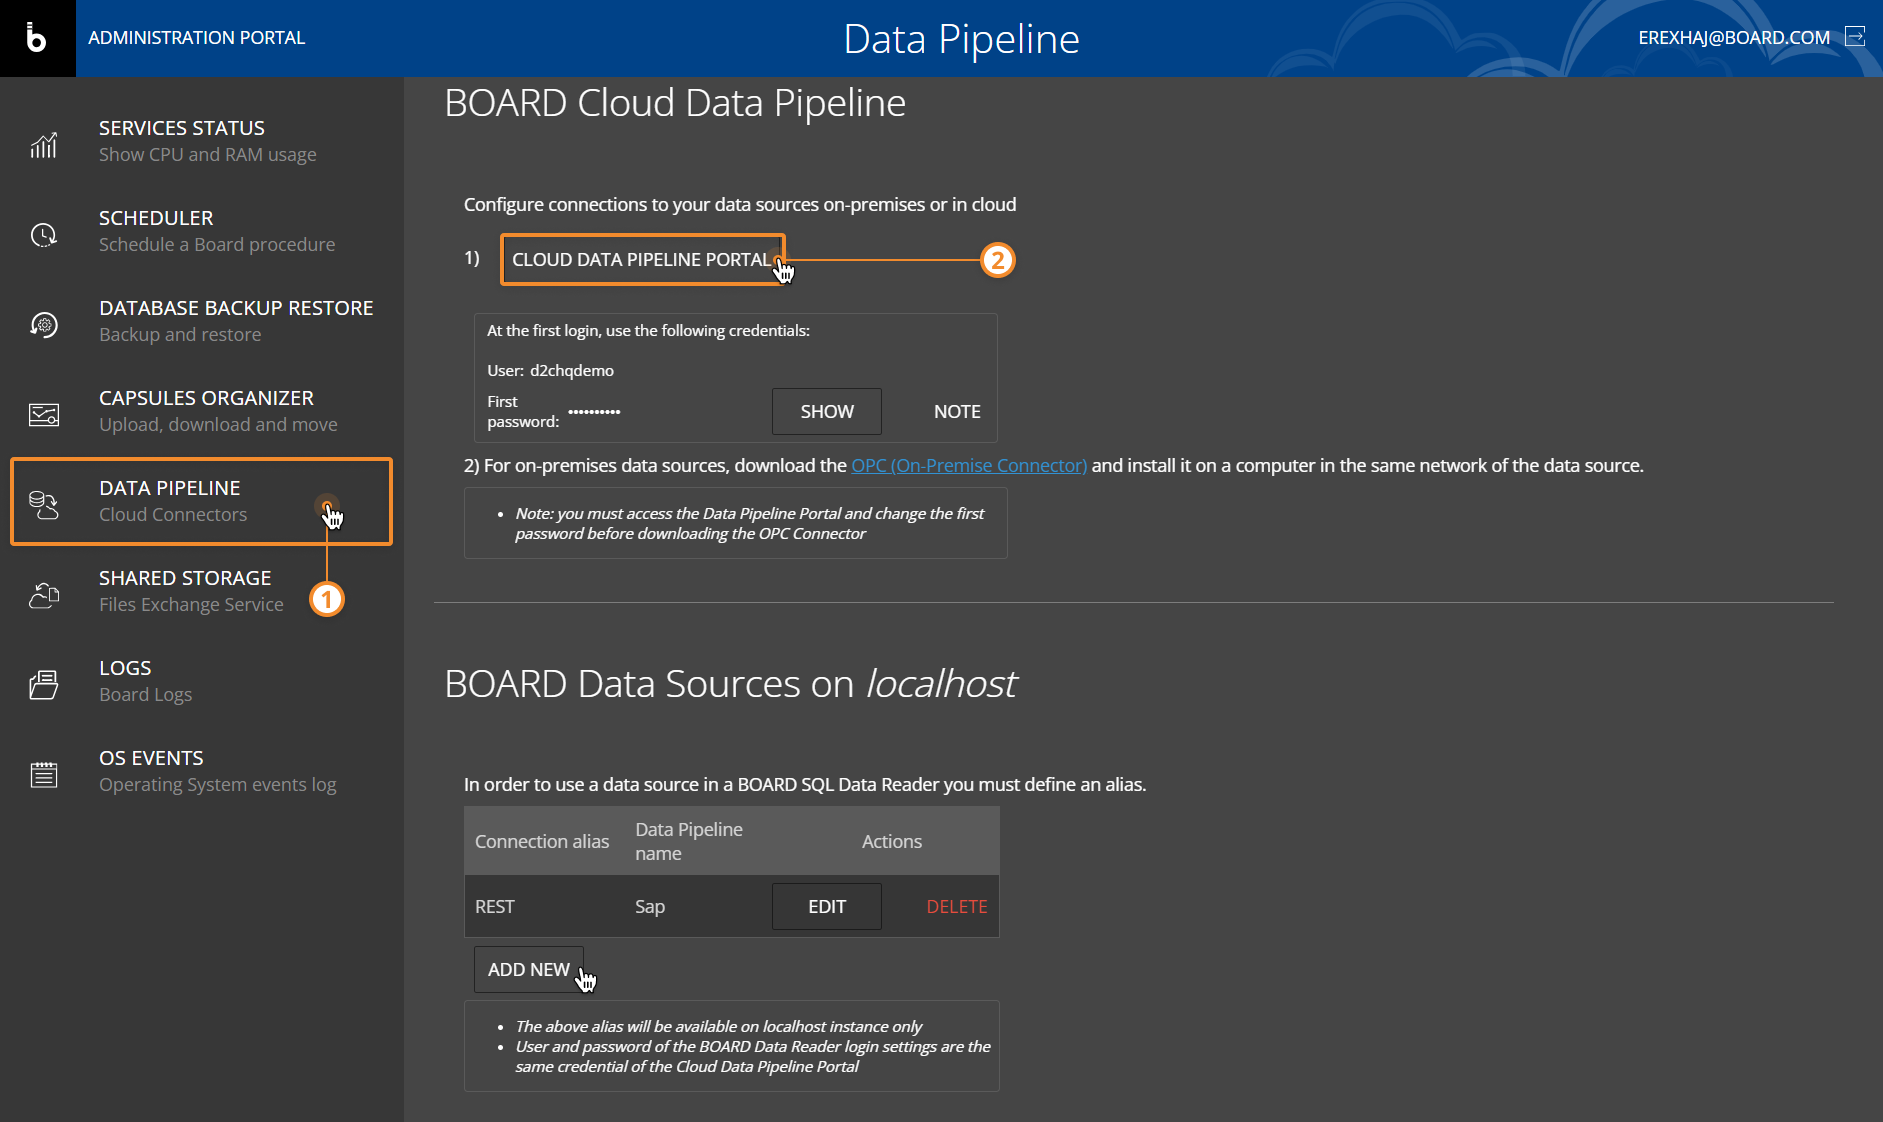
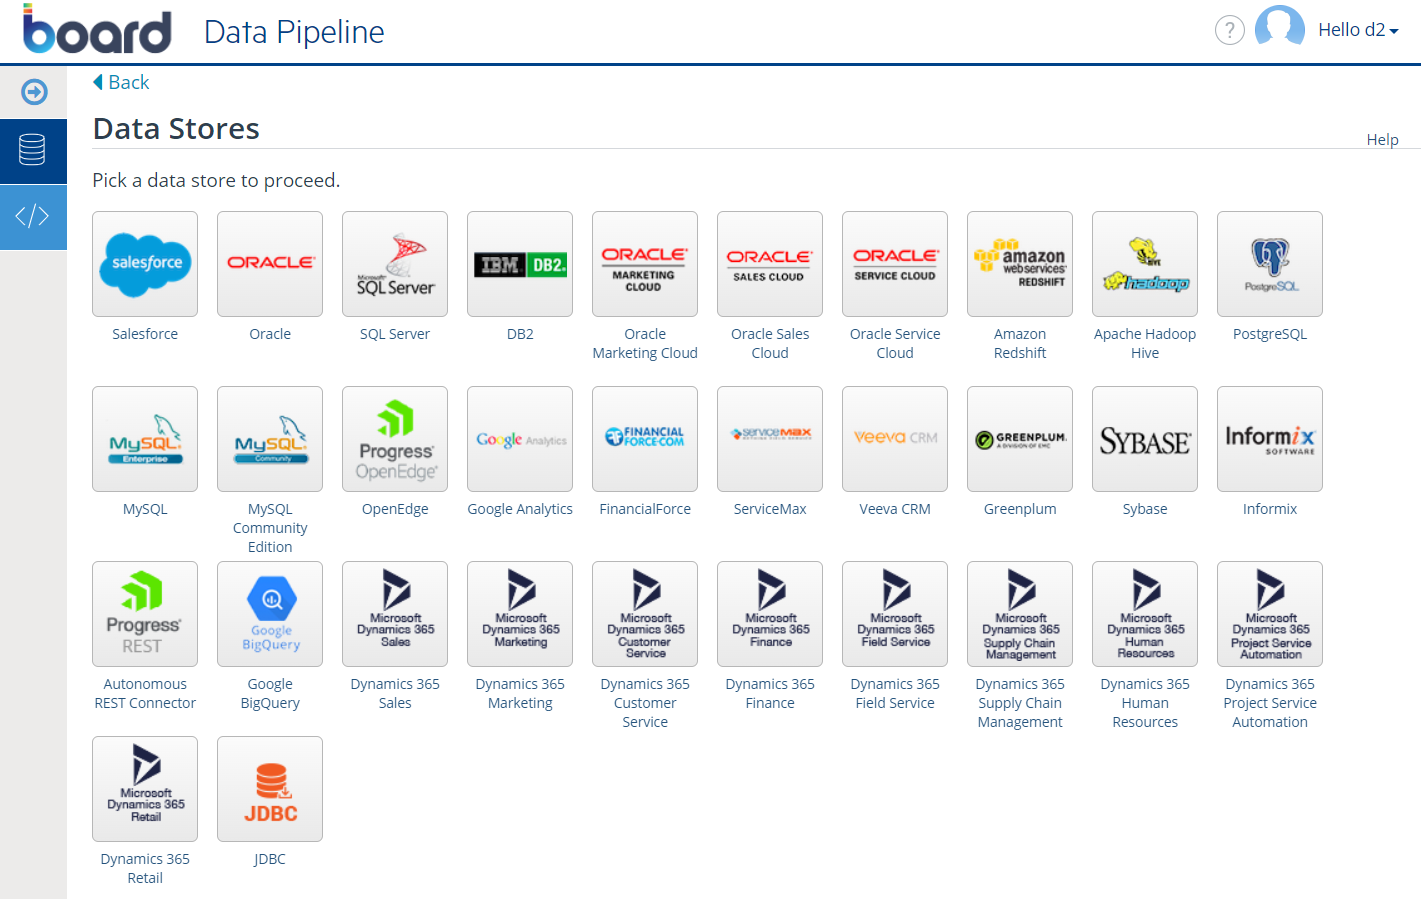
- Click on the "+New Data Source" button in the upper right corner of the Data Pipeline portal page to add a new data source
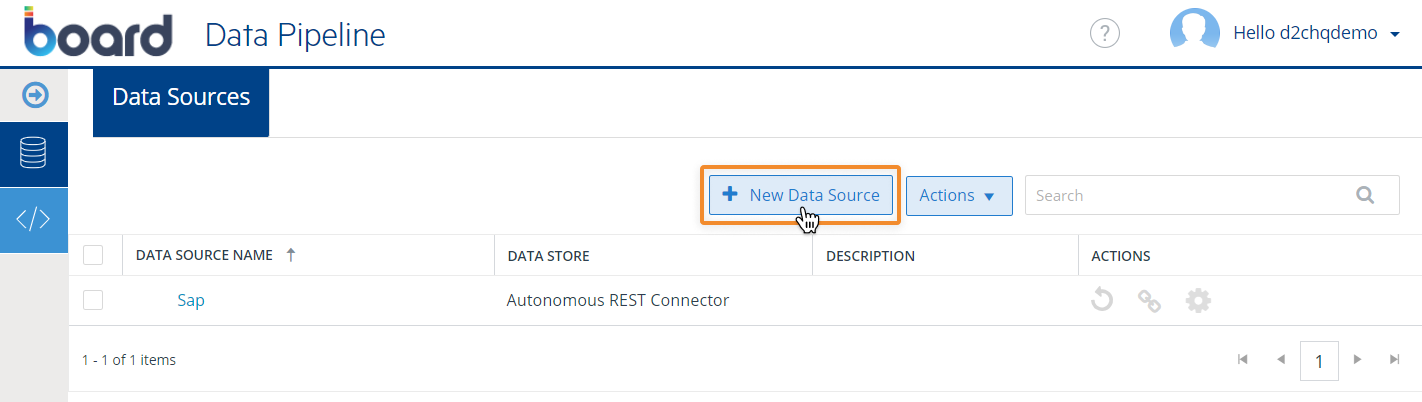
- Click on the desired data source and configure its options. If your data source is located on a local machine (on-premises), for example a MySQL database, then you will need to install the On-Premise Connector (OPC) on that machine or another one in the same network and connect it with the Cloud Data Pipeline Portal of your Platform. See this page for more information
- After configuring the data source connection, return to the Data Pipeline section of the Admin Tool and click on the "ADD NEW" button at the bottom of the page. A pop-up window will appear

- Enter an alias in the "Connection name" field. This is the name that will appear in the "ODBC" drop-down list in the Data sources section of Board
- Enter the name of the data source in the "Data source name" field. The data source is the one you configured in the Cloud Data Pipeline Portal
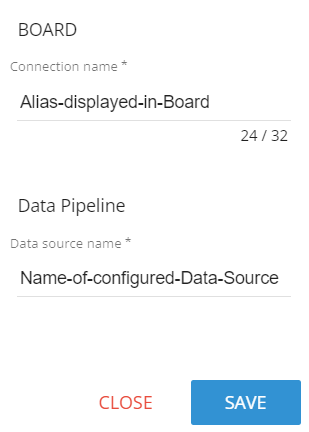
- Click on "SAVE"
- For on-premises Board installations:
- Open the ODBC Data Source Administrator (64bit version) in the machine where Board is installed by going in the Control Panel, clicking on Administrative Tools (inside the "System and Security" category), and finally clicking on "ODBC Data Sources". See this page for more information
- Go to the "System DNS" tab
- Click on "Add" to add and configure your desired ODBC data source
- When done, click "OK"
- For Board cloud installations:
- Configure the SQL dialect for queries. This can be changed to match whichever database type is in use: if the database you are connecting to is not listed, set the type to "General". The following properties are available:
- Query timeout: set of waiting seconds. When you're using an ODBC database, such as Microsoft SQL Server, there may be delays because of network traffic or heavy use of the ODBC server. Rather than waiting indefinitely, you can specify how long to wait before the database engine produces an error.
If you set a low query timeout value, some queries on the ODBC data sources may always time out: be sure to check the queries you need and set the query timeout value accordingly.
- Disable record counting: Enable/disable counting of affected rows in a query. If disabled, the data reading process completion percentage is not available during the protocol execution
- Disable table sampling: Enable/disable sampling on the Database
- Query timeout: set of waiting seconds. When you're using an ODBC database, such as Microsoft SQL Server, there may be delays because of network traffic or heavy use of the ODBC server. Rather than waiting indefinitely, you can specify how long to wait before the database engine produces an error.
- Enter the credentials in the respective "Username" and "Password" fields. The credentials are required and are defined on the SQL server that you want to connect to
- Click on "SAVE CHANGES" to save the Data source configuration.
You can also create this type of Data source connection during the configuration of a Data reader protocol.
Creating a SAP connection
To configure a Data source connection to a SAP server, proceed as follows:
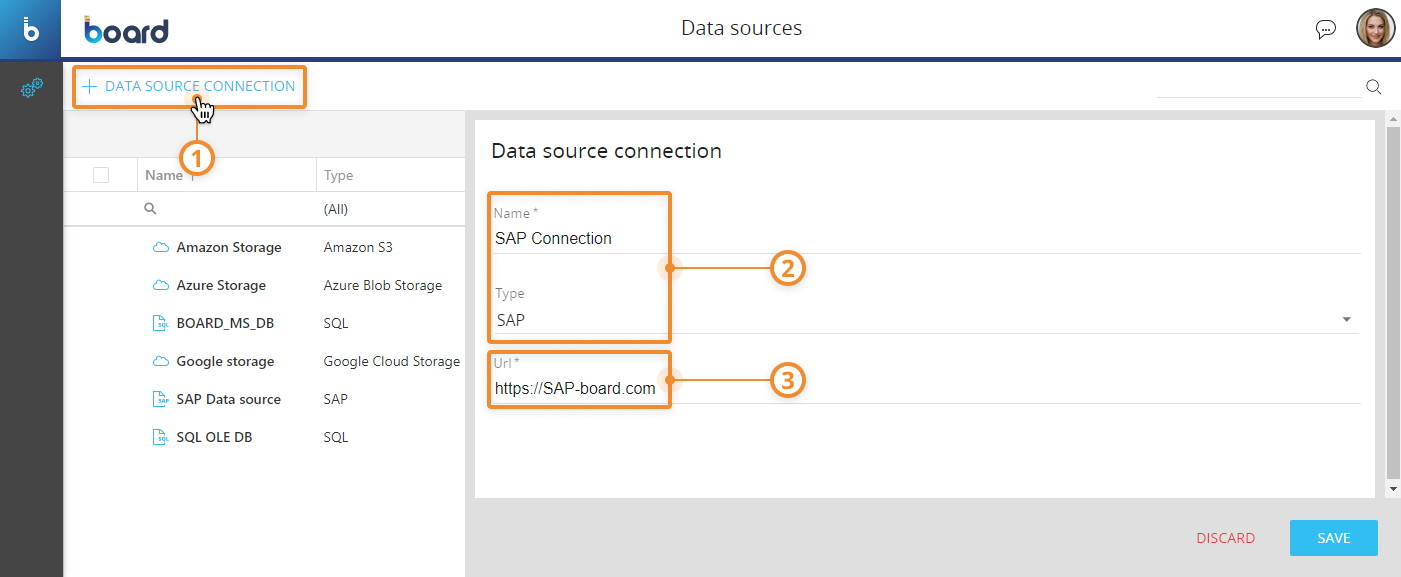
- From the Data sources section of the desired Platform, click on “+DATA SOURCE CONNECTION” in the upper left corner to bring up the configuration panel
- Enter a name for the new connection in the "Name" field and choose "SAP" from the "Type" drop-down list
- Enter the address of the SAP connector Server in the "Url" field
- Click on "SAVE CHANGES" to save the Data source configuration.
You can also create this type of Data source connection during the configuration of a Data reader protocol.
Connection to cloud storage services
If you want to set up a Text file Data reader and the file you wish to read is stored on a cloud storage service, you need to configure a connection to it in the Data sources section of Board.
Board supports the following cloud storage services:
- Amazon S3
- Azure Blob Storage
- Google Cloud Storage
Creating an Amazon S3 connection
To configure a Data source connection to an Amazon S3 cloud storage, proceed as follows:
- From the Data sources section of the desired Platform, click on “+DATA SOURCE CONNECTION” in the upper left corner to bring up the configuration panel
- Enter a name for the new connection in the "Name" field and choose "Amazon S3" from the "Type" drop-down list
- Enter the Client Key in the "Client Key" field
- Enter the Client Secret in the "Secret" field
- Enter the AWS Region in the "Region" field
- Enter the name of the desired S3 bucket container in the "Bucket name" field
- Click on "TEST CONNECTION" to perform a connection test and then click on "SAVE" to save the new Data source connection.
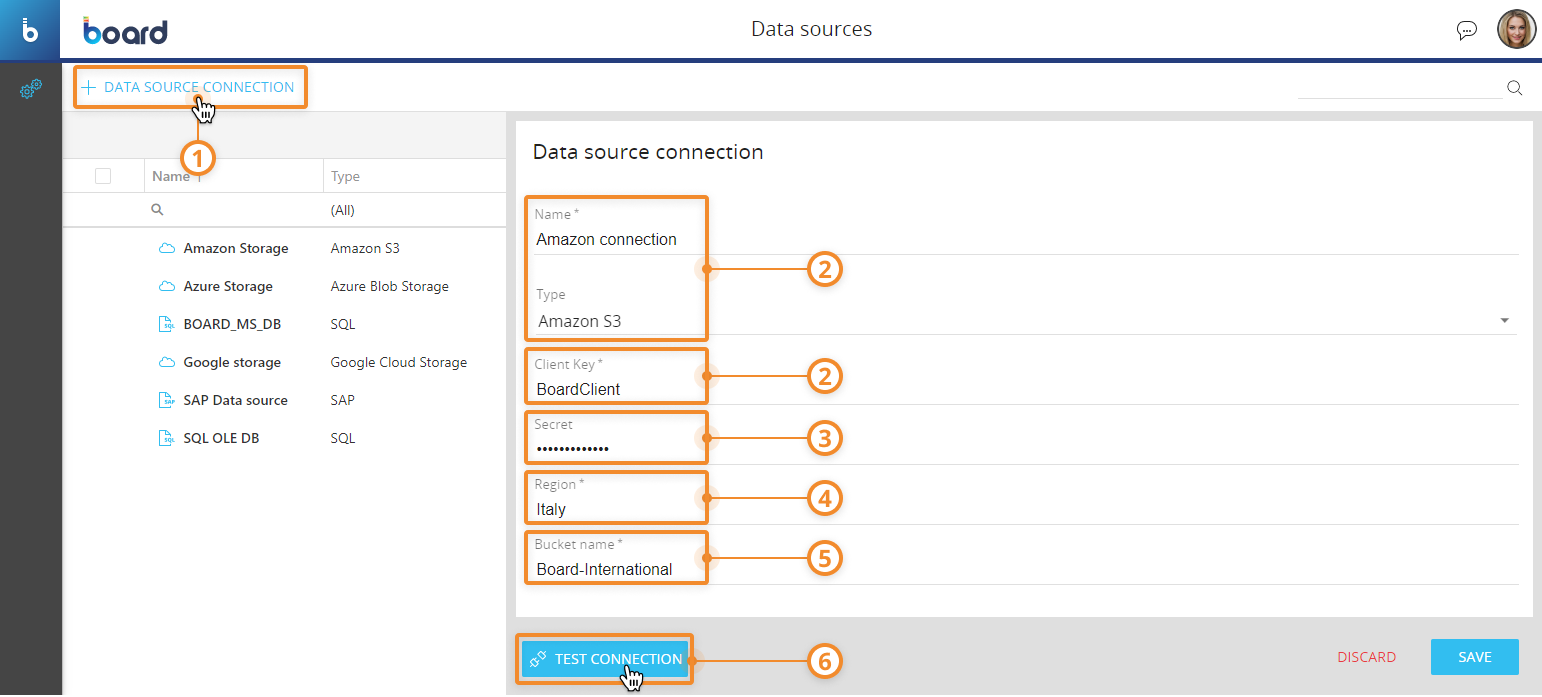
Fields marked with an asterisk (*) are required
Please refer to Amazon S3 documentation for more details.
Creating an Azure Blob Storage connection
To configure a Data source connection to an Azure Blob storage, proceed as follows:
- From the Data sources section of the desired Platform, click on “+DATA SOURCE CONNECTION” in the upper left corner to bring up the configuration panel
- Enter a name for the new connection in the "Name" field and choose "Azure Blob Storage" from the "Type" drop-down list
- Enter the connection string of the desired Azure Storage Account in the "Connection string" field
- Enter the name of the desired Azure Blob container in the "Container name" field
- Click on "TEST CONNECTION" to perform a connection test and then click on "SAVE" to save the new Data source connection.
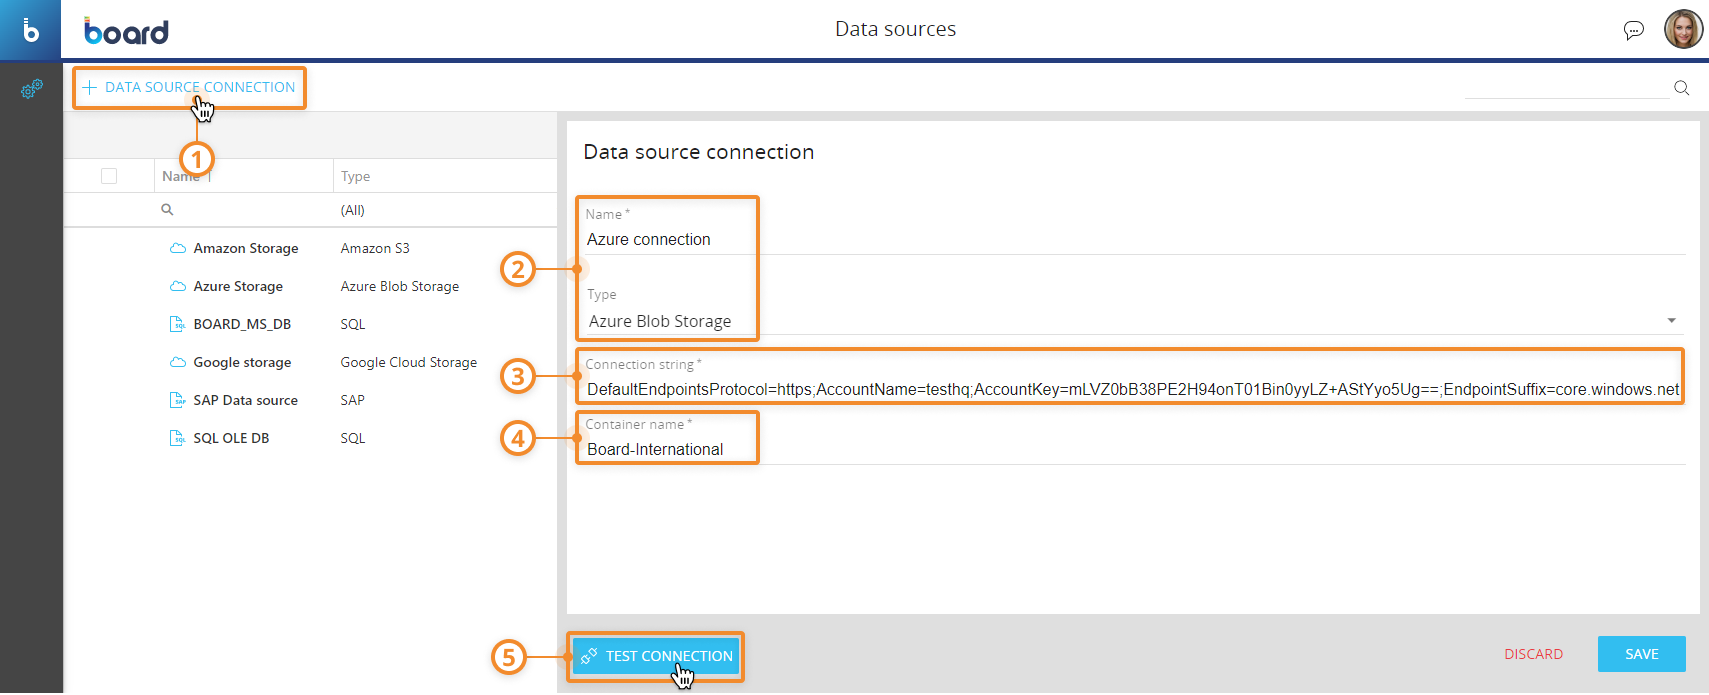
Fields marked with an asterisk (*) are required
Please refer to Azure Blob Storage documentation for more details.
Creating a Google Cloud Storage
To configure a Data source connection to a Google Cloud storage, proceed as follows:
- From the Data sources section of the desired Platform, click on “+DATA SOURCE CONNECTION” in the upper left corner to bring up the configuration panel
- Enter a name for the new connection in the "Name" field and choose "Google Cloud Storage" from the "Type" drop-down list
- Enter the key of the desired Google service account in the "Service account key" field
- Enter the name of the desired Google Cloud bucket container in the "Bucket name" field
- Click on "TEST CONNECTION" to perform a connection test and then click on "SAVE" to save the new Data source connection.
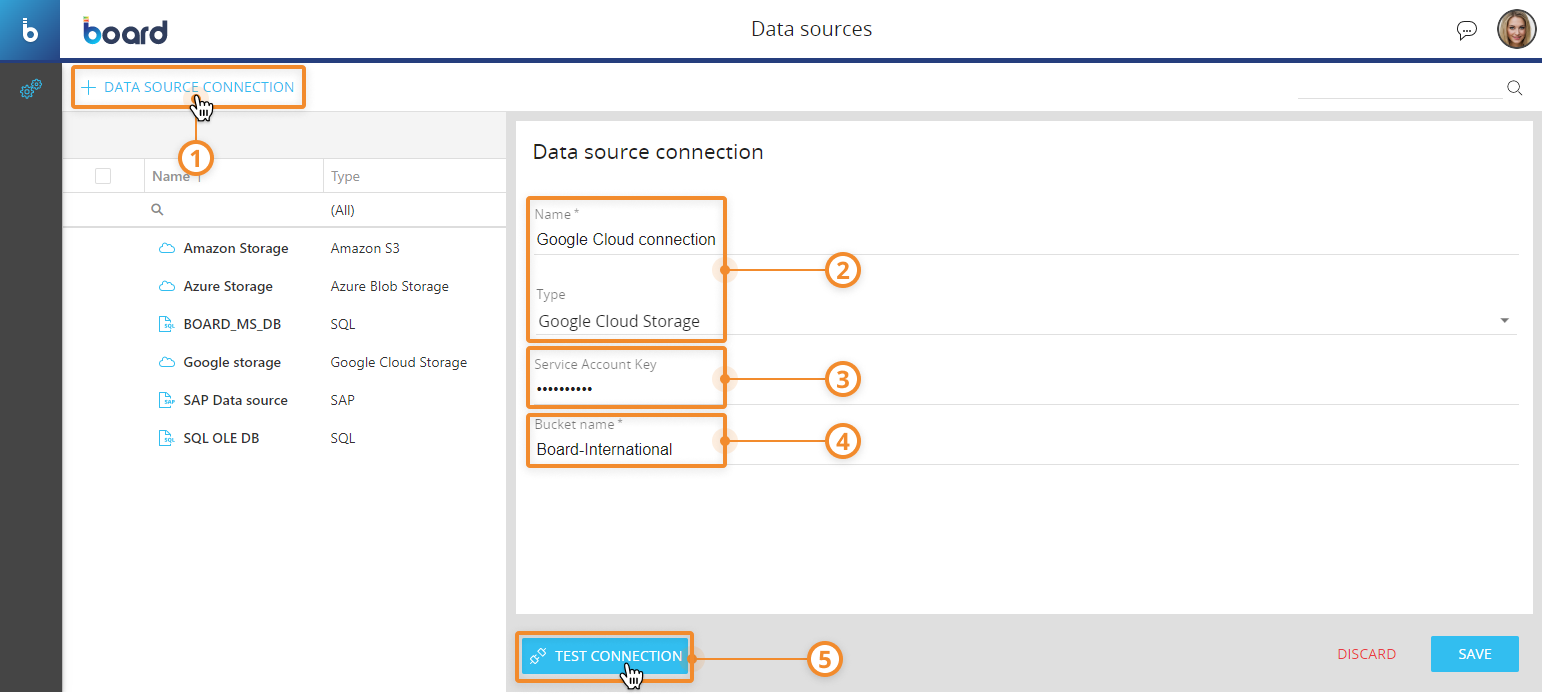
Fields marked with an asterisk (*) are required
Please refer to Google Cloud storage documentation for more details.
Managing a Data source connection
To edit a Data source connection, select it and modify the desired options in the configuration panel explained in the steps above.
To delete one or more Data source connections, select the desired ones and then click on the "DELETE" button above the table.
To retrieve data from a Data source through a Data reader, follow the instructions in this page.