The Time Range section
This topic describes the Time Range section of a Board Data model and its specific properties.
From the Time Range section of a Data model, you can review and change settings related to Time Entities and their Relationship within the Data model.
When you created the Data model, you had to define the time range of your data: this initial configuration usually reflects your existing data lifespan and extends for a few years in the future for planning purposes.
Sometimes you may need to change or update the time range of your data. For example, you may decide to shift the time range to 2019-2023 to include budgeting for the year ahead or you could shift to 2019-2022, removing one year of past data which is no longer relevant.
The minimum length of a time range is one year: in that case, the start year and the end year are the same.
The maximum extent of a time range is 110 years with the earliest being 1990 and the latest 2100.
Changing the Time range
You can always change an existing time range, but some modifications require additional data management activities.
The following modifications can be done at any moment and don‘t require any reload of the data:
- Increasing the end year value (extend future years)
- Adding or removing time Entities
The following modifications will clear all data in Cubes of the Data model, to ensure it is restructured in the most efficient way:
- Changing the start year (extending or removing data relating to years)
- Decreasing the end year (removing data for future years)
To preserve some or all of the data, the Data model should first be extracted and then reloaded once the modification is made.
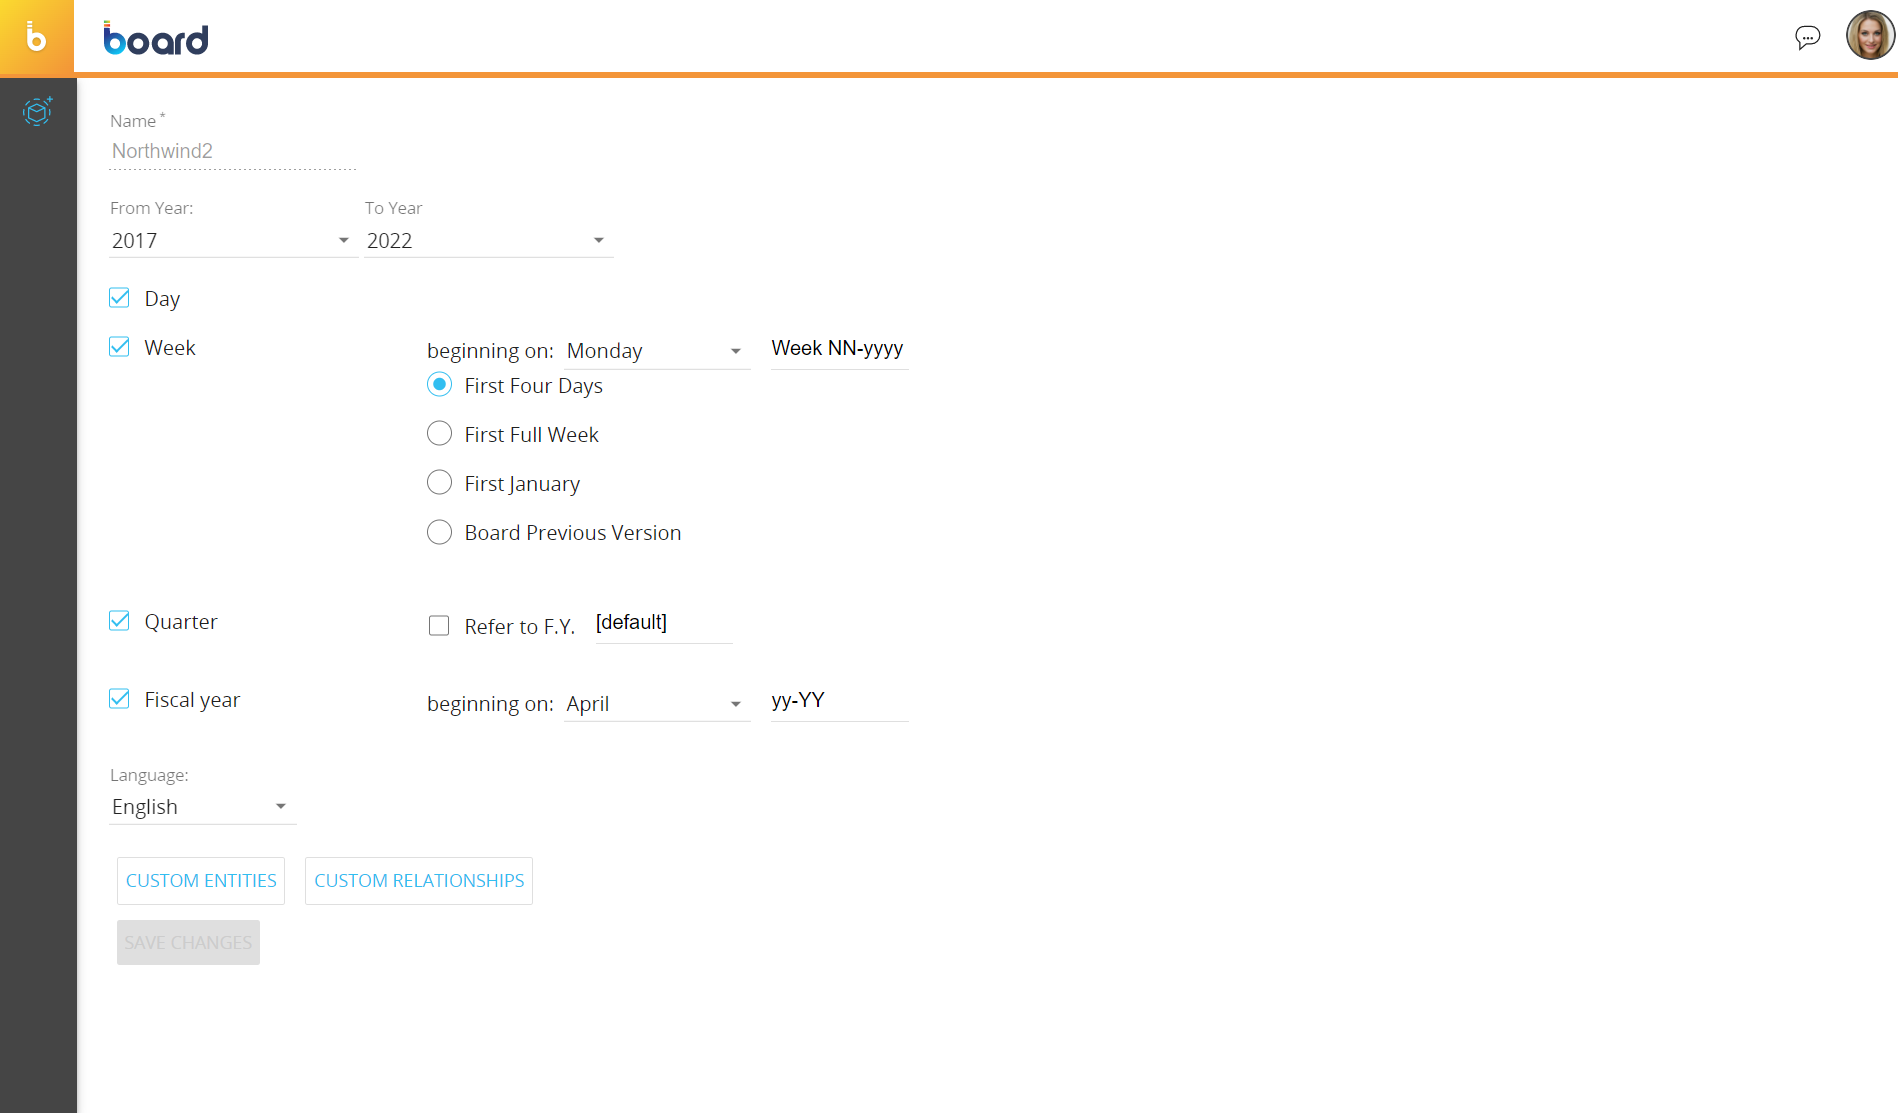
Default time Entities
For settings about the Day, Week, Quarter, and Fiscal Year time Entities, please refer to this page.
Language
From this dropdown menu, you can change the language of the time Entities descriptions (names of the months, etc.).
All Board Data models are Unicode-based, so they can support all double-byte languages such as Chinese, Japanese, and Korean.
Other options
Custom time Entities
The "CUSTOM TIME ENTITIES" button allows you to create up to four custom time Entities.
With custom time Entities you can add new units of time (or time intervals) to the standard calendar, for example "Season" or "Promotion".
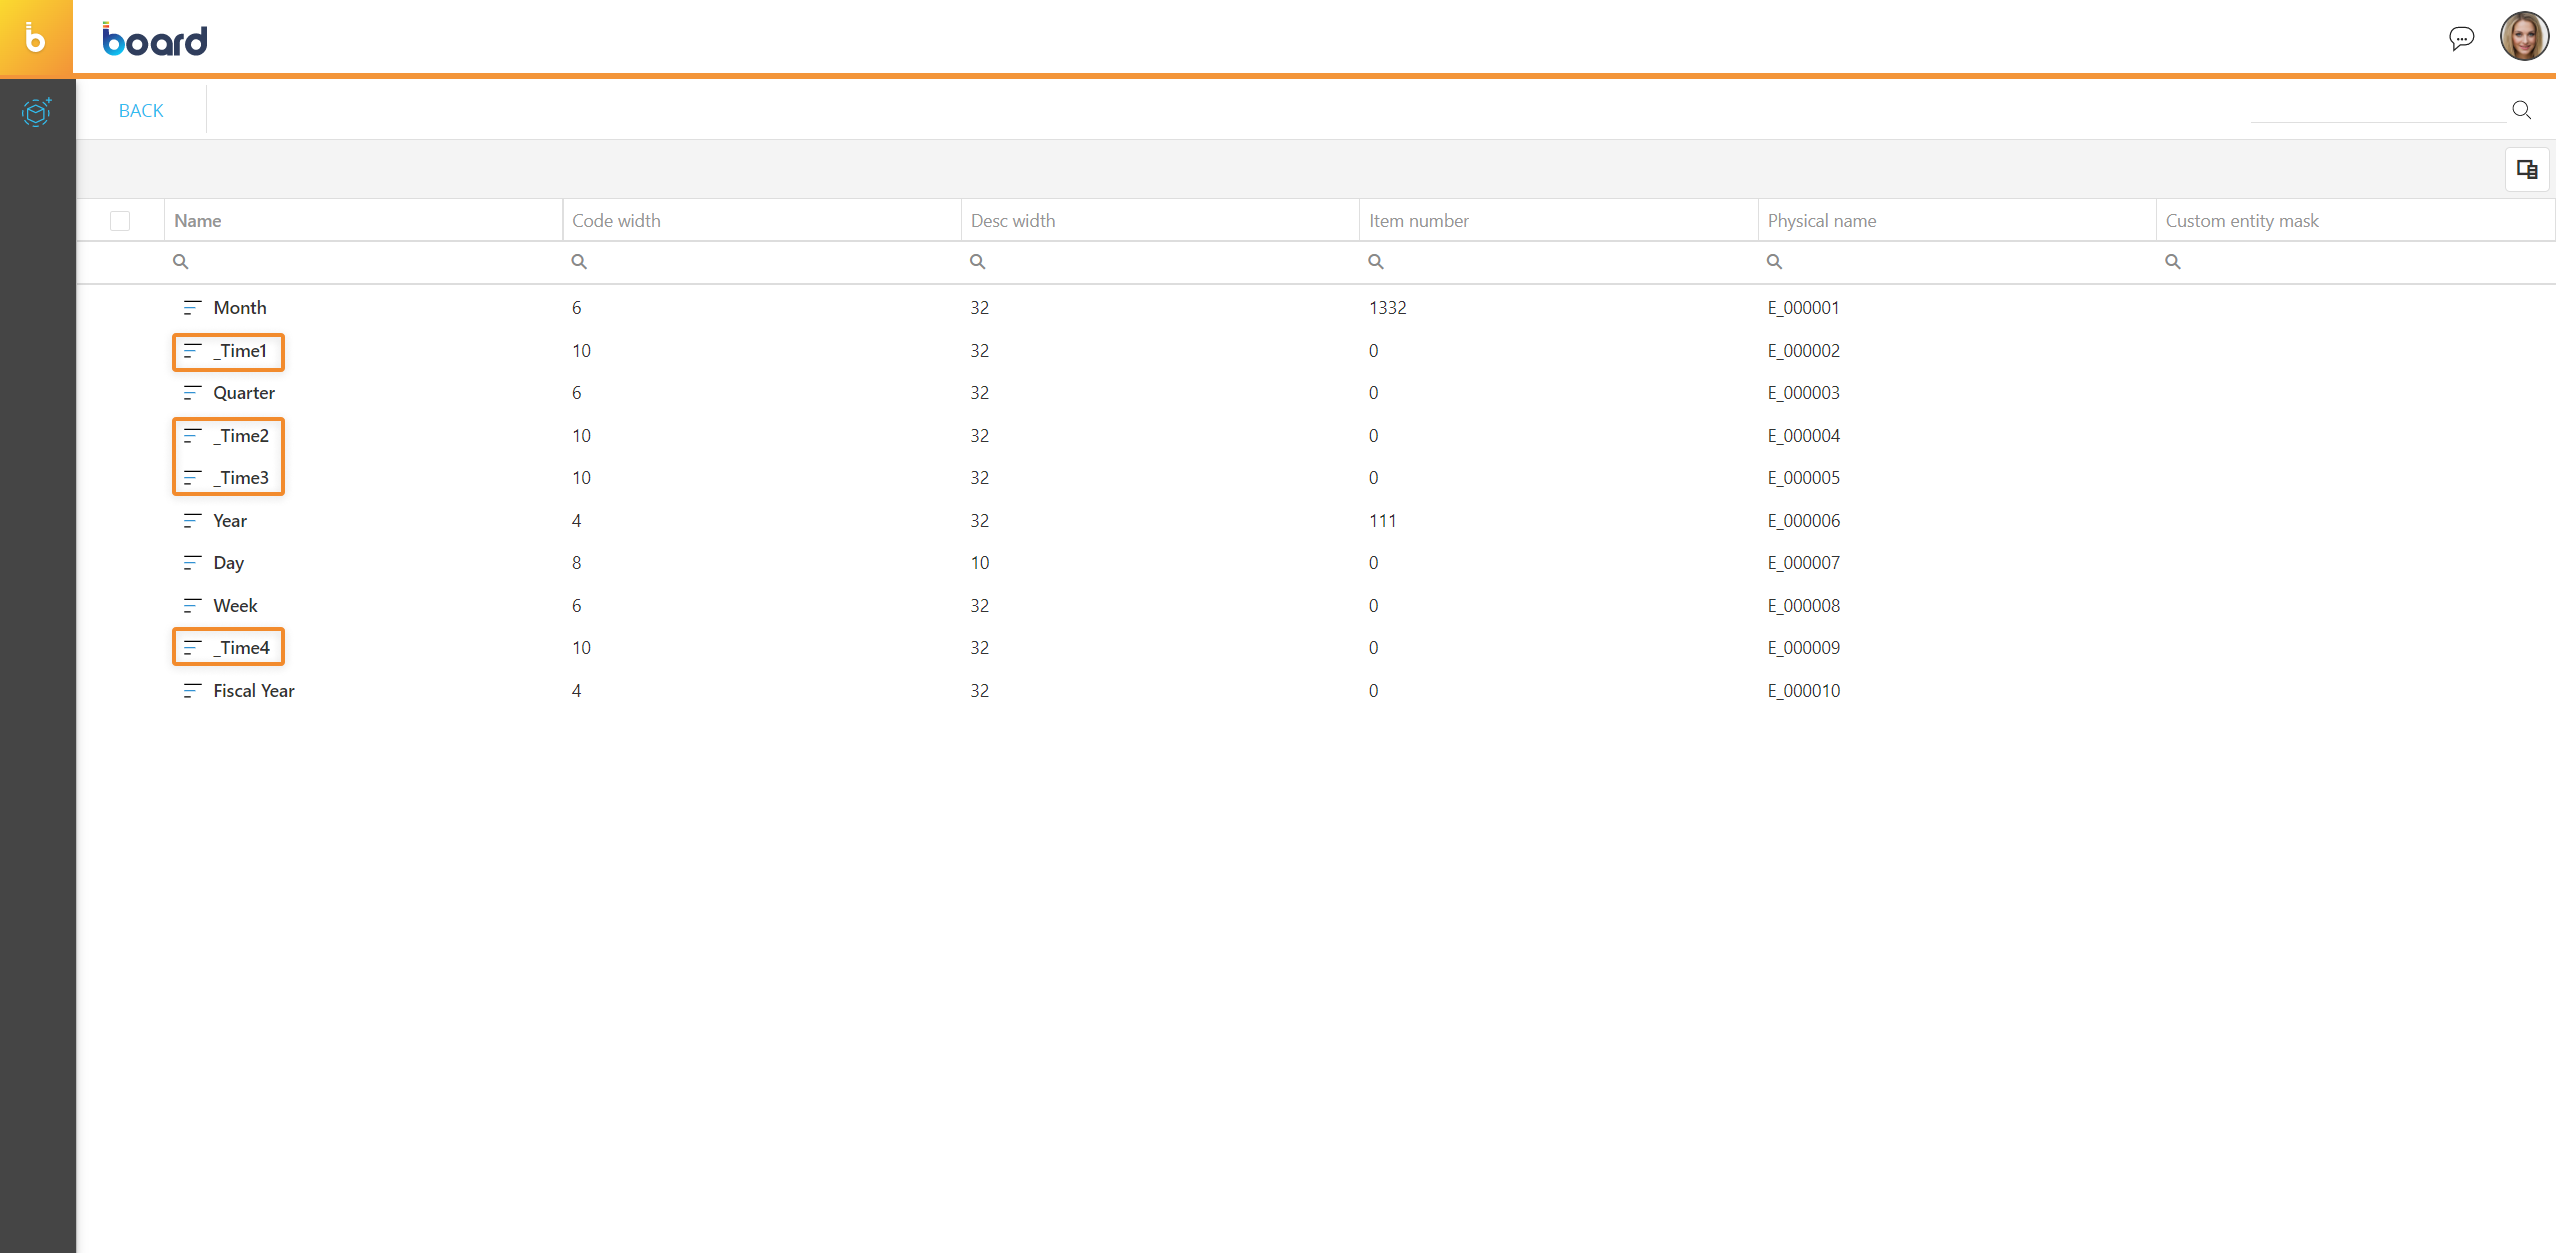
To access the time Entity configuration page, click the corresponding button. In the time Entities page, you can see all existing time Entities for the Data model and their main information: the table is sortable and searchable using the interactive header fields. You can also show or hide columns to your liking, by clicking the Column chooser button in the upper right corner of the table.
To create a custom time Entity, locate one of the four Entities whose is "_TimeN", where "N" is a number from 1 to 4, then edit the Entity properties and apply all necessary changes in the properties panel that appears on the right.
The "Custom entity mask" property in the properties panel allows you to enable a custom calendar on which to apply the "Previous Year" and "Yearly Cumulated Value" functions.
A custom calendar can be one year made of 13 custom time periods, and each period could be an aggregation of a certain number of days, weeks or months. It could even be a standalone Entity not related to the Board's standard time Entities. With the custom calendar you can create a custom calendar that follows the typical 4-4-5 weeks convention or other ad-hoc retail calendars. A custom calendar is defined by the corresponding custom time Entity.
In order to enable this function, the custom time Entity must contain the year as part of the code of its members.
For example, members of a custom time Entity could have these kinds of codes: 2022/01, 2022/02, 2022/13, 2023/01, 2023/02, 2023/13, and so on.
To activate the custom calendar function, the part of the code that contains the year must be defined through a Custom Entity mask. This mask drives the code convention for that Entity: use the letter "Y" for each digit that represents the year and a "-" (hyphen) for other parts of the code.
The characters representing the year must be numerical. The rest of the code can be alphanumeric and can include separators and spaces.
The number of characters in the Entity mask must match the code width value.
Examples of possible custom Entity masks.
| Mask | Description | Example |
| YYYY--- | The first four characters represent the year, followed by three other characters that represent a period of that year | 202201 |
| ----YY | The first four characters represent the period of the year. The year is represented by the last two characters | 000122 |
| --YY---- | The year is represented by the two characters after the first two characters of the code | 0122aabb |
Once the mask is created, the Entity will be shown in the calendar dropdown menu of the time functions, in the Layout editor. In the following example, the custom time Entity is "Season":
Custom time Entities are also supported by the "Current Date" option of the Dynamic Select function and the "Current Period", "Previous Period", and "Last Period" options of the Pager Object.
To learn how to edit an existing Entity and to add new Entity members, please refer to this page.
Custom Relationships
Once you have created one or more custom time Entities, you have to define their Relationship with other existing time Entities.
For example, if you want to add the "Season" custom time Entity (where a "season" is a group of months), after creating the custom time Entity "Season" you must create a Relationship with the standard "Month" Entity and define which months belong to which seasons.
To do so, click on the "CUSTOM RELATIONSHIPS" button and, from the Relationship configuration page, drag and drop the standalone parent time Entity onto the chosen child time Entity. Unless you need to create a new time Entities relationship tree, all indirect Relationships with other default time Entities will be automatically defined by Board.
The ANALYZE action available in the top left corner of the Relationships page allows you to fix missing Relationships, at the member or Entity level.
To learn how to create a new Relationship and how to use the ANALYZE action, please refer to this page.