Managing Entities
This topic describes various common tasks that administrators can perform on Entities.
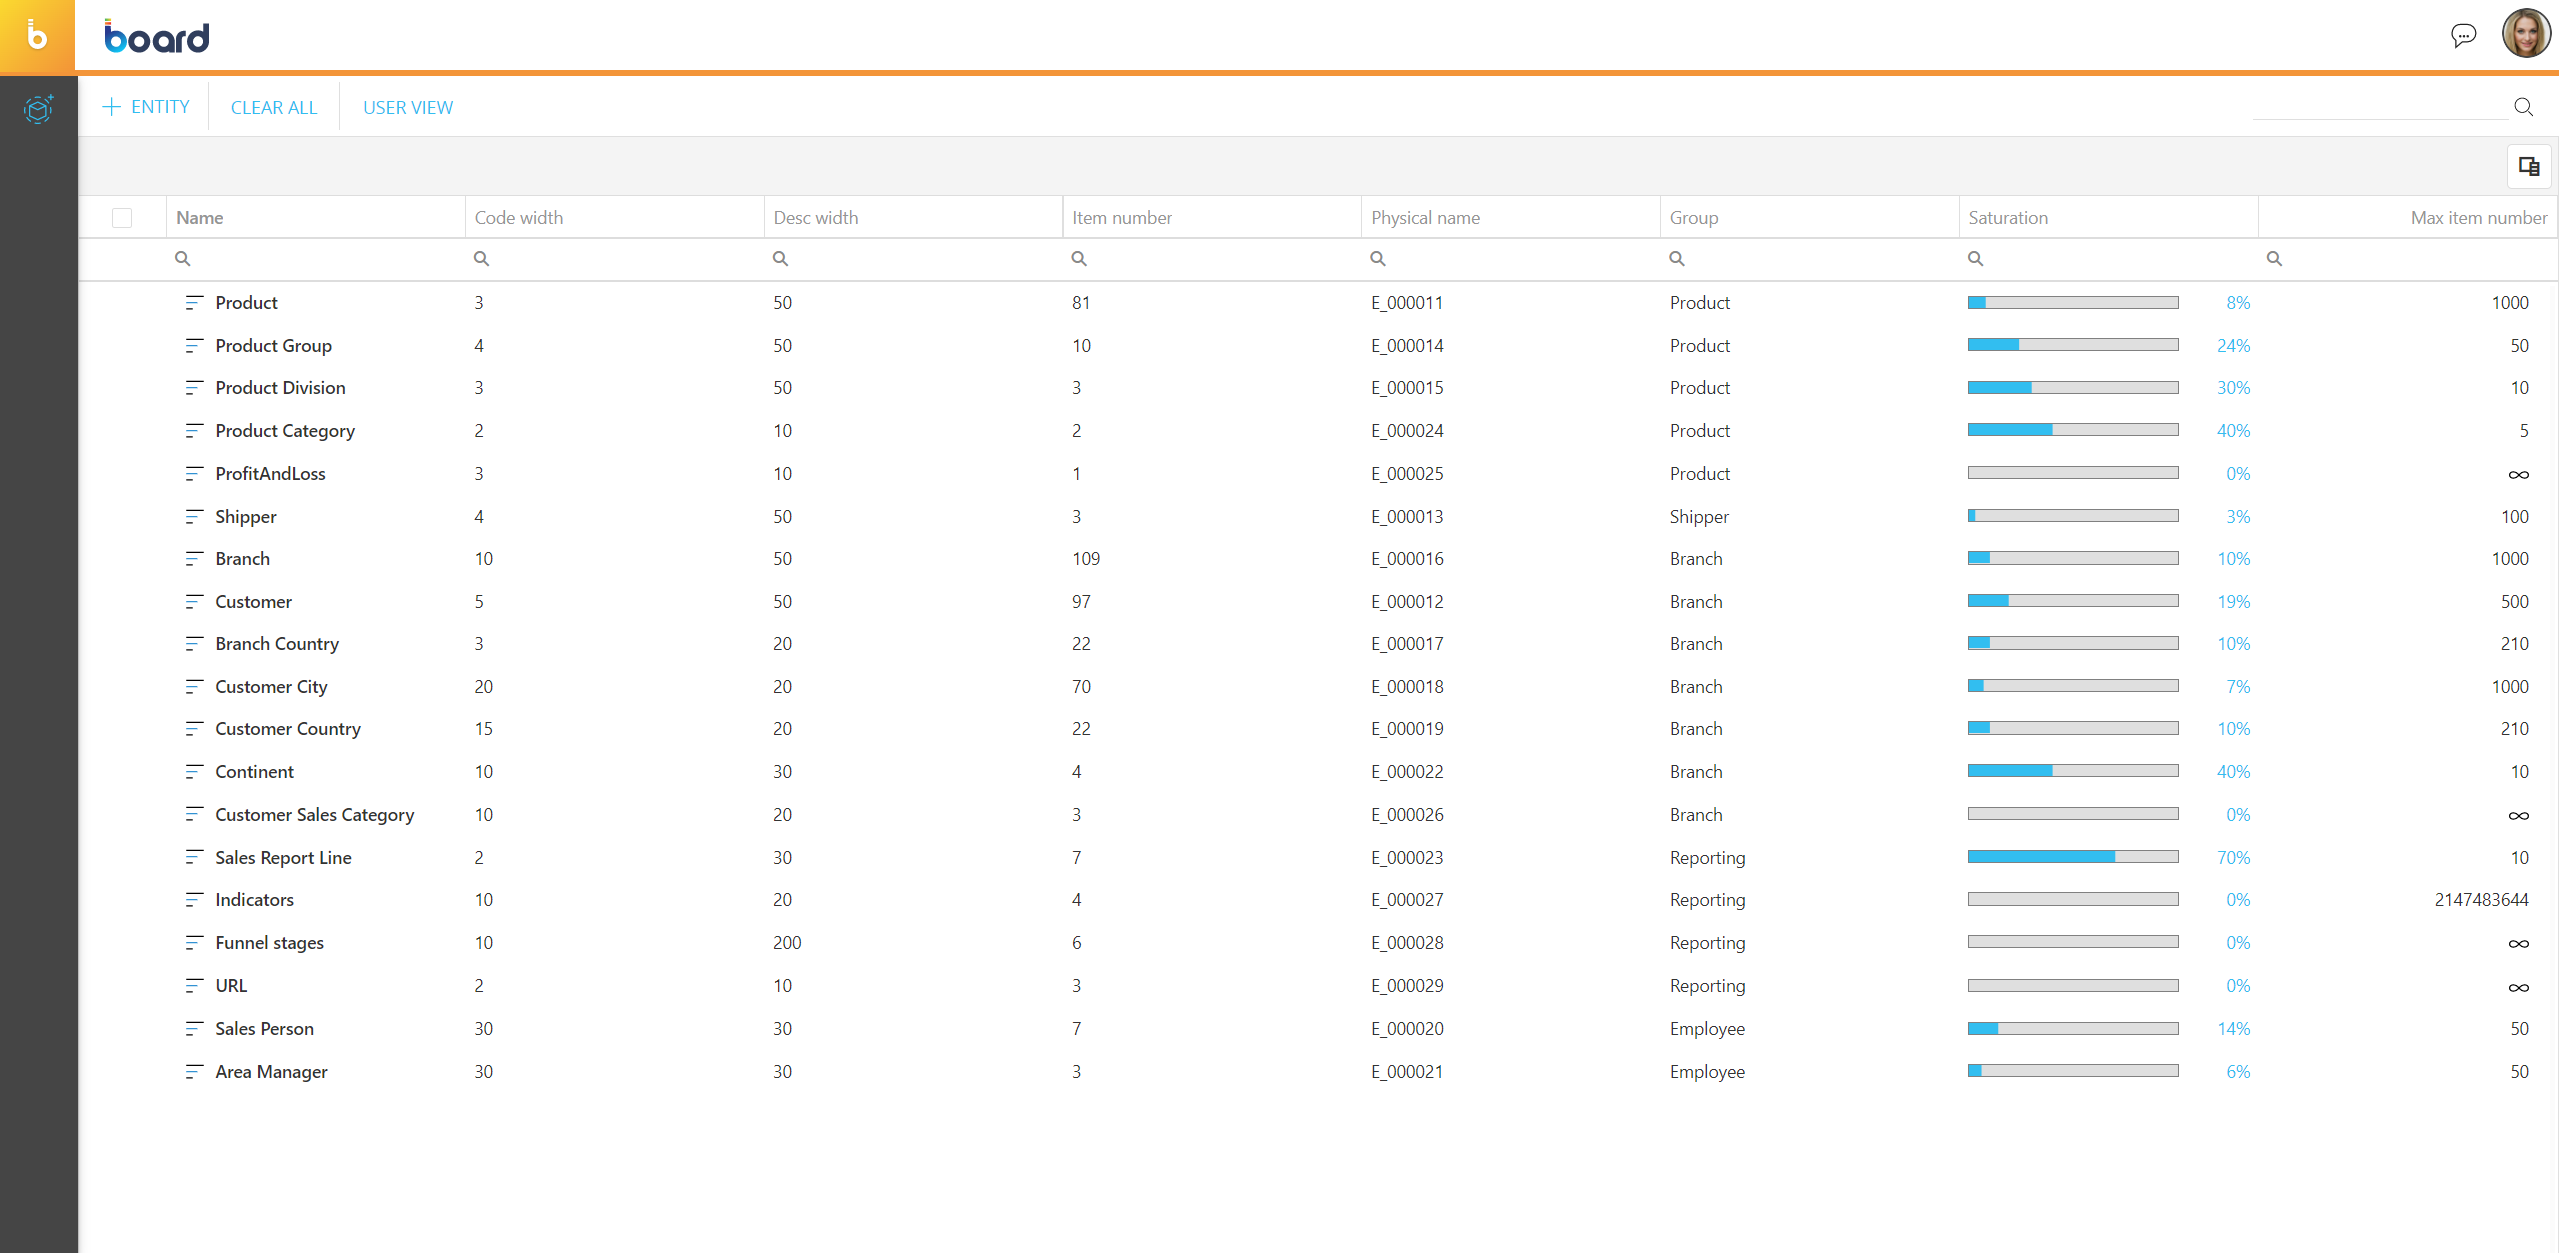
In the Entities home page, you can see all existing Entities and their main information: the table is sortable and searchable using the interactive header fields. You can also show or hide columns to your liking, by clicking the Column chooser button in the upper right corner of the table.
See Creating an Entity for more details about Entity properties.
You can perform different actions on one or more Entities by selecting them and by clicking on the different buttons above the Entity list or by editing properties in the panel that appears on the right.
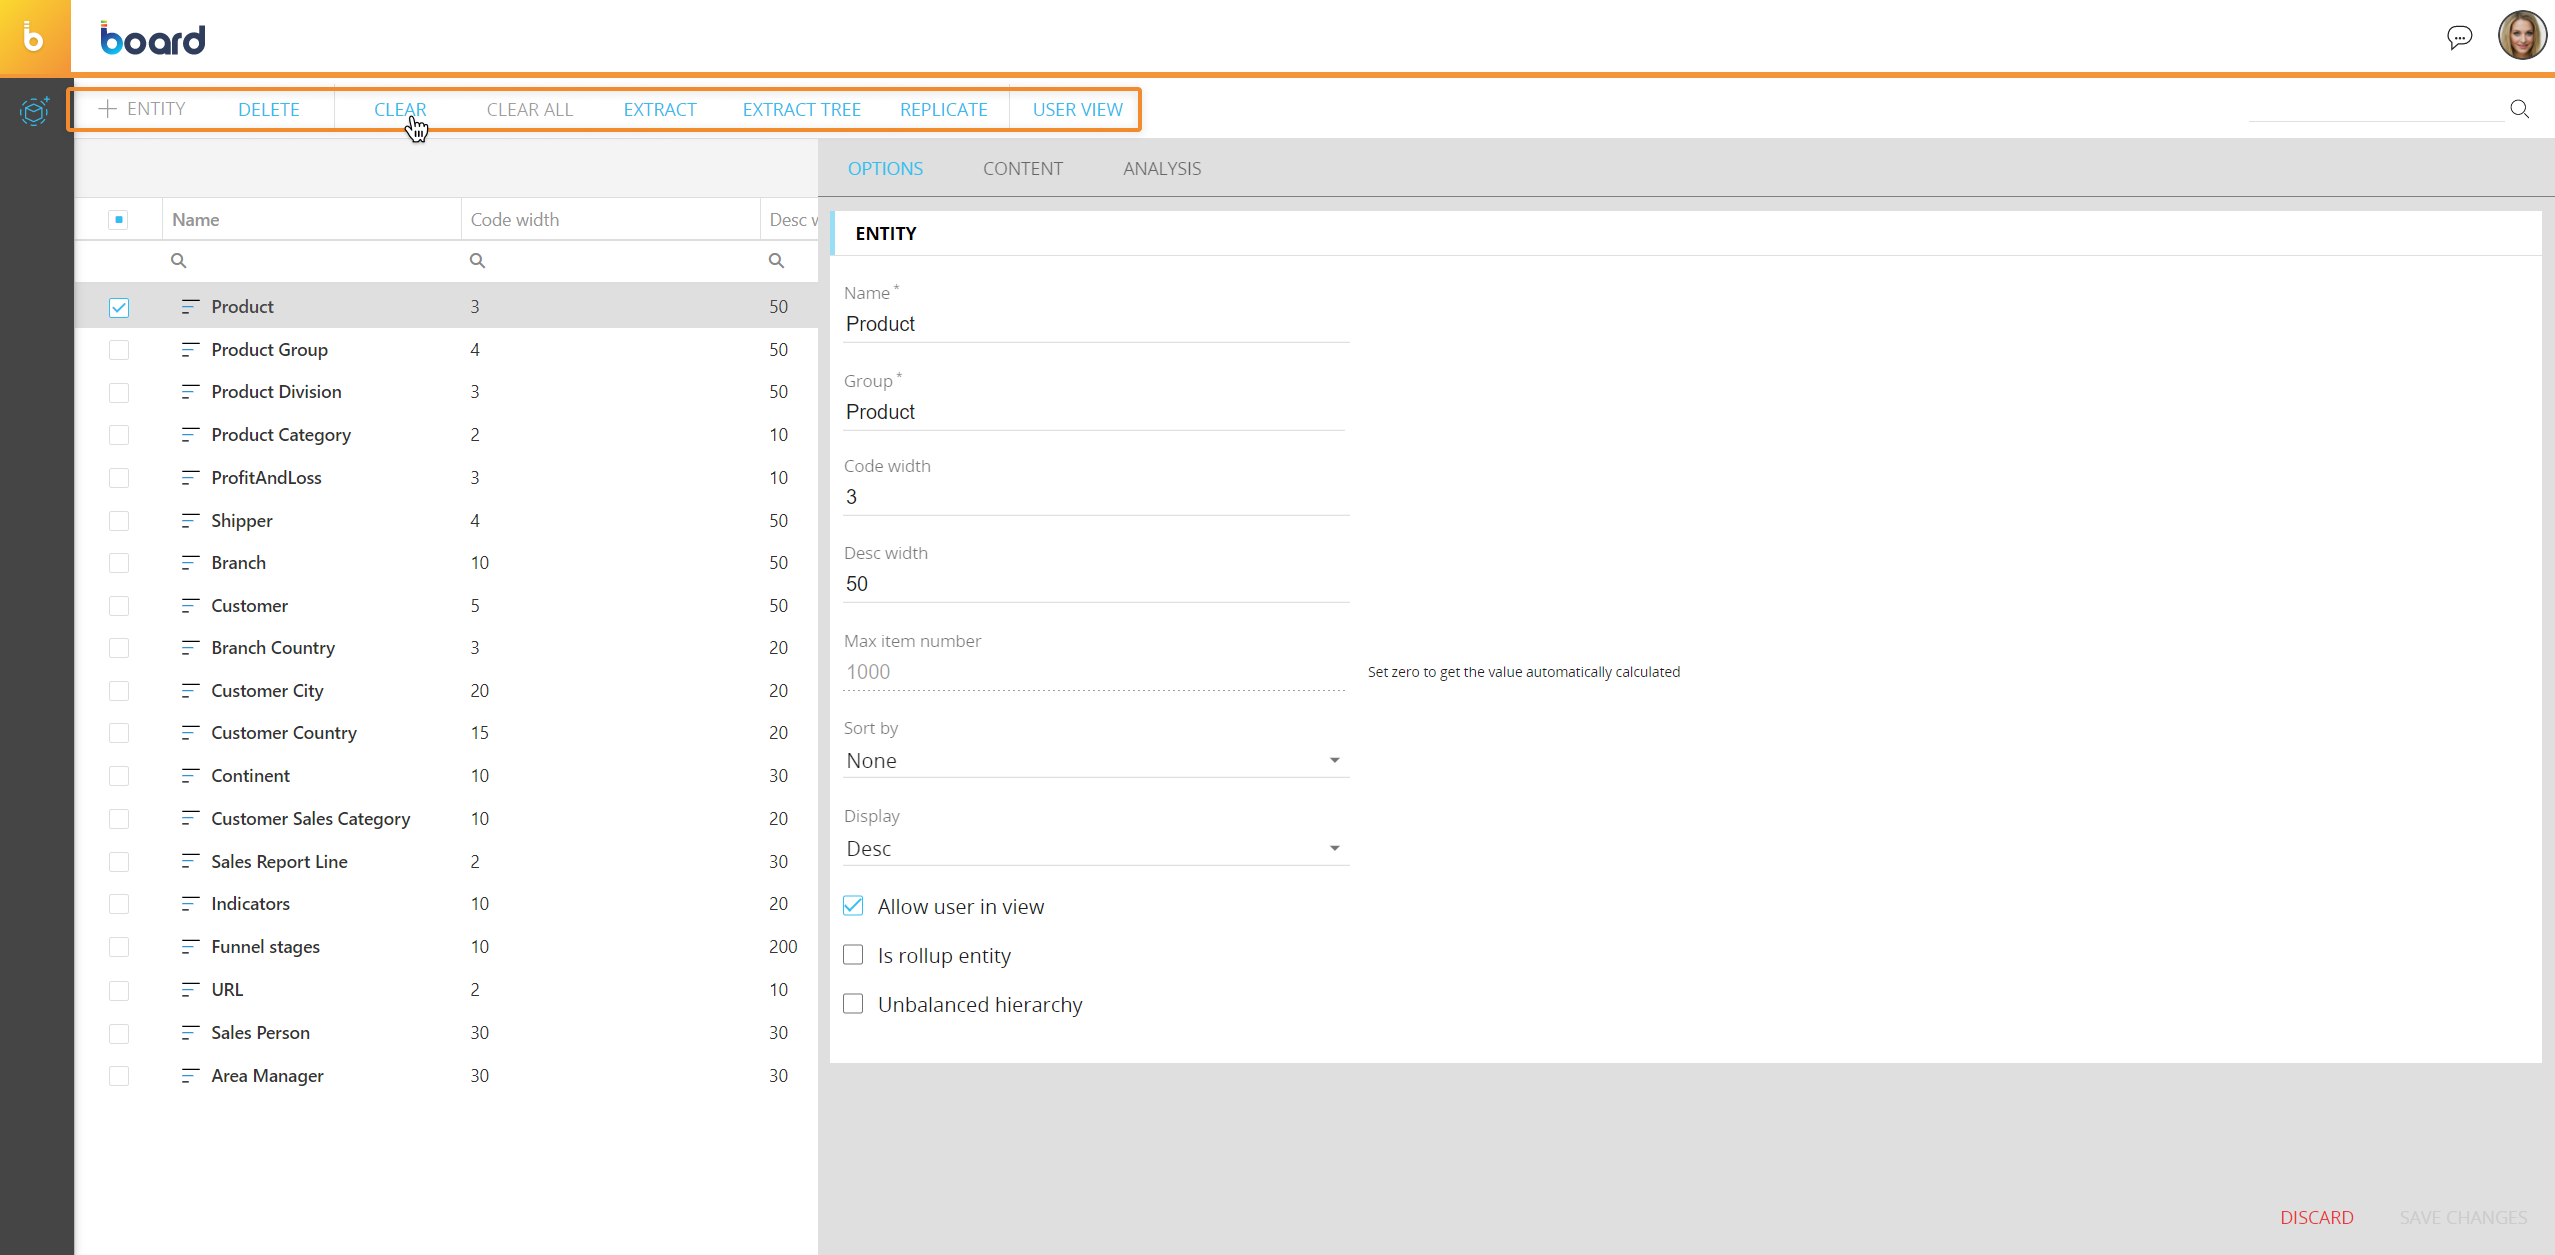
The available actions are described below.
- To edit the properties of an existing Entity, select it and apply changes in the properties panel that appears on the right
- To delete an Entity, select it and click on the "DELETE" button that appears above the Entity list. This action will delete the Entity and cannot be undone
- To clear an Entity, select it and click on the "CLEAR" button that appears above the Entity list. This action will delete all existing members of the Entity and cannot be undone
- To clear all Entities at once, click on the "CLEAR ALL" button above the Entity list. This action will delete all existing members of all listed Entity and cannot be undone
- To extract all members of an Entity into a CSV file, select the desired Entity and click on the "EXTRACT" button that appears above the Entity list. The CSV file is exported in the default download location. The CSV file can be used for loading members in an Entity using a Data reader at a later time
- To replicate an Entity, select the desired Entity and click on the "REPLICATE" button that appears above the Entity list. An exact copy of the source Entity will be created immediately, with the suffix [R] appended to the original Entity name. The replicated Entity will be included in the same Group as the original Entity
You can delete, clear and replicate multiple Entities at once by selecting them and clicking on the appropriate button above the Entity list. The same goes for the extract function.
You can also modify multiple Entities at once by selecting them. This option is available for the Group, Code width, Desc width Sort by, and Display properties, along with the Allow user in view, Is rollup entity and Unbalanced checkboxes.
When a new Entity member is created, Board assigns an unique internal identifier (UID) for that member. The UID is then used to refer to the member across Board: all selections (stored into Capsules, Procedures, and security setting) will all refer to a single member using its UID. Consequently, changing the member code or the description will not affect existing Capsules (and related reports and Procedures) and security profiles in any way.
When an Entity is deleted, all Cube versions structured by that entity are deleted as well.
When an Entity is cleared, all Cube versions structured by that Entity are also cleared.
When an Entity member is deleted, all existing selections that include the deleted member (in Capsule and Procedures) are lost.
Editing Entity properties
Entity properties can be modified at will as long as the Entity contains no members.
When an Entity is populated, you will be able to change the following properties:
- Entity name. This property can be changed freely at any time, without impacting any existing Capsule, Screens, Procedures and security settings. However, some web services scripts and Excel macros may refer to an Entity by its name, so changing the Entity name will affect those scripts and macros
- Code width. Lowering this value requires clearing the Entity
- Desc width. Lowering this value requires clearing the Entity
- Max item number. It is possible to change the Max item number of an Entity without having to clear it with the only restriction that the Entity should not be used by any cube version containing data. For example, if you run the Clear all Cubes function, then it is possible to change the Max item number of any Entity in the Data model without having to clear them first.
If you need to modify the Max item number of an Entity when the Data model is populated, you only need to clear all the Cube versions which use that Entity before changing the Max item number. Since it is not required to clear the Entity itself, any existing selections in Procedures or in Capsules will not be affected by this operation - Sort by. This property can be changed freely
- Display. This property can be changed freely
- Allow user in view. This property can be changed freely
- Is rollup entity. This property can be changed freely, but we highly recommend using the Unbalanced hierarchy option instead
- Unbalanced hierarchy. This property can be changed freely
The USER VIEW page
The User View page shows the list of Entities that will be visible to users in the Capsules environment, as well as allowing you to re-order the Entities and Groups. To reorder Entities and Groups, simply drag and drop the desired item in the new position.
The Groups that the Entities have been assigned to control how they are grouped in this view.
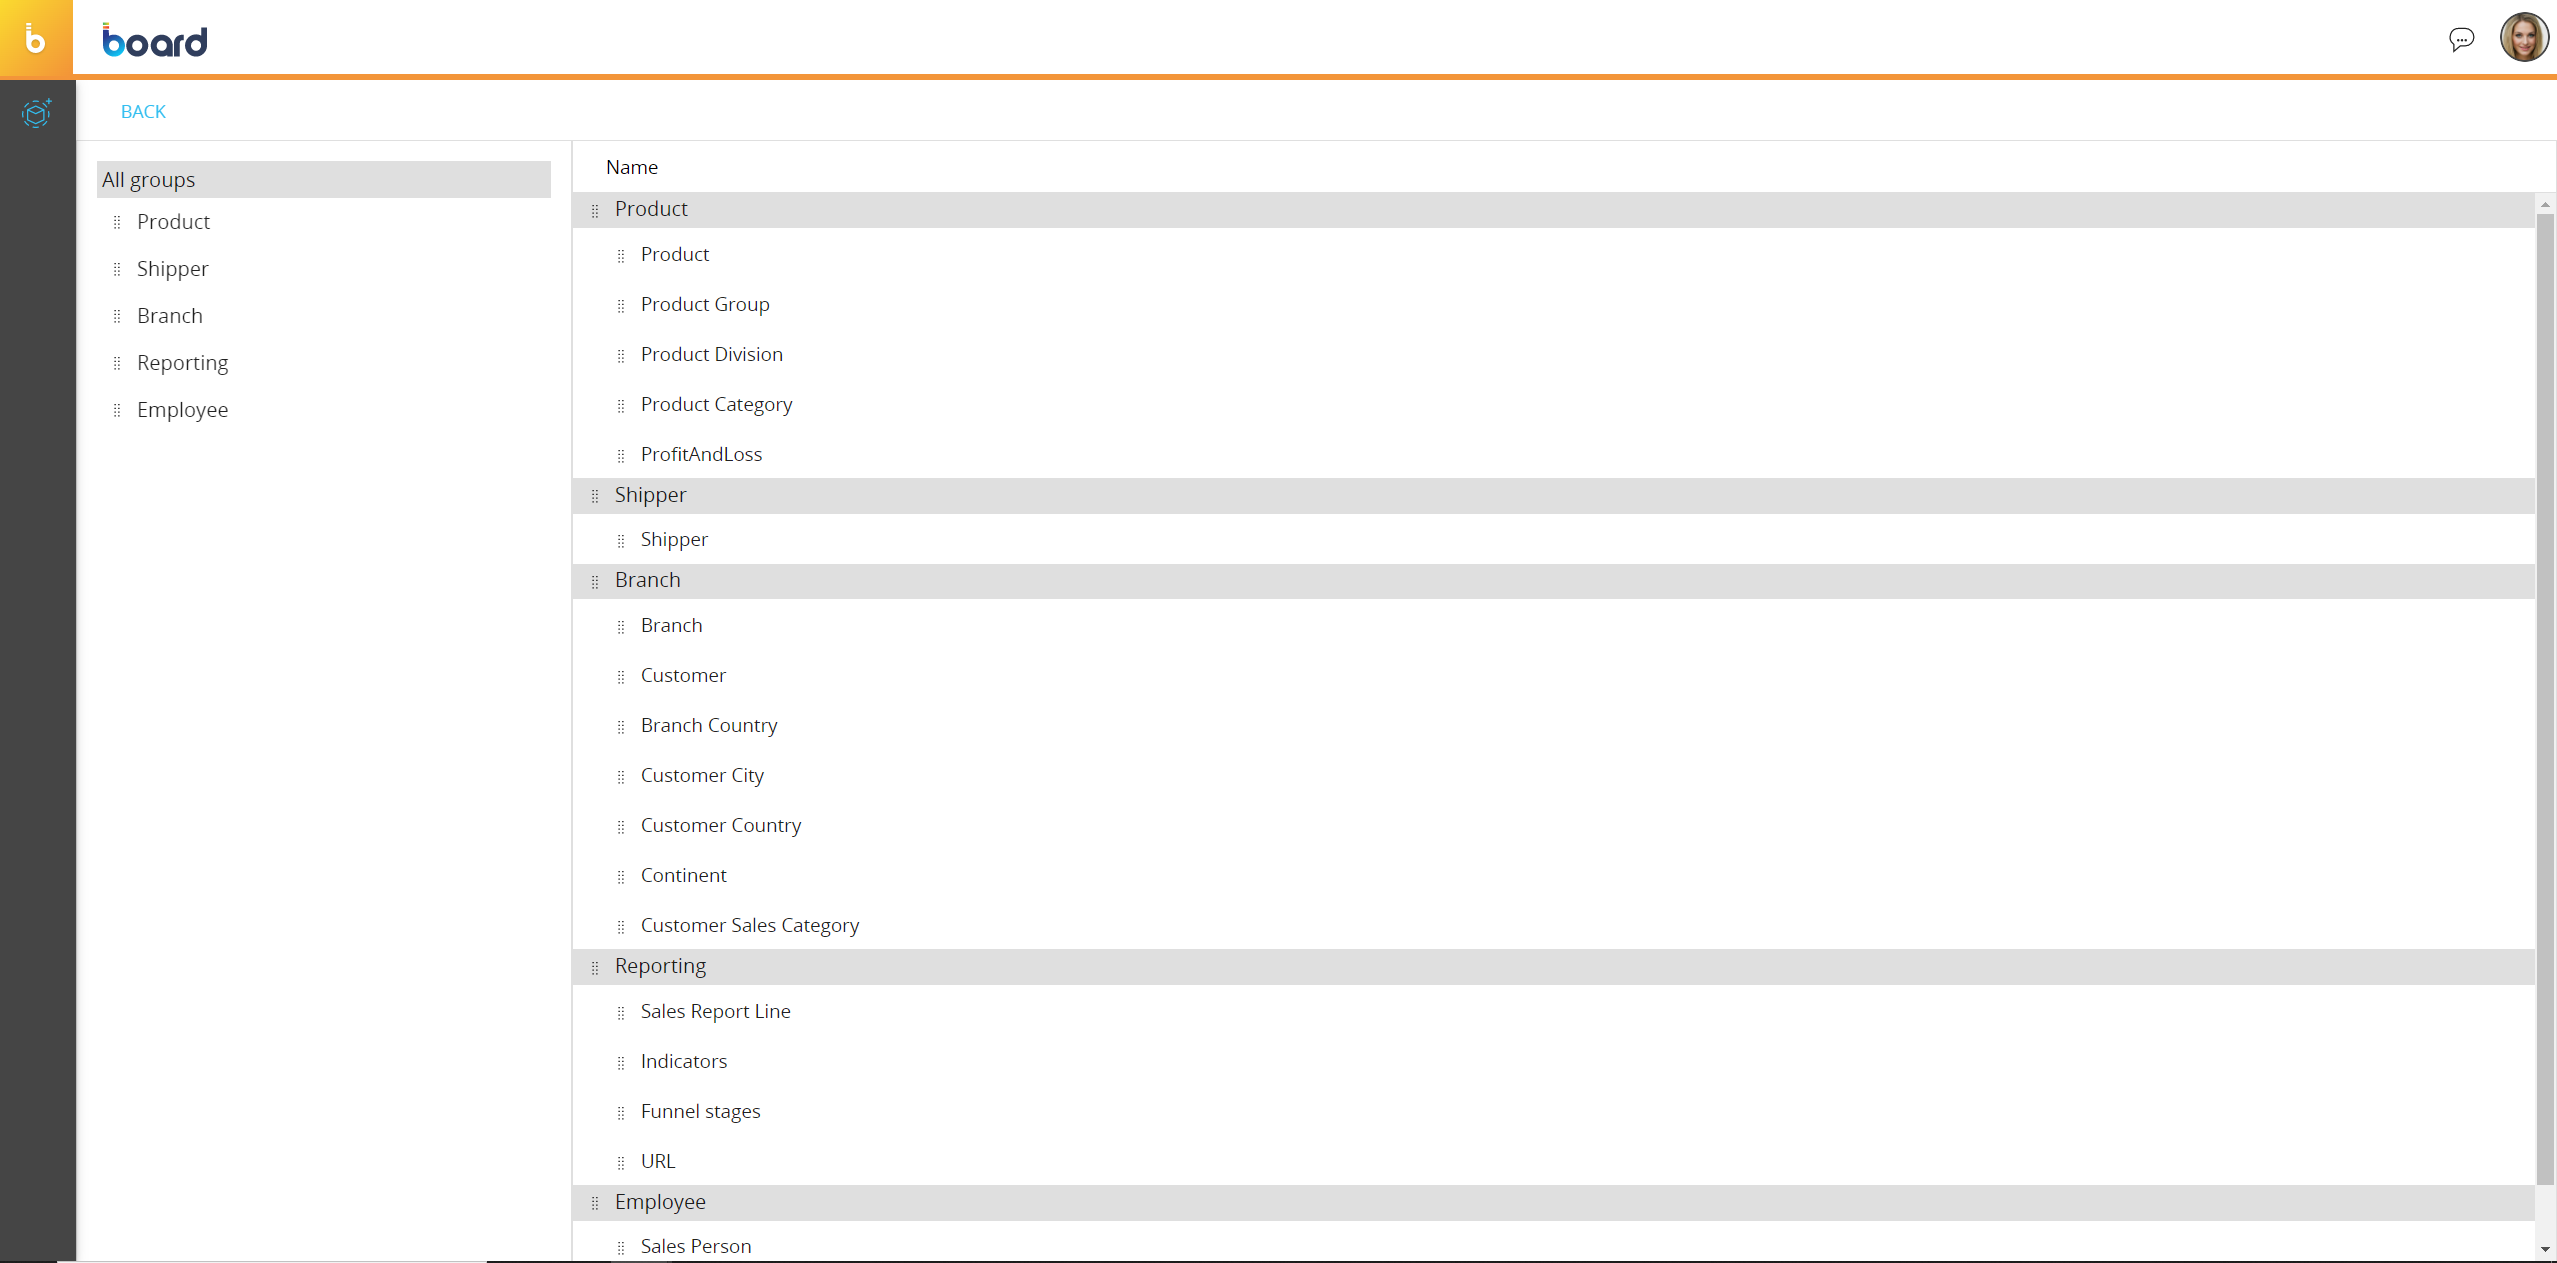
This view exactly reflects how users will see Groups and Entities in various sections of the Capsules environment, for example in the Select window and in the Layout configuration window.
Managing Entity members
You can add new members to an Entity in two ways:
- Manually, from the "CONTENT" tab. This process is useful for adding single members to an Entity or for populating small Entities which do not exist in your source data systems.
To manually new members to an Entity, proceed as follows:- Select the desired Entity
- Click on "CONTENT"
- Click on "ADD NEW MEMBER"
- Enter the code and description of the new member
- Click on "ADD NEW MEMBER". Repeat the process from the previous step to add as many members as needed
- Click on "SAVE ADDED MEMBERS"
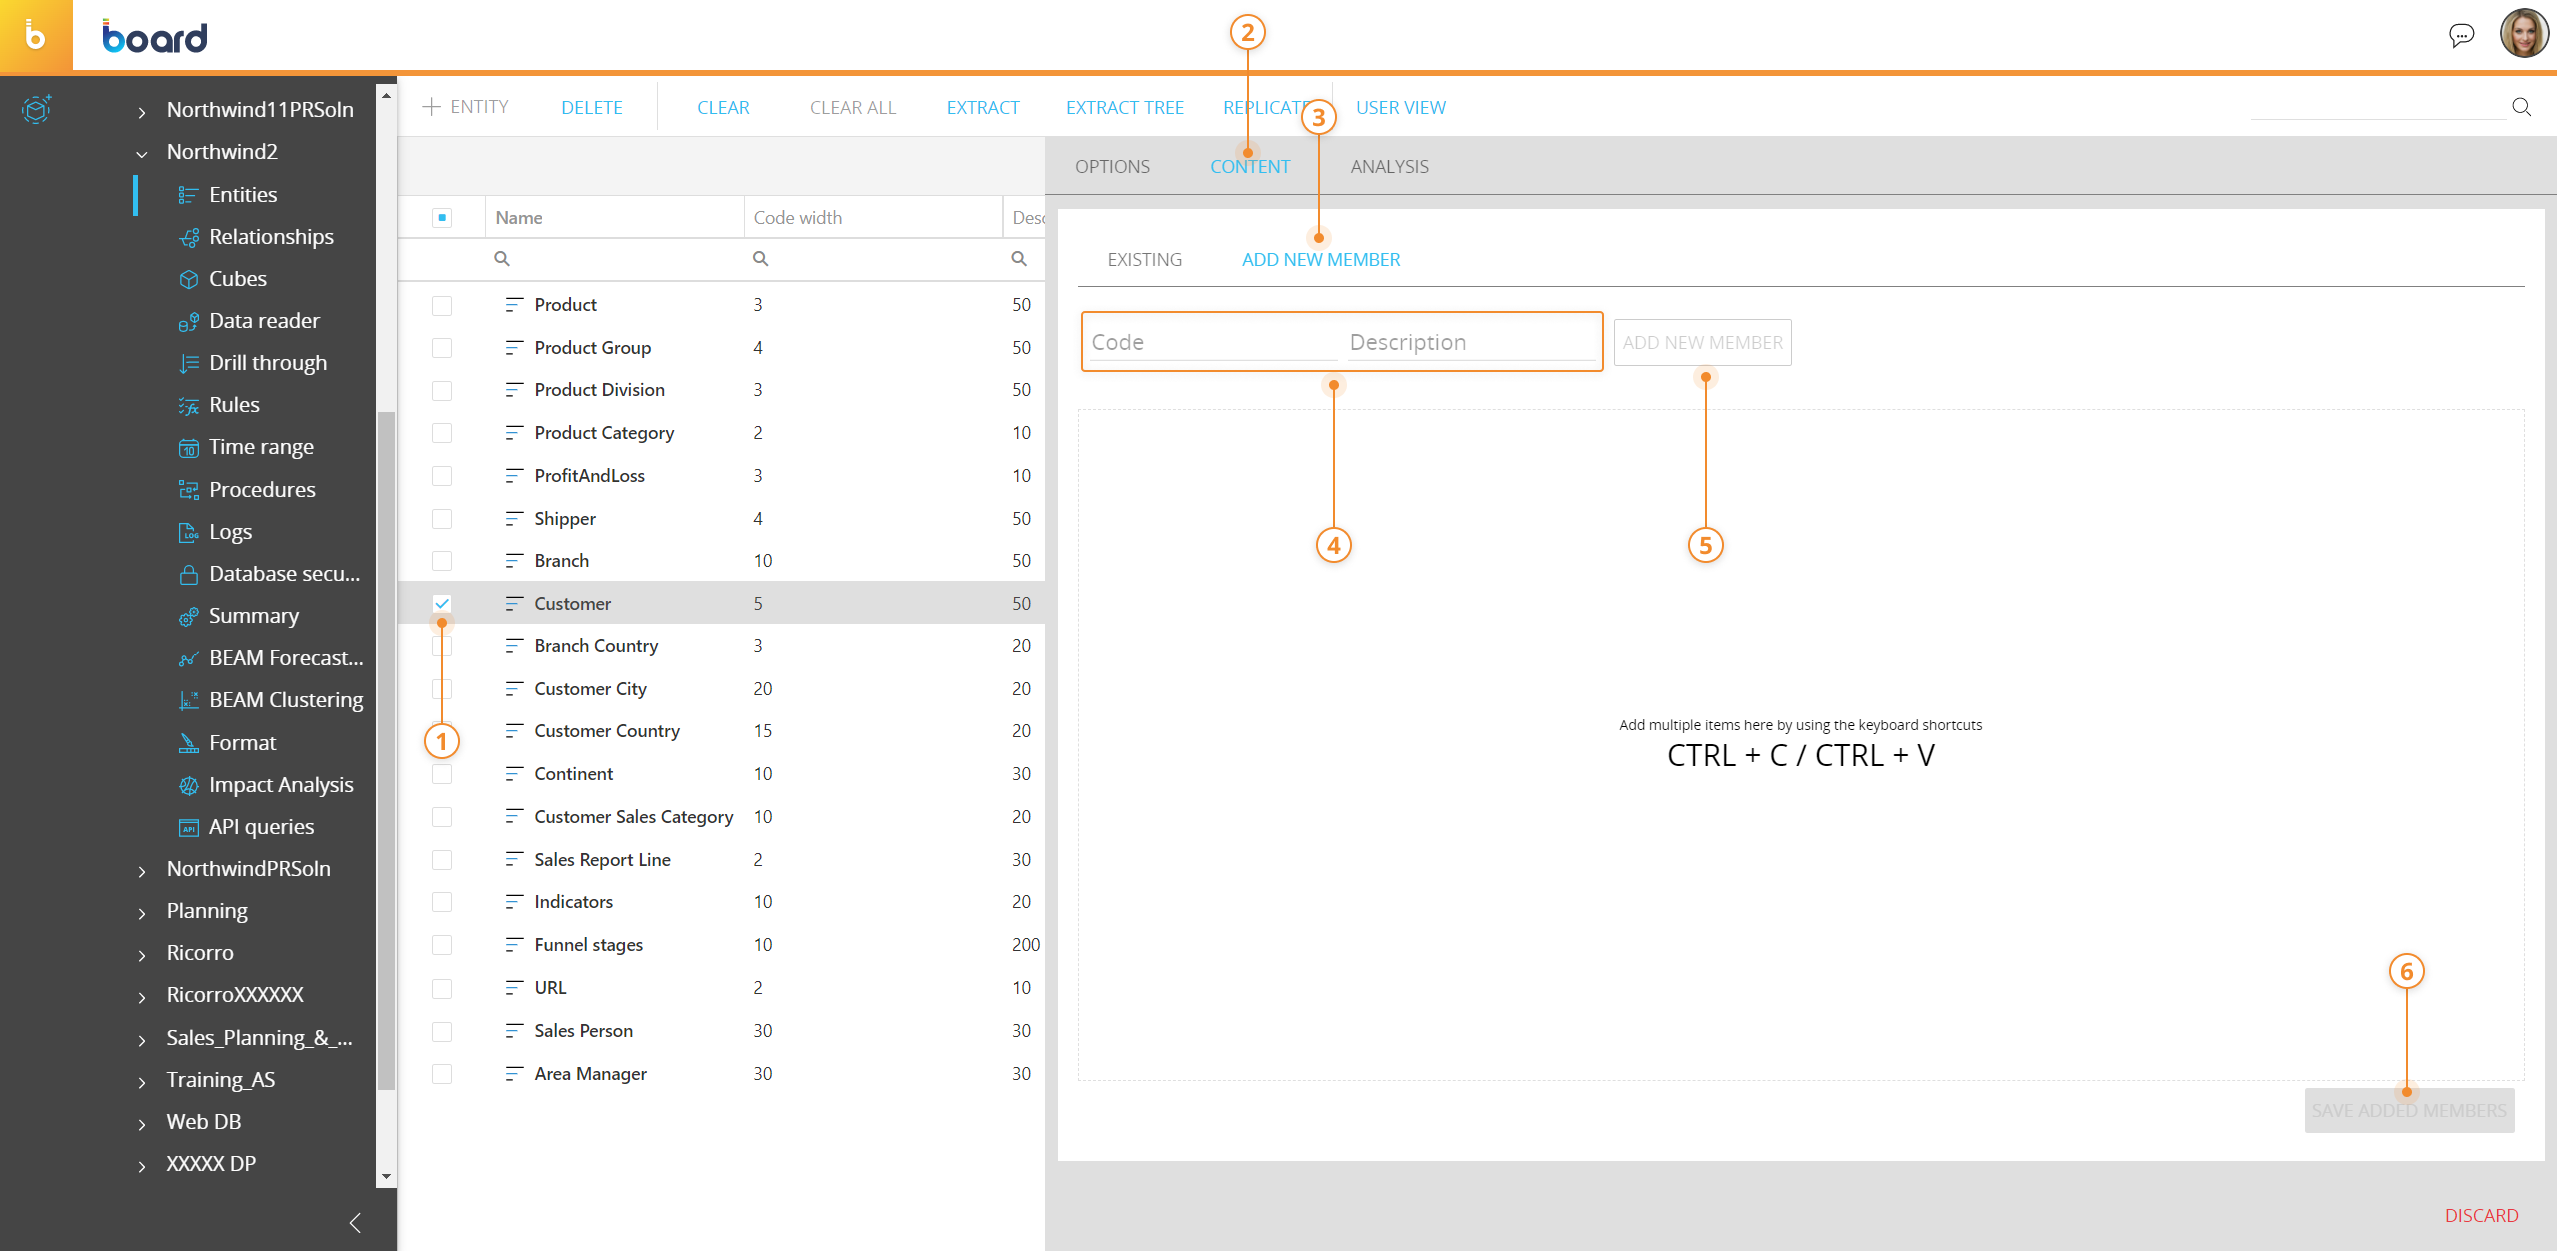
If you're creating a new Entity, the "CONTENT" tab becomes available only after the first "SAVE CHANGES" confirmation.
From the "ADD NEW MEMBER" section you can easily add new members in bulk from a spreadsheet by copying and pasting the columns that you wish to use. You should only copy two columns of data, with the first column being the code and the second column being the description. Do not include column headers in your selection.
You must also bear in mind the Code and Description widths that are set for the Entity, as well as the Max item number, as these parameters cannot be exceeded. If any of the parameters are exceeded, no new members will be added until the incorrect members are removed. - Via a Data reader. The Data reader is a Board tool which allows you to import data from text files, ODBC, OLE DB- or OLAP connections into the Board database. After mapping the source data to an Entity, running the Data reader will load members into it following the saved configuration. See Data reader basic concepts for more details
You can delete existing members of an Entity in two ways:
- One by one, from the "CONTENT" tab. Hover over the member you want to delete and click on the recycle bin icon that appears on the right
- In bulk, by selecting the Entity and clicking on the "CLEAR" button that appears above the Entity list
Deleting a member does not reduce the saturation level of an Entity. The saturation is determined by the number of members created. For example, if after inserting and deleting members the Entity's members count is 50 and the Entity’s Max item number is 100, then the saturation is at 50%. The saturation is reset only when the Entity is cleared using the Clear function.
You can edit existing members of an Entity by double-clicking on its code or description field.
When a new Entity member is created, Board assigns an unique internal identifier (UID) for that member. The UID is then used to refer to the member across Board: all selections (stored into Capsules, Procedures, and security setting) will all refer to a single member using its UID. Consequently, changing the member code or the description will not affect existing Capsules (and related reports and Procedures) and security profiles in any way.