Create an Adjustment
To create an Adjustment you have to do the following steps :
> Create the Adjustment
> Add Adjustment Rows
> Save the Adjustment
Create the Adjustment
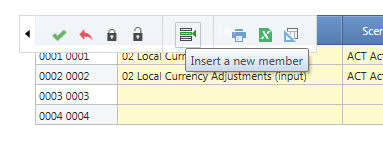
Open the 040 - 01 Adjustment Heading Editor Screen (Capsule Local Reporting). Click on the Insert New Member Icon and type an Adjustment Code and Description.
Optionally an Adjustment Nature can be given : it does not impact the Consolidation Process but provides Grouping Criteria for Adjustment. Default Value is "Default".
Now clicking on the attributes columns of the Adjustment Row Number, a Pop Up will prompt the available choices per each of them. Once completed click on the Save Icon.
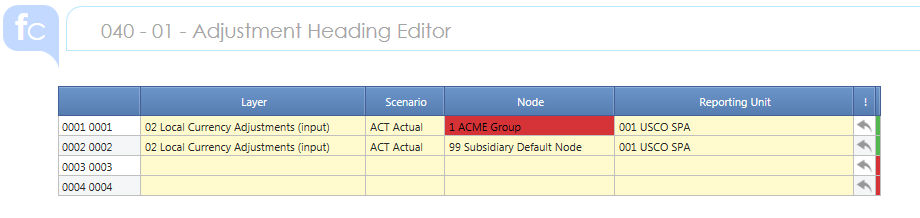
Once all the attributes have been saved click on the left arrow to create the Adjustment Heading. The Green Flag identifies those Adjustment Numbers which Heading has already been created. From the Picture above you can see that you can create Adjustment Number or partially define their attributes without creating the heading (Red Flag on).
![]() Highlights
Highlights
> Adjustment Rows can be added only for those Adjustments which Heading has been created.
> A Red background in the Node Field identifies that there is an inconsistency between the Layer and the Node. E.g. Layer "02" must be associated to Consolidation node "99" only. Please pay attention.
> You can any time change any Heading attributes and re-create the Heading. Previous heading will be deleted. Warning to apply this change to existing Adjustment Rows on this Adjustment Number, the "Confirm" Process must be re-executed in the Adjustment Row Edit Screen. In this case Existing Rows will be kept ; please check with the FC Team if and how to remove them.
![]() If you
want to lock the Adjustment Heading Edit when the Adjustment has been
created use the Cube Adjustment Heading.
If you
want to lock the Adjustment Heading Edit when the Adjustment has been
created use the Cube Adjustment Heading.
Add Adjustment Rows
Select the Adjustment Number and the Month from the drop down list. The layout is refreshed and ready to accept data. The Heading attributes are visible on the top of the screen.
Now click on the Insert Row Icon as per below picture :
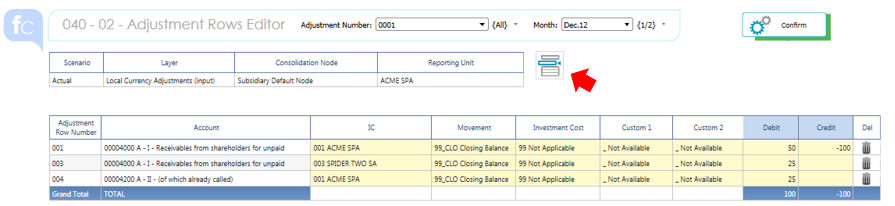
A Window Pop-Up is prompted and you must first the Adjustment Row Number (001 is pre-selected) then the Account. Repeat such operation for all the rows you need to insert.
Type the Credit and Debit Trial Balance ; click on the Save Icon to Save .
When all the rows have been completed click on Confirm (Top Right Button). Please notice that the Adjustment is created but not posted yet.
![]() Highlights
Highlights
> If the choice of the Account implies a single Option for the following row attribute the Item is automatically selected. For example for those Accounts that do not require a Counterpart the IC attribute is automatically setup to Third Party, P&L Account Movement is automatically setup as Closure etc etc.
Vice-versa, when multiple options are available, a "False" quote is prompted. Then click on the attribute column and make your choice.
> You can't Select more than 1 Row Number/Account per time. This prevents that big Row Edit mistakes especially if the User clicks on Cancel without any Select.
![]() The
Adjustment Row attributes are driven by the Nature of the Account through
a series of Matrixes setup as Suggested Value Sources. To Edit the Available
Choices you must change the Procedure that Determine the Valid combination
in such cubes.
The
Adjustment Row attributes are driven by the Nature of the Account through
a series of Matrixes setup as Suggested Value Sources. To Edit the Available
Choices you must change the Procedure that Determine the Valid combination
in such cubes.
Suggested Value |
Procedure Name | Screen (Admin Capsule) |
| IC | 010-01 Account Attributes | 020 Legal Entity Editor |
| Movement | 050-04 Setting Movement Attributes | 050 Movement Editor |
| Investment Cost | 060 - 01 Investment Cost Attributes | 060 Investment Cost Editor |
| Custom 1 | 070 - 01 Custom 1 Attributes | 070 - 01Custom 1 |
| Custom 2 | 070 - 02 Custom 2 Attributes | 070 - 02 Custom 2 |
> If the Application couldn't determine a single and unique choice for the attribute of the Adjustment Row a False Red alert is prompted.
Clicking on it a Selection Pop-Up prompts the available choices. The Nature of the Account implies also some restrictions on the such choices. This restrictions are given by the configuration of the Account attributes in the Accounting Grouping and Categories.

Delete Adjustment Rows
Simply click on the Basket Icon of the Adjustment Row you want to delete.
When done on the Click Save Icon of the Report Sliding Bar.
> The Background of the Confirm Button highlights if the Adjustment
- is balanced (Green)
- or un-Balanced (Red). Totals are available as well : it isn't anyway possible to create an un-balanced Adjustment. An alert message will be prompt during the Confirmation process.
- balanced but the current balances do not match with the previous balance (Amber). This can happen only if you are reviewing an Adjustment that has been already Confirmed and eventually Posted.
> You can any time change the attribute of any row and re-confirm
> Any row can contemporary host both debit and credit trail balances clicking on the basket icon.
![]() If you
want to copy and paste the Adjustment Rows from an Excel Sheet, select
all the Accounts you need to include in the Adjustment and then Copy and
Paste from the Excel Sheet into the Yellow area. Then Save. Of course
Column and Rows Order criteria must be kept.
If you
want to copy and paste the Adjustment Rows from an Excel Sheet, select
all the Accounts you need to include in the Adjustment and then Copy and
Paste from the Excel Sheet into the Yellow area. Then Save. Of course
Column and Rows Order criteria must be kept.