Add and manage User metadata
- Applies to: All Board Cloud subscriptions
HOW: Create a new user metadata field
Create a new user metadata field to store relevant information about each user. Every user metadata field you create will immediately appear under the User metadata table in the user profile panel, in the configured order. Each user metadata field can be used to build a request form for an Enrollment process.
You can also retrieve information stored in a User metadata field and use it in Board Platforms via the @var function.
A user metadata field can be of two types: Text or Dropdown list.
Create a Text user metadata field
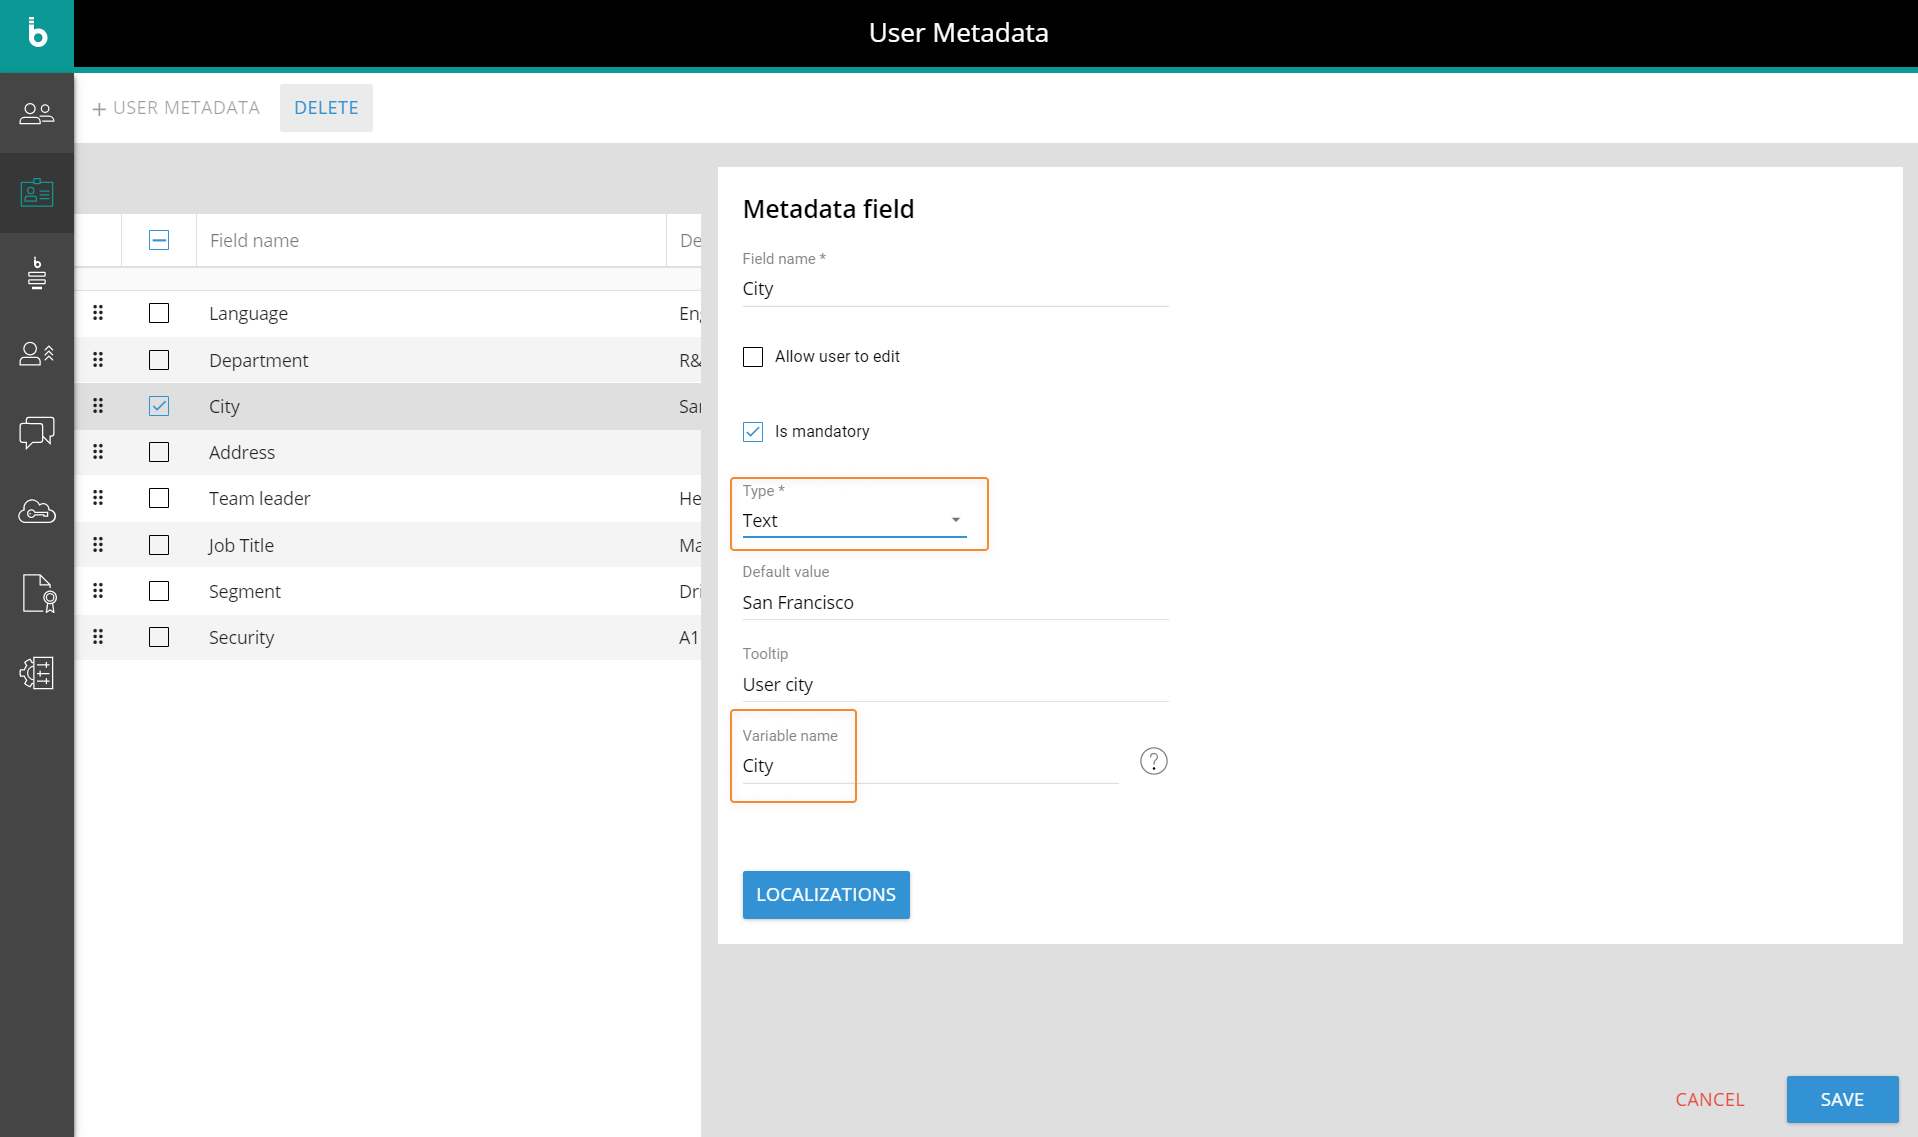
To create a new Text user metadata field:
- Click on "+USER METADATA" and fill in the Field name field. This field accepts any character and cannot be longer than 50 characters.
- The "Allow user to edit" checkbox, when ticked, allows the user to freely modify the field. If you leave it unchecked, only Subscription Hub administrators will be able to edit the field in the user profile panel
- The "Is mandatory" checkbox indicates whether the field has to be filled or not. Check it to mark the field as required.
- From the Type dropdown menu, select the "Text" option.
The Default value, Tooltip and Variable name fields are optional. To know more about those fields, please see the "Field formats and information" paragraph at the bottom of this page
-
(Optional. This step is required only if you use Board's SCIM api service to manage users in the Subscription Hub). From the SCIM attribute dropdown menu, define which SCIM attribute is to be mapped to the user metadata field
-
Click the “SAVE” button in the bottom right corner of the page to create the user metadata field. The new user user metadata field should now appear in the User metadata home page.
Create a Dropdown list user metadata field
To create a new Dropdown list user metadata field:
- Click on "+USER METADATA" and fill in the Field name field. This field accepts any characters and cannot be longer than 50 characters.
- The "Allow user to edit" checkbox, when ticked, allows the user to freely fill in the field. If the checkbox labeled "User can only select an item from the list" is unchecked, any new value written by the users is saved and added to the existing item list.
If the "Allow user to edit" checkbox is unchecked, only Subscription Hub administrators will be able to edit the field in the user profile panel. - The "Is mandatory" checkbox indicates whether the field has to be filled or not. Check it to mark the field as required.
- The "Allow user to edit" checkbox, when ticked, allows the user to freely fill in the field. If the checkbox labeled "User can only select an item from the list" is unchecked, any new value written by the users is saved and added to the existing item list.
- From the Type dropdown menu, select the "Dropdown list" option. Two new elements will appear: a blue "MANAGE LIST ITEMS" button and a checkbox labeled "Users can only select an item from the list"
- (Optional. This step is required only if you use Board's SCIM api service to manage users in the Subscription Hub). From the SCIM attribute dropdown menu, define which SCIM attribute is to be mapped to the user metadata field
- Click on "MANAGE LIST ITEMS" to bring up the items management pop up and configure a new Dropdown list.
- Click on "+ ITEMS". A new item will appear in the table.
- Define the item name by writing in the corresponding cell and tick the Default value checkbox to set it as default value for the user.
Repeat the process to add as many list items as needed.You can also sort items in any order you see fit by dragging and dropping each row.
Click on the recycle bin icon to delete the corresponding item. - Click on "APPLY" to save the Dropdown list items and close the pop up.
Tick the checkbox labeled "Users can only select an item from the list" if applicable.If the "Users can only select an item from the list" and "Allow user to edit" checkboxes are both ticked, users and Subscription Hub administrators will only be able to select one list item.
If the "Users can only select an item from the list" checkbox is ticked and and the "Allow user to edit" checkbox is not, only Subscription Hub administrators will be able to select one list item in the user profile panel.
If the "Users can only select an item from the list" checkbox is unchecked and the "Allow user to edit" checkbox is ticked, both users and Subscription Hub administrators will be able to to freely modify the field: each new value is then saved and added to the existing list items.
If both the "Users can only select an item from the list" and the "Allow user to edit" checkboxes are unchecked, only Subscription Hub administrators will be able to to freely modify the field: each new value is then saved and added to the existing list items.The Default value, Tooltip and Variable name fields are optional. To know more about those fields, please see the "Field formats and information" paragraph at the bottom of this page.
-
Click the “SAVE” button in the bottom right corner of the page to create the user metadata field. The new user user metadata field should now appear in the User metadata home page.
For both User metadata field types, the blue "LOCALIZATION" button allows you to input other language versions of the Field name that will be shown in accordance with the user's language preference set in Board Platforms.
WHAT: Fields formats and information
| Field name | Description | Examples | |||||
| Field name |
|
Department | |||||
| Allow user to edit (checkbox) |
|
- | |||||
| Is mandatory (checkbox) |
|
- | |||||
|
Type |
|
Text | |||||
| Default value |
|
Financial Department | |||||
|
Tooltip |
|
User's department | |||||
| Variable name |
|
dept | |||||
| SCIM attribute |
|
Family name | |||||
| Default value (checkbox - Manage list items pop up only) |
|
- | |||||
| Item name (Manage list items pop up only) |
|
Logistics | |||||
HOW: Edit/Delete a User metadata field
To edit a User metadata field:
- From the home page, click on the entry you want to modify
- Edit the metadata field details and click the “SAVE” button in the bottom right corner of the page
Any change made to a User metadata field is immediately applied to all existing users, except for the Default value: once it's been modified, the new attribute is only applied when a new user is created.
To delete a User metadata field:
- From the home page, click on the entry you want to delete
- Click “DELETE” in the upper left corner of the page and then "yes" in the confirmation pop up
When you delete a User metadata field with an associated Variable name attribute, any @var function based on that attribute will be invalid in Board Platforms.
Selection scripts in User metadata fields
You can enter a selection script in any User metadata field to automatically filter data displayed in Board Platforms based on Entity members defined in the script.
The script leverages the variable name defined on each custom User metadata to apply the selection on a user.
To use selection scripts, proceed as follows:
- Create a new User metadata field. You can use and existing one, as long as it is a text field and the "Variable name" field has been filled out.
- Create a new Role in every Board Platform the user has access to. To create a new Role:
- Access the System Administration section and click the "Roles" tile
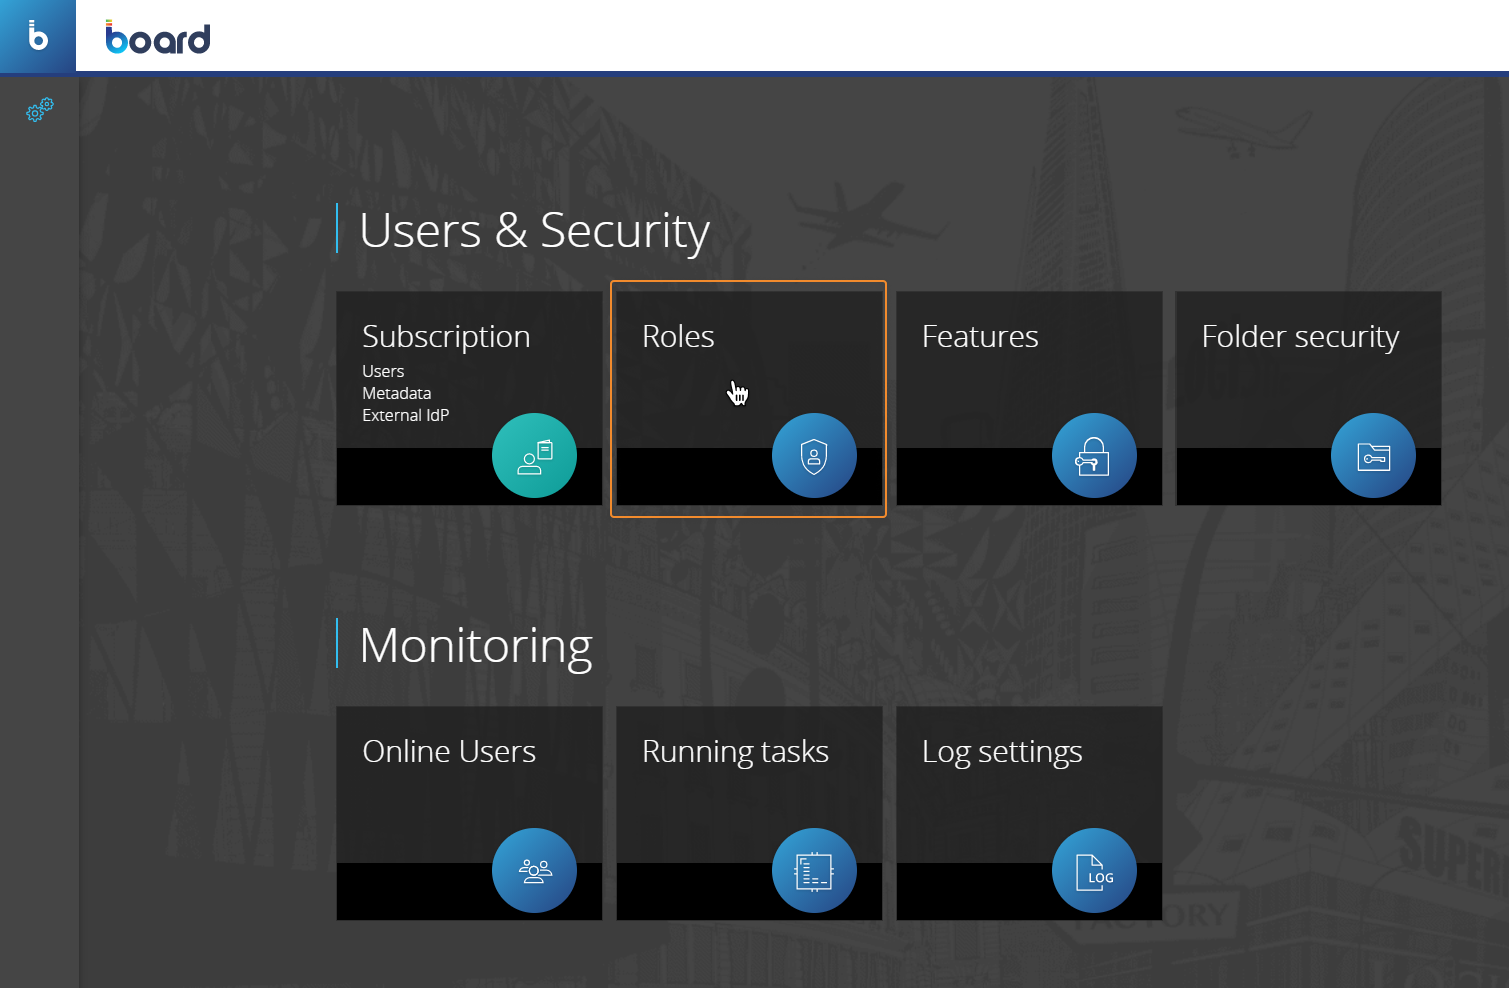
- In the Roles management page, click on "+ ROLE", give it a name and select the desired Data model under the "SELECT" section
- Enter the @var function in the "Custom selection script" field using the Variable name value entered in the User metadata field configuration
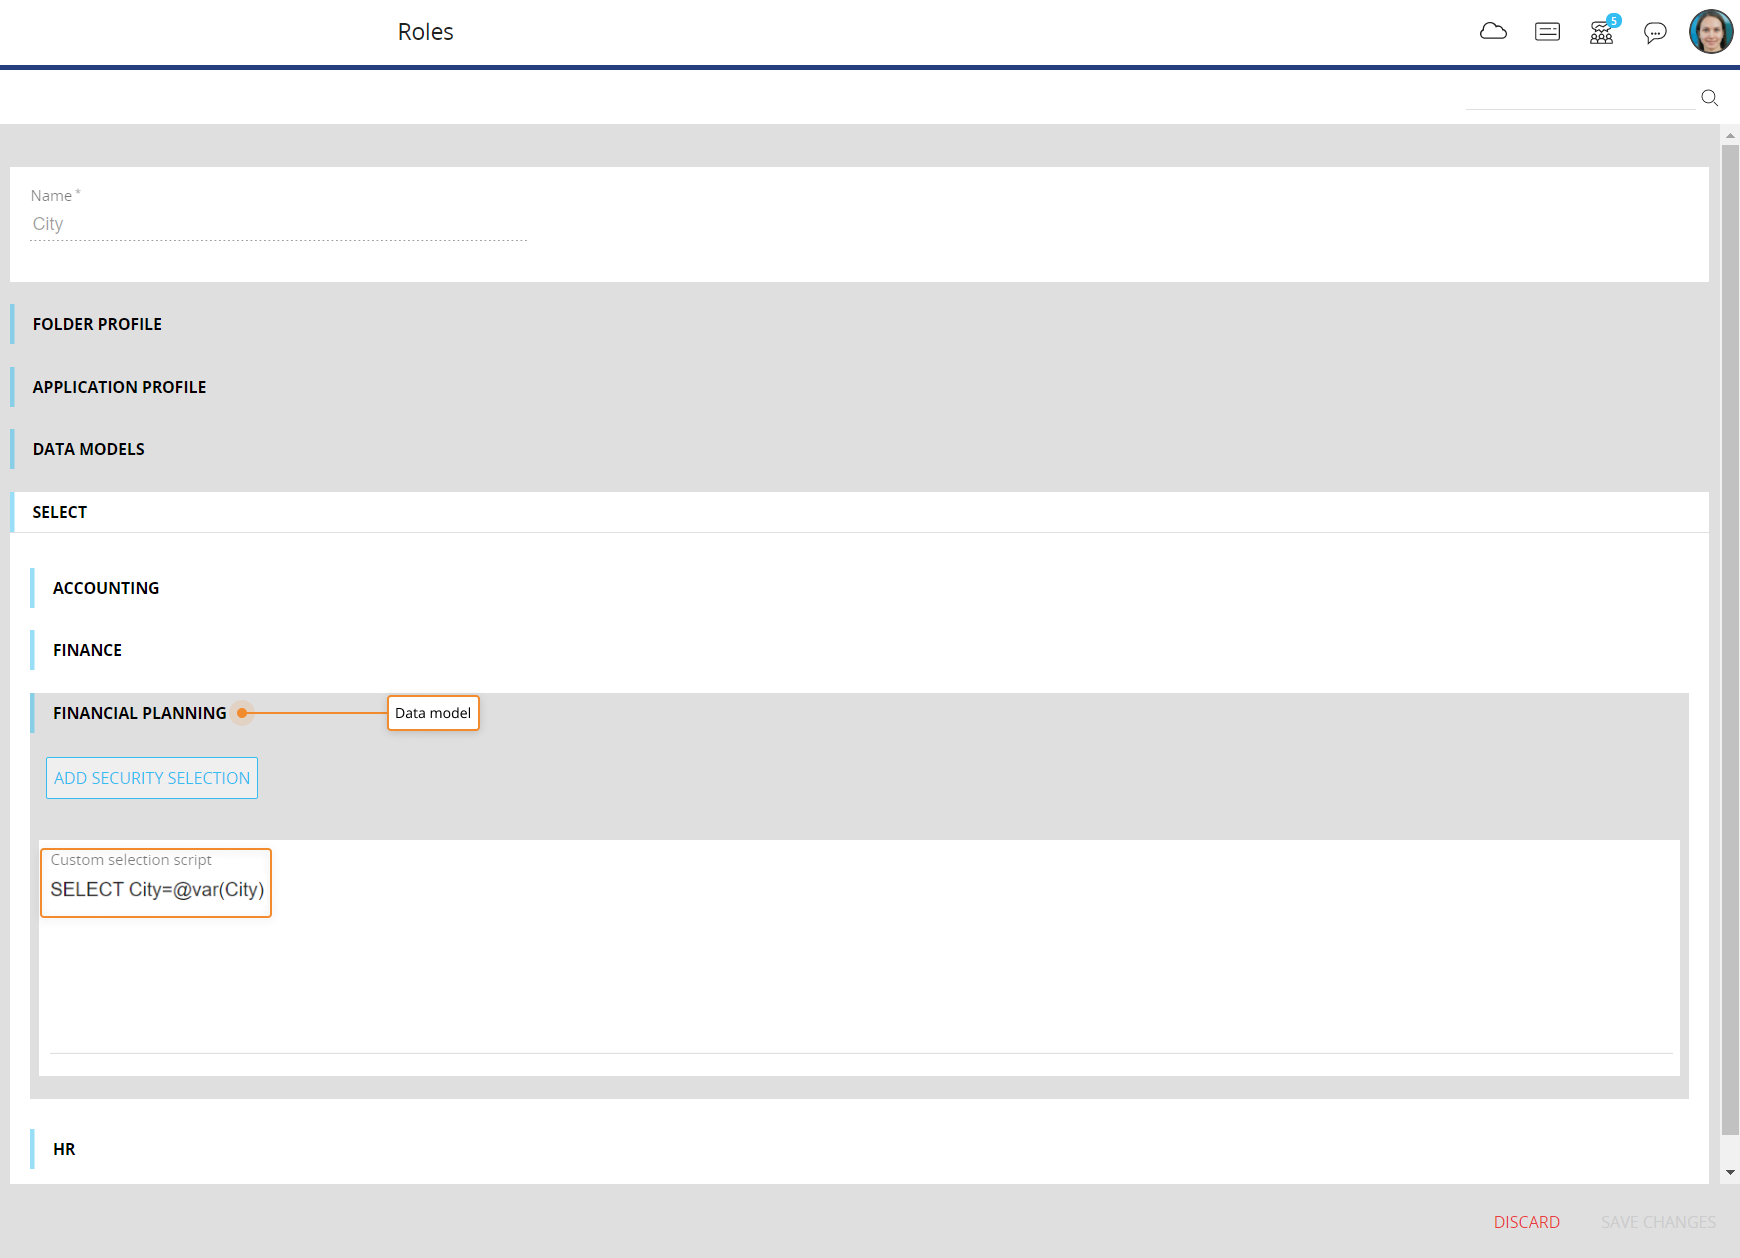
- Save the newly created Role by clicking on "SAVE CHANGES"
- Access the System Administration section and click the "Roles" tile
- In the Subscription Hub, select the desired user from the users table to open the User profile panel. In the PLATFORM AUTHORIZATION table, select the Role you previously created and enter the selection script in the custom User metadata field configured in step 1.
You can use the pipe character as a delimiter to make selections on multiple Entities and the comma to reference multiple Entity members in a single selection.
For example, the following script selects "FRESNO" on the City Entity and selects "Everest" and "Camper" on the Product Entity:
SELECT City=FRESNO | SELECT Product=Everest, Camper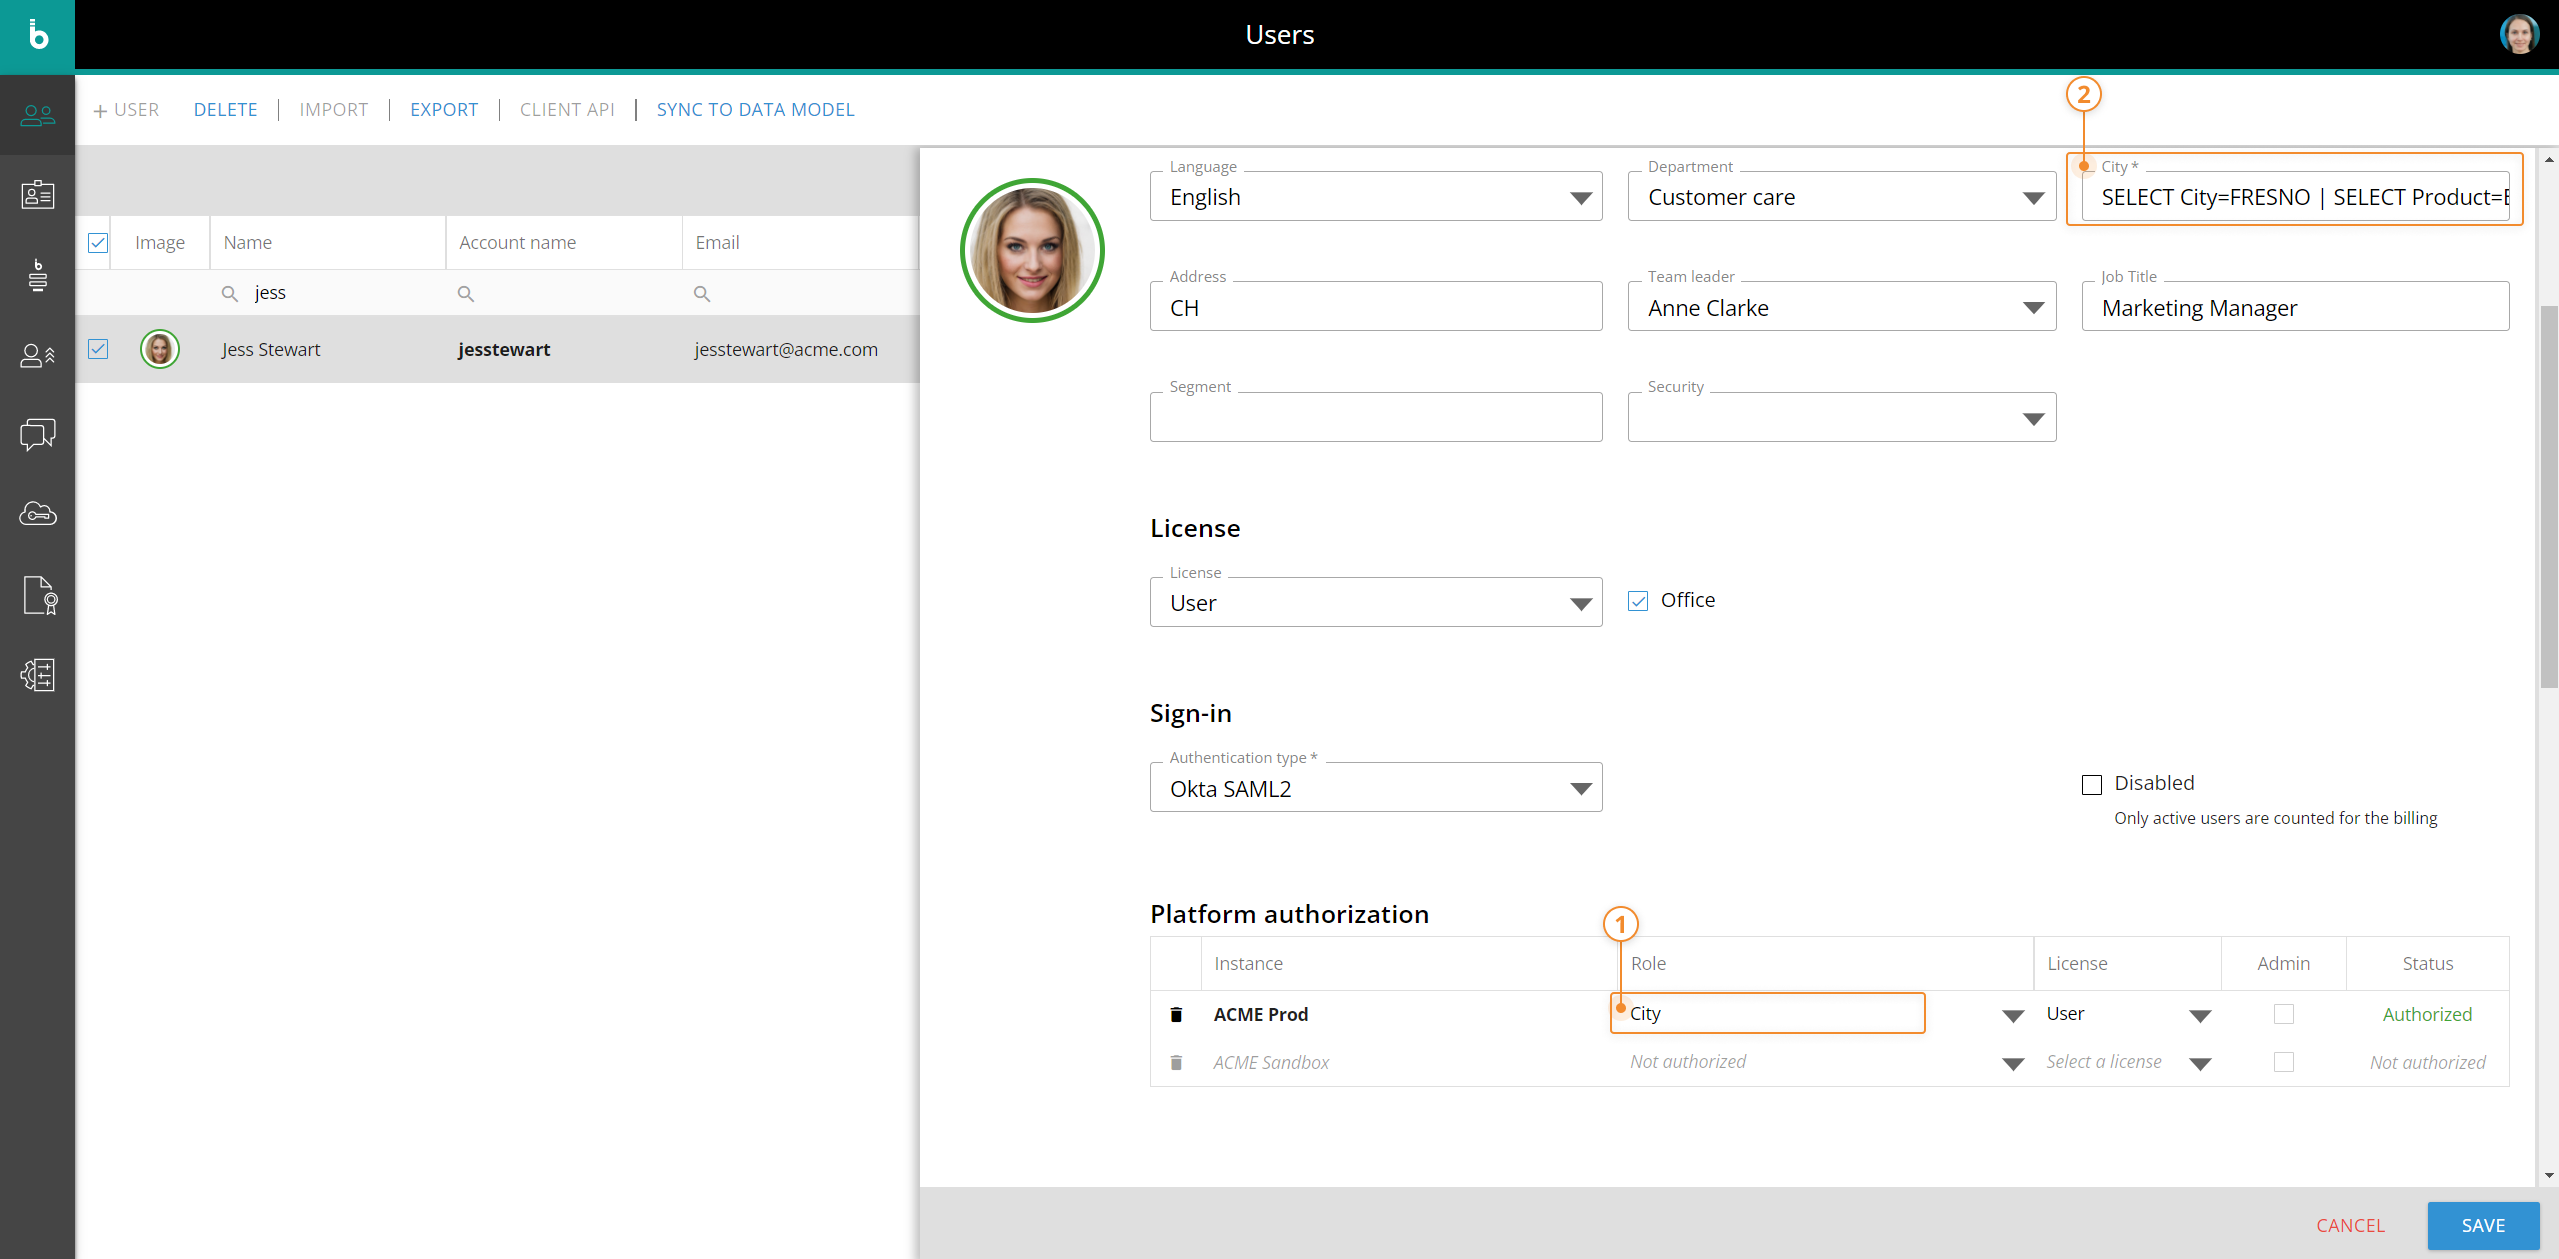
- Save all changes by clicking the SAVE button.
The configured selection is applied at the user level: this means that, in Board, the user will always see data filtered according to the selection script. This applies to all Screen Objects associated with the Data model where the @var function was defined and to Select windows.
Selection script at the Data model level
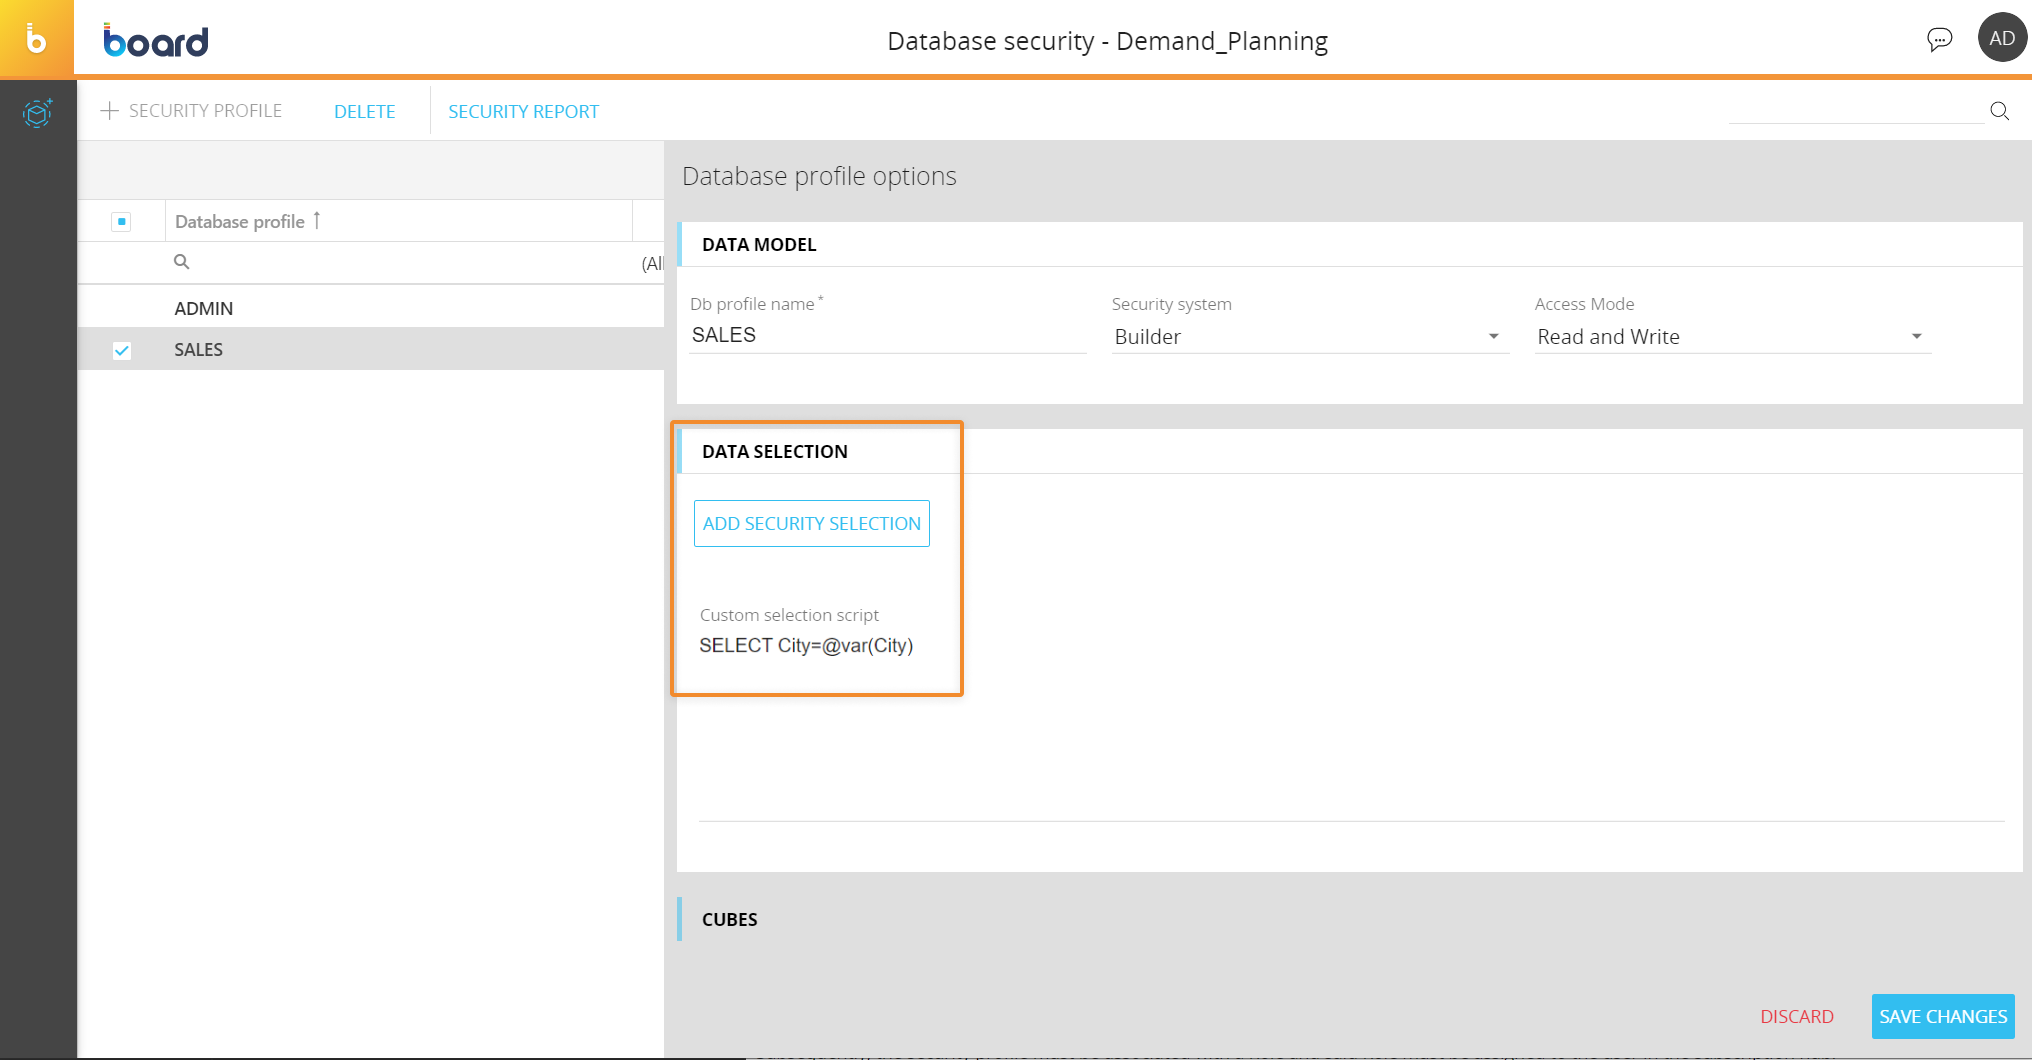
You can also assign a selection script at the Data model level, under the "Database Security" section of the desired Data model in a Board Platform.
To do so, edit or create a security profile and under "Data selection" assign a custom selection script using the @var function. Thus, the selection setting is applied at the Data model level.
Subsequently, the Data model security profile must be associated with a Role in the same Board Platforms. Here's how to do it:
- Access the System Administration section and click the "Roles" tile
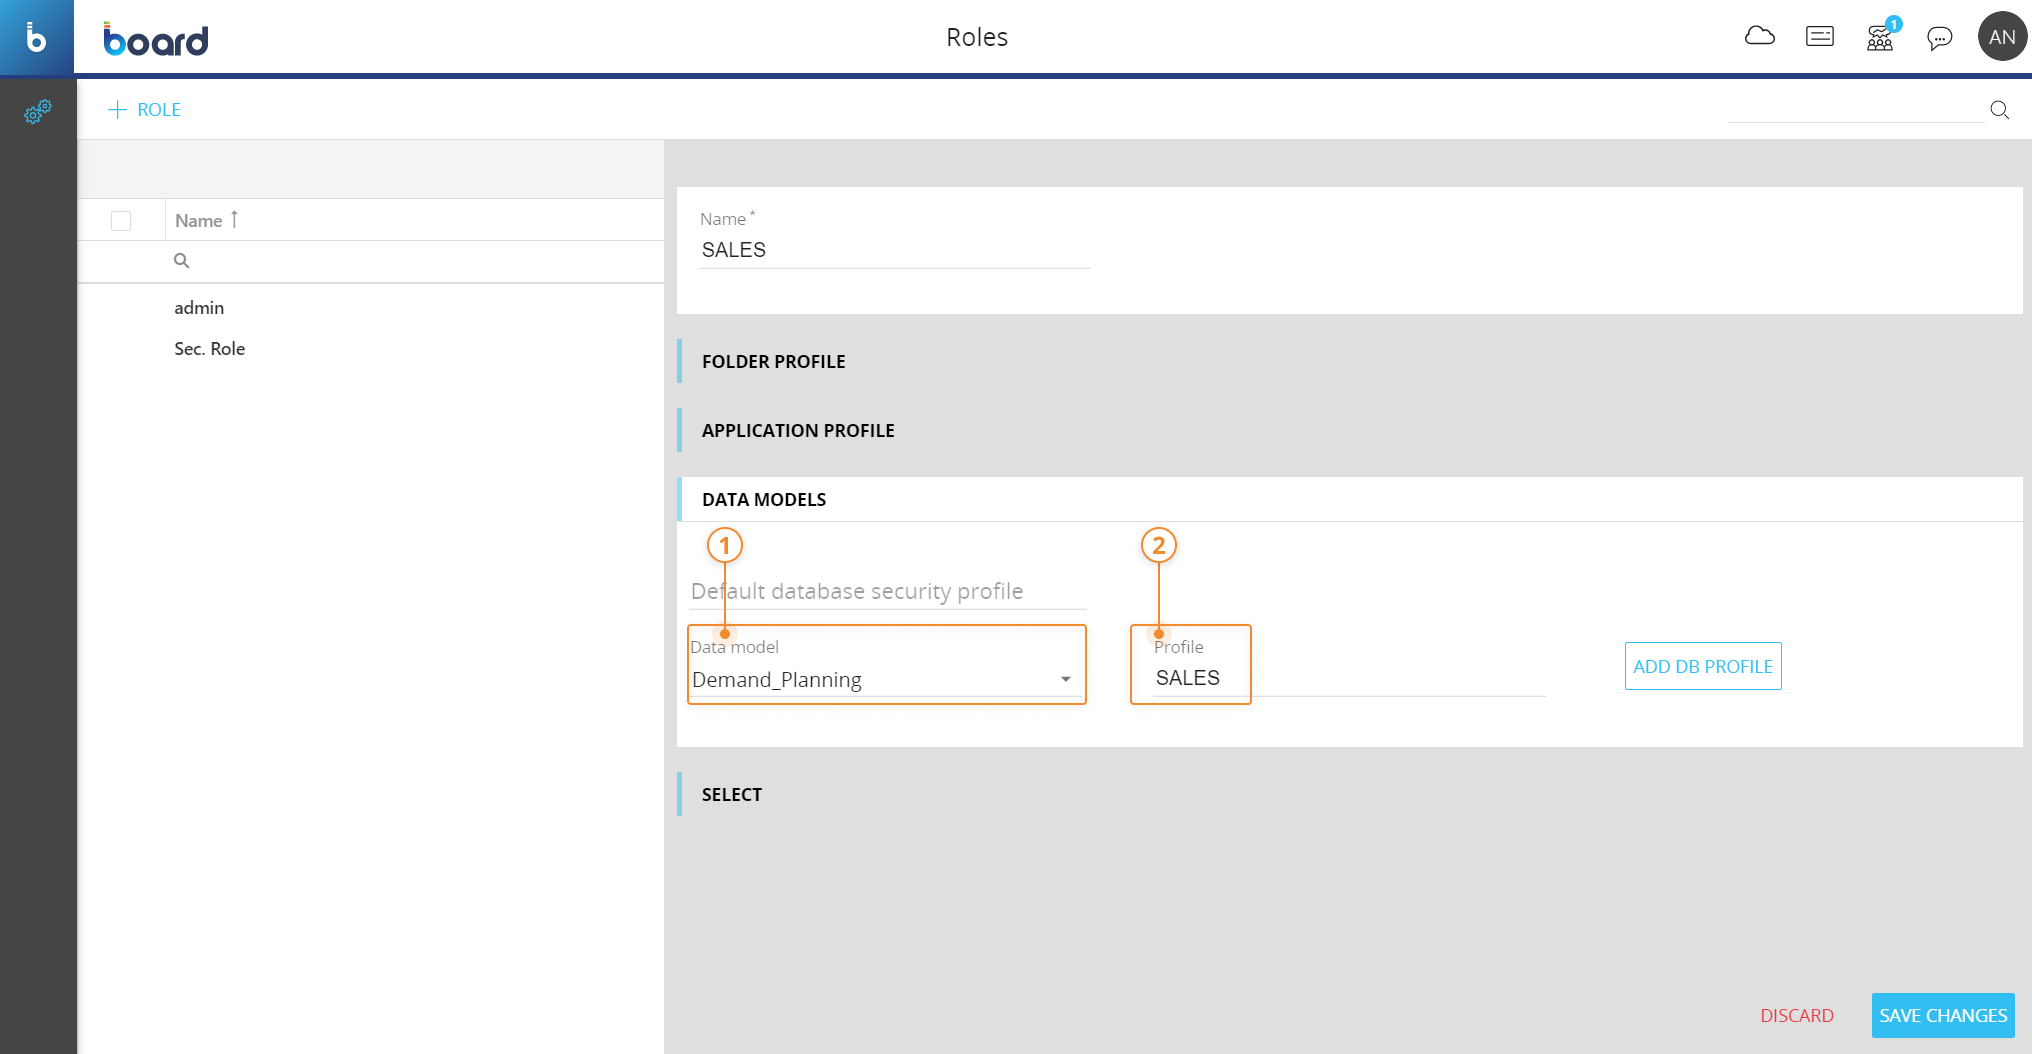
- In the Roles management page, click on "+ ROLE", give it a name and select the desired Data model under the "DATA MODELS" section. You can also edit an existing Role
- From the dropdown menu, select the Data model that includes your previously created security profile and, in the "Profile" field on the right, write the security profile name (Db profile name). Click SAVE CHANGES.
To complete the configuration, assign the Role to the desired user from the User profile panel in the Subscription Hub as described in step 3 of the previous paragraph. Then enter the selection script in the custom User metadata field configured with the @var function (see step 1 of the previous paragraph).
The difference in this case is that the selection script is applied to a Data model and not to a Role of a Board Platform. Thus, the selection script can only be configured and edited by a Data model administrator who has access to to the "Database security" section of the selected data model.
Exporting a database also includes all security profiles created in it, while Roles are associated with a specific Board Platform and cannot be exported.