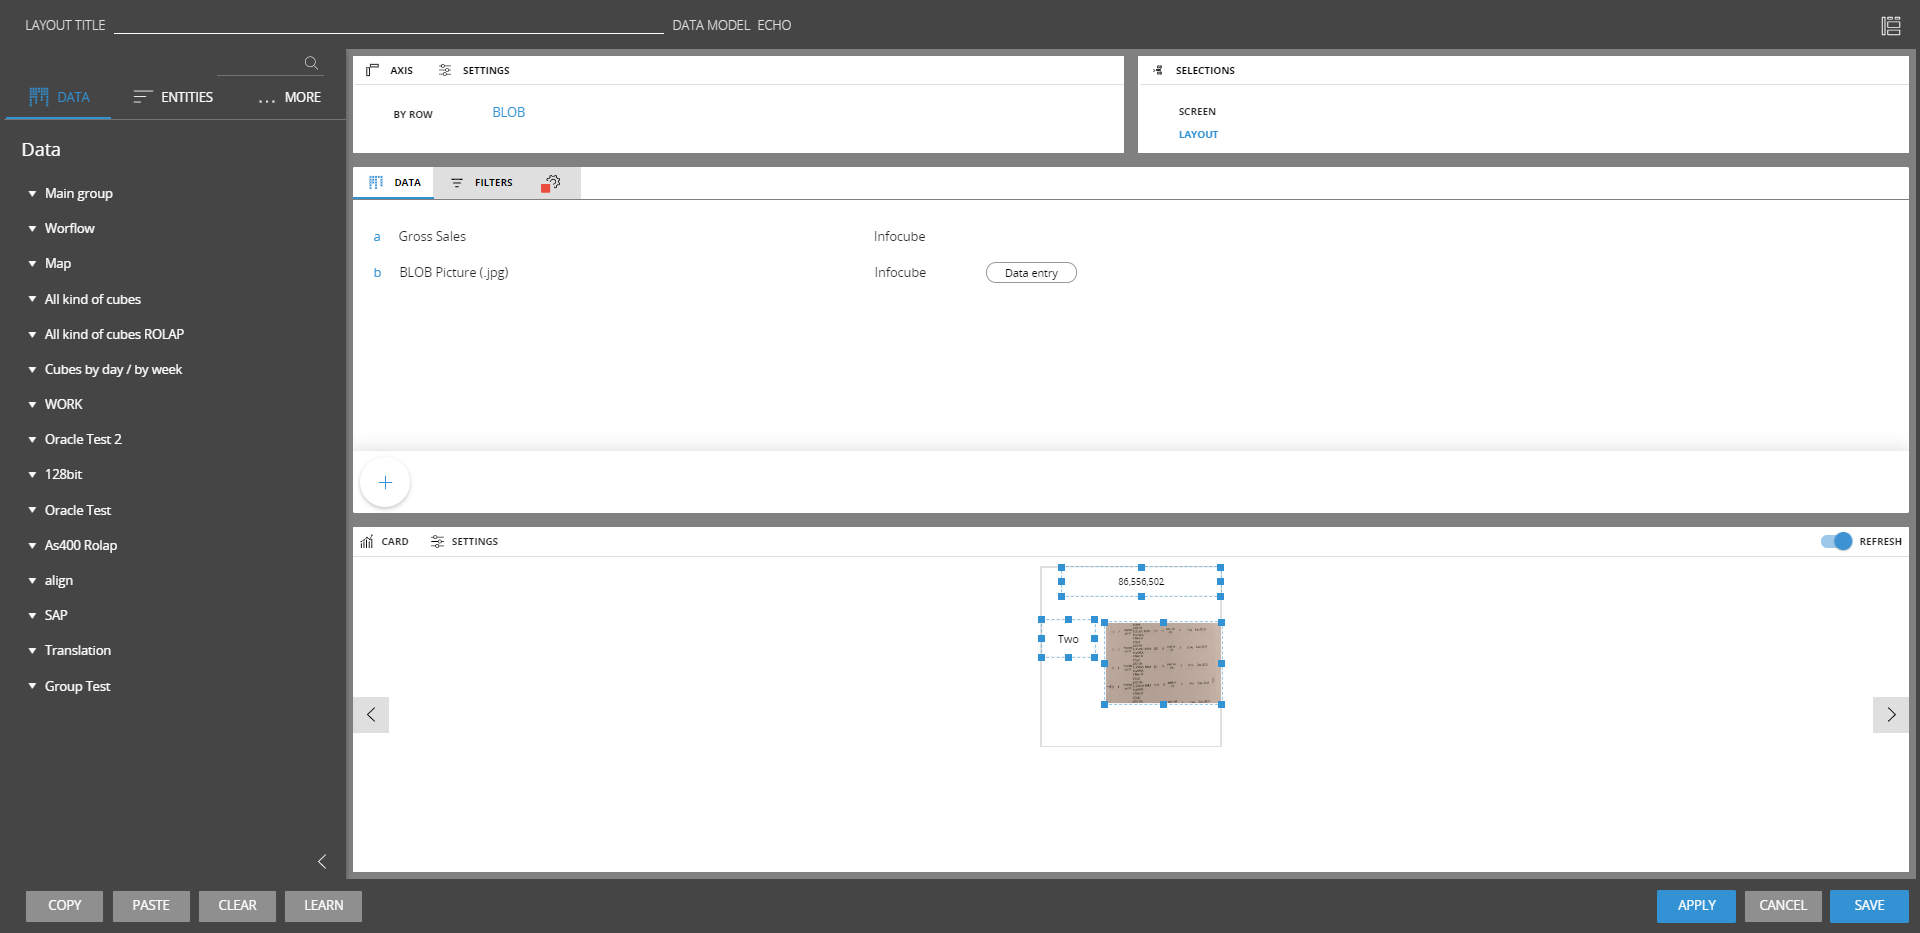
The new Card object is available on the web application. The Card object is an alternative and graphical representation of the standard dataview object. The object is available on the toolboxes list on the web editor.
Once the object is dragged in the screen, the configuration is a standard layout setting. The blocks can be of any type (numeric, text, blobs) with the standard options like the data-entry available. The blocks are also drillable.
The layout configuration has the following constrains:
one entity by row in the axis
the columns are not available
the detail by is not available
As soon as the row axis is defined, a card that contains all the blocks defined in the layout is shown per each of the occurrences of that entity. Each block is shown in the layout editor as a rectangle that can be positioned and resized inside the card.
The card object is responsive. So, once the layout is configured, the card object puts as many cards element as possible on each single line.
It is possible to configure a fixed card height and width from the card settings panel. It is also possible to configure a gap between each of the card elements.
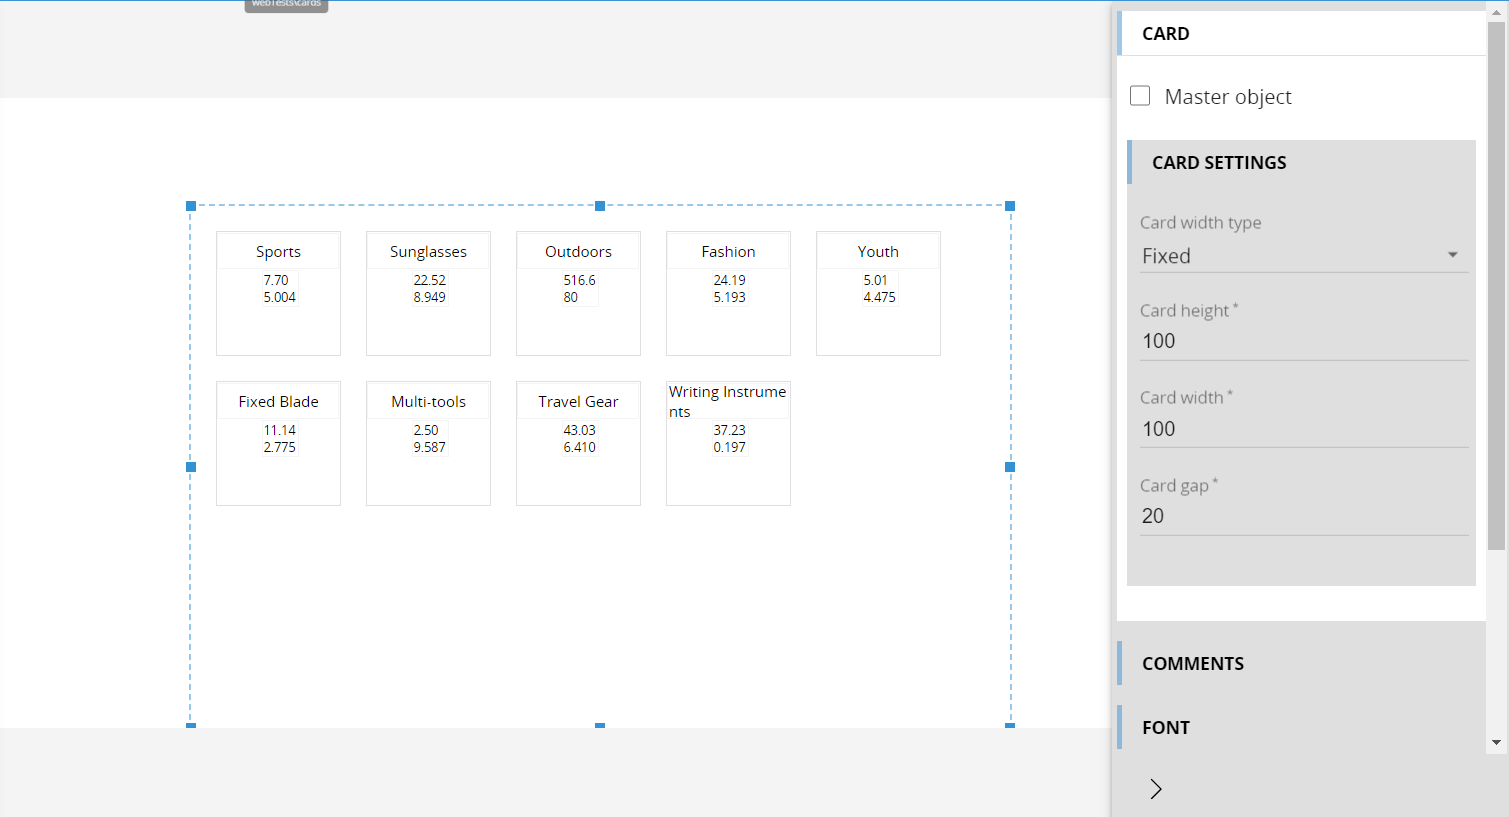
Additionally, there is a dynamic option for the card width, so there is a max and a min width to configure to have the objects automatically resized within these limits. These sizes are measured in number of pixels.
The new Responsive Container is now available on the toolboxes list of the web application. Once the object is dragged into the screen in design mode, it is possible to add other toolboxes (like dataviews, charts, labels, etc..) inside the container. Then it is possible to configure the layouts of the child elements.
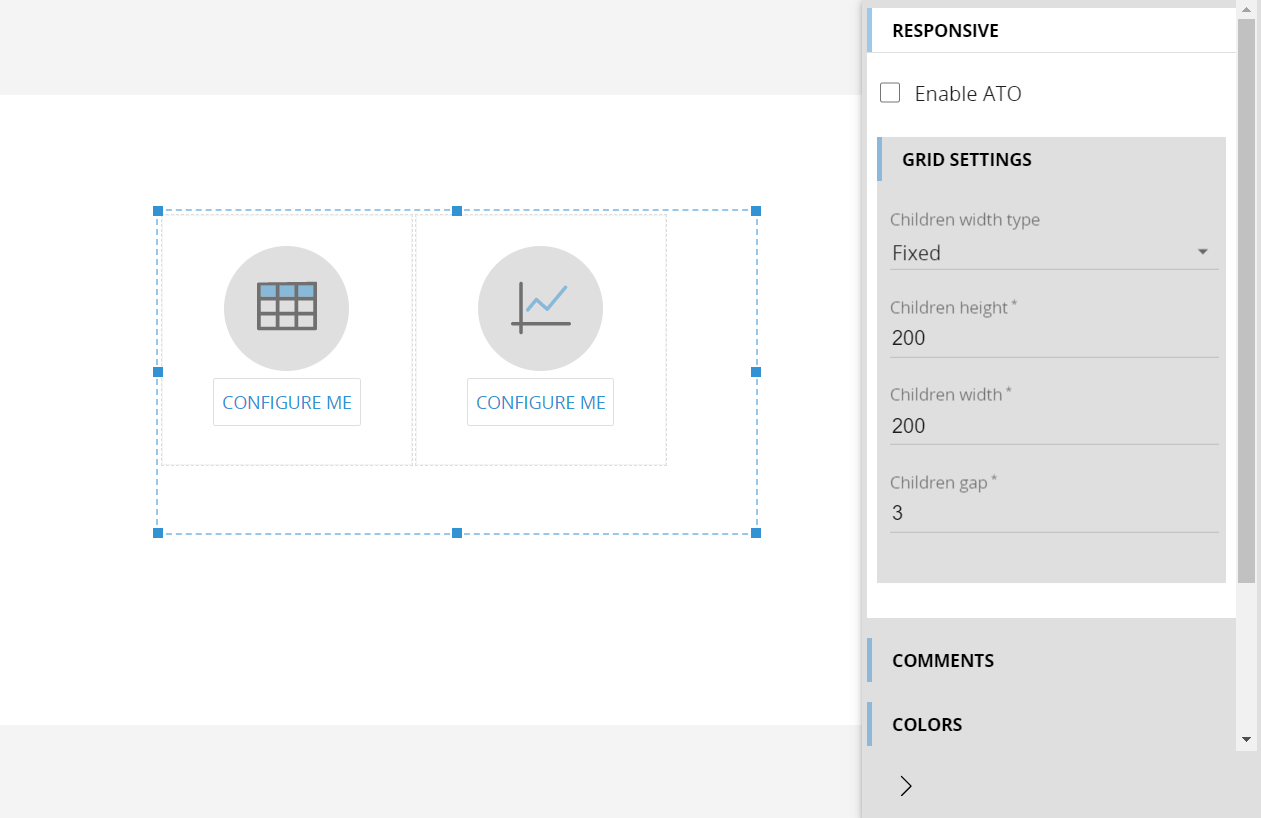
As per the Card object, there are 2 available options for the children width under the grid settings: Fixed and Dynamic. This configuration will drive the sizing and positioning of the children objects. The dynamic option will help in fitting the available space in a better manner.
A new Expander object is available on the web application. The Expander is a container where it is possible to position child elements (other toolboxes). The child objects are displayed in column: 1st object then 2nd object below the 1st and so on. On these objects it is possible to set-up the visibility option. While the screen is in play mode, the position of these child objects depends on the result of the visibility properties. For example, if the expander contains 2 objects 1 dataview above and a chart below, if the visibility of the dataview is hiding the object, the chart is switched in the first position inside the expander container.
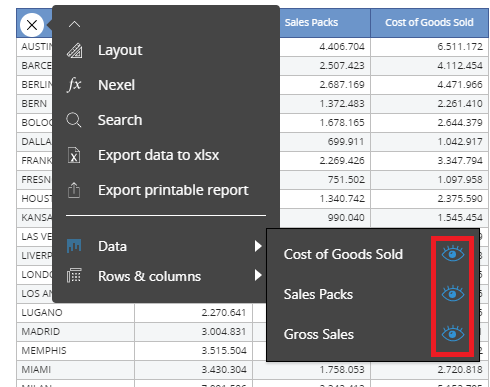
A new Quick Edit functionality is available on the web application. This feature is available only for the Dataview object for now. From the quick Edit it is possible to show or hide on the fly the visible blocks defined in the layout.
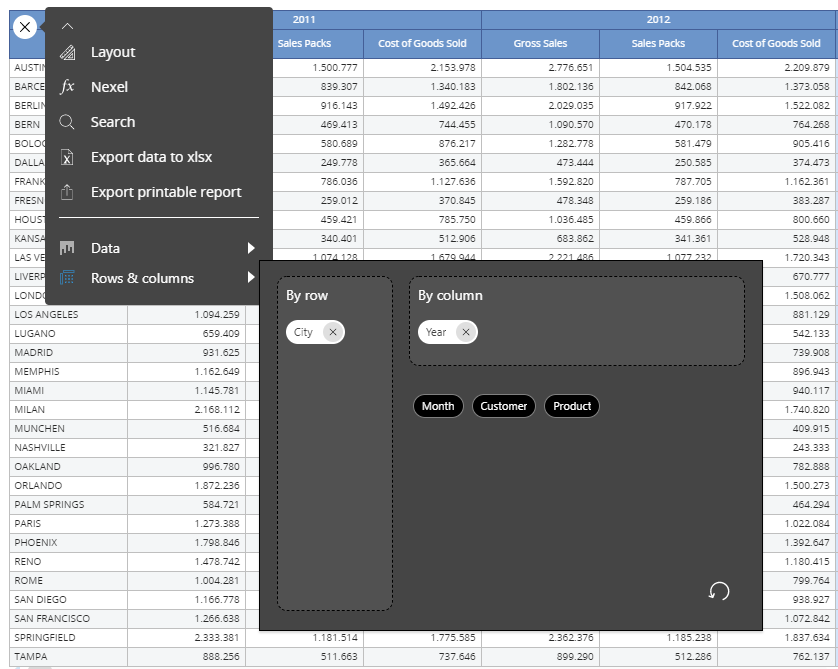
It is also possible to modify on the fly the axes of a layout. From the rows & columns menu it is possible to move the existing entities on the axes or to set other additional entities that are not present in the original dataview axes saved on the screen but have been set up by the screen developer in the layout settings.
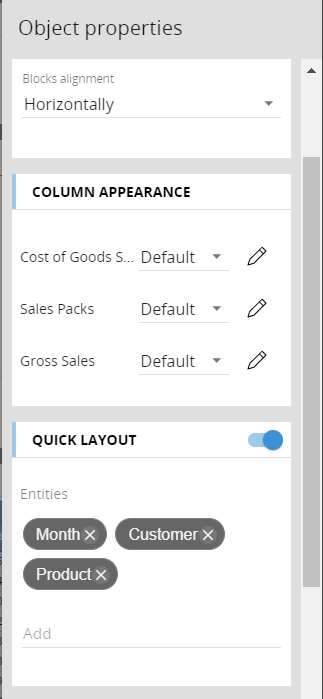
The Quick Edit Layout can be enabled or disabled from the layout editor. By default the Quick Edit is enabled in al the new dataviews and in the dataviews that already exists in a capsule. From the layout editor the quick edit configuration is available under the settings. It is possible to enable/disable it and configure additional entities that will be available by the end user on the screen in play mode. Additional entities can be added from the Add field, typing the name of the entity.
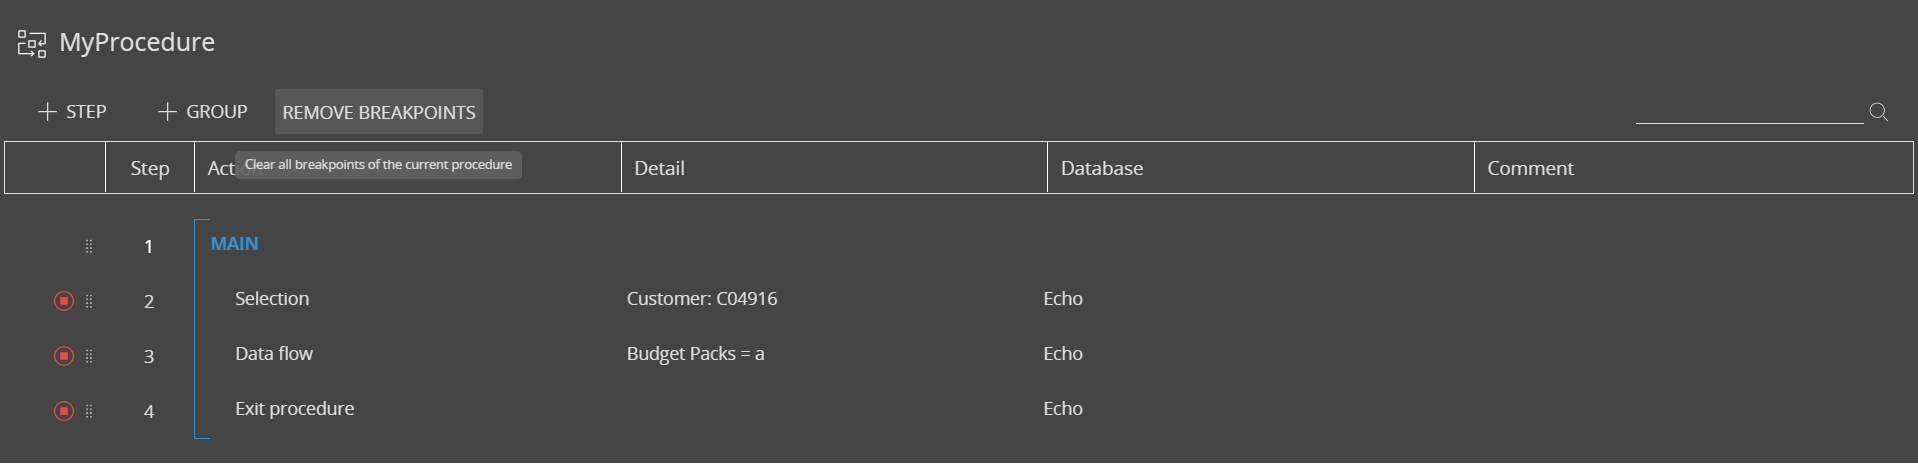
The Procedure Debugger is now available on the web application. The breakpoints can be enabled or disabled from the procedure designer when in edit mode.
When the procedure run, at the first breakpoint the debugger console is shown up with all its available commands.
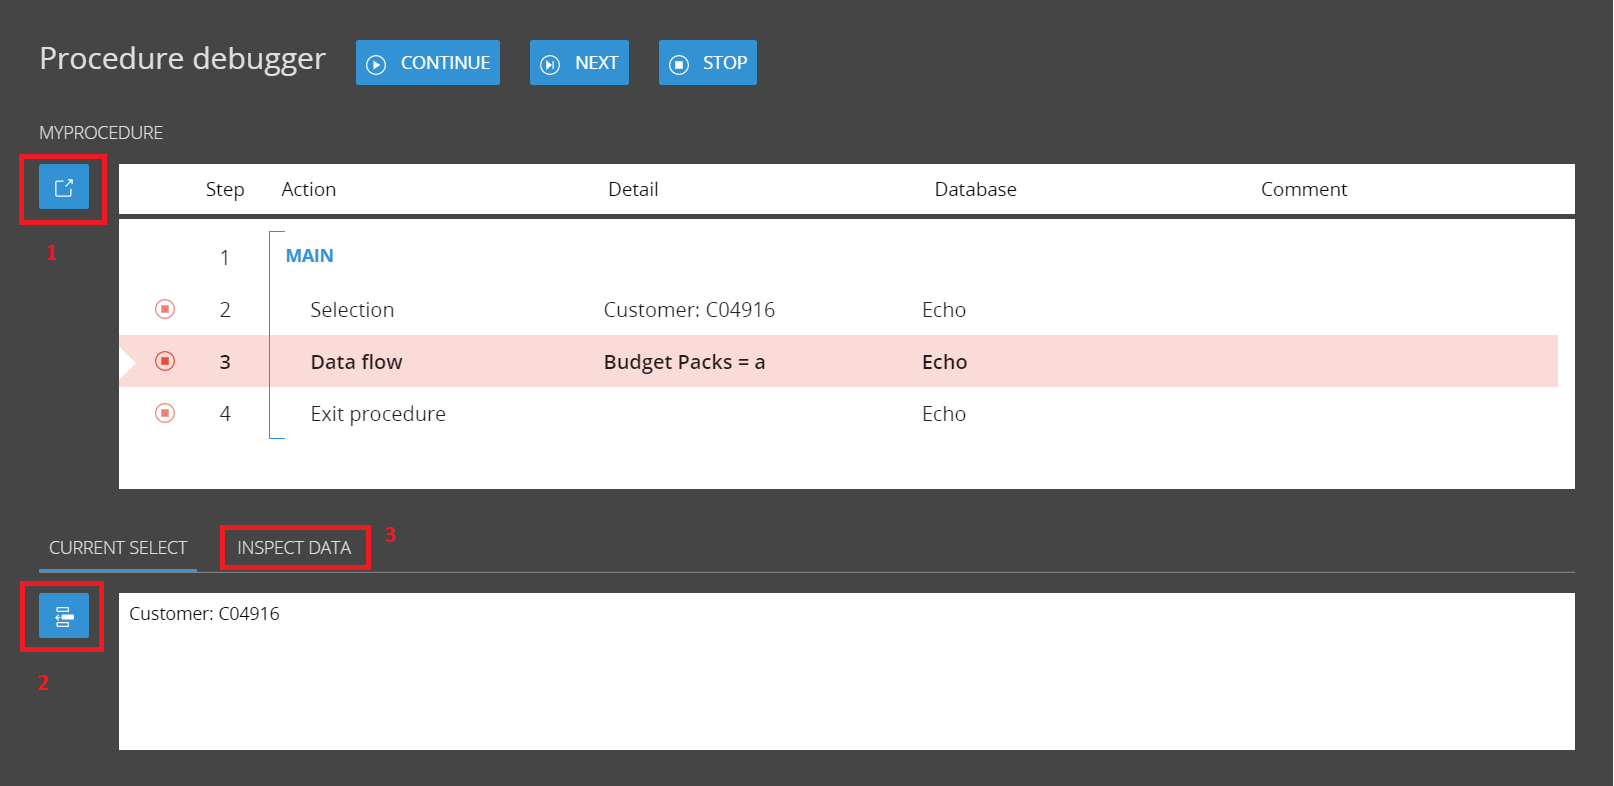
From there it is possible to control the execution flow with the buttons Continue, Next and Stop. Continue executes the procedure until the next breakpoint. Next executes the next step (with or without the breakpoint). Stop will break the execution of the procedure. There are then other command on the console to check the results of he procedure execution.
(1) clicking this icon it is possible to jump into the procedure and edit it
(2) it is possible to check the current selection during the procedure execution
(3) it is possible to create layouts and check data during the procedure execution
It is now possible to configure a specific font family on the web objects. The Font configuration is available on the right-side configuration panel selecting the web object in edit mode.
There is also the possibility to upload a Corporate Font on hte web application. The corporate Font will be available on the entire environmnet. This font can be uploaded from the Them section, available under the System Administration space.
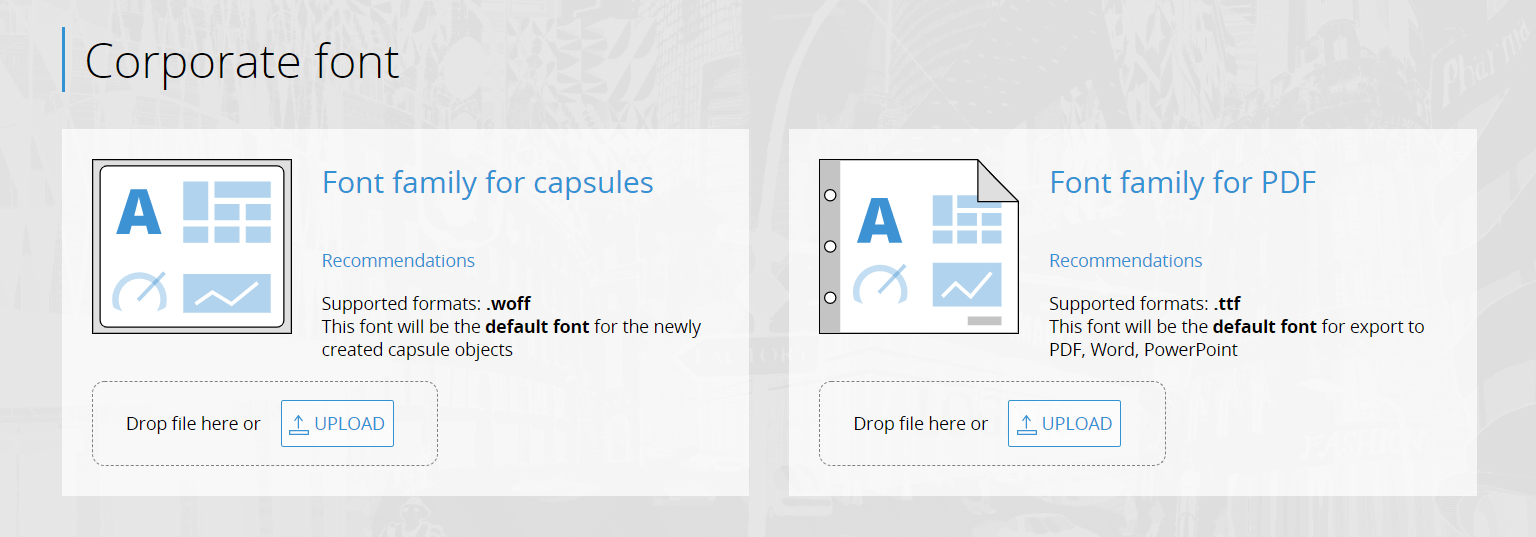
It is possible to load a Corporate Font for the capsule objects (.woff format supported) and one for the PDF exports (.ttf format supported).
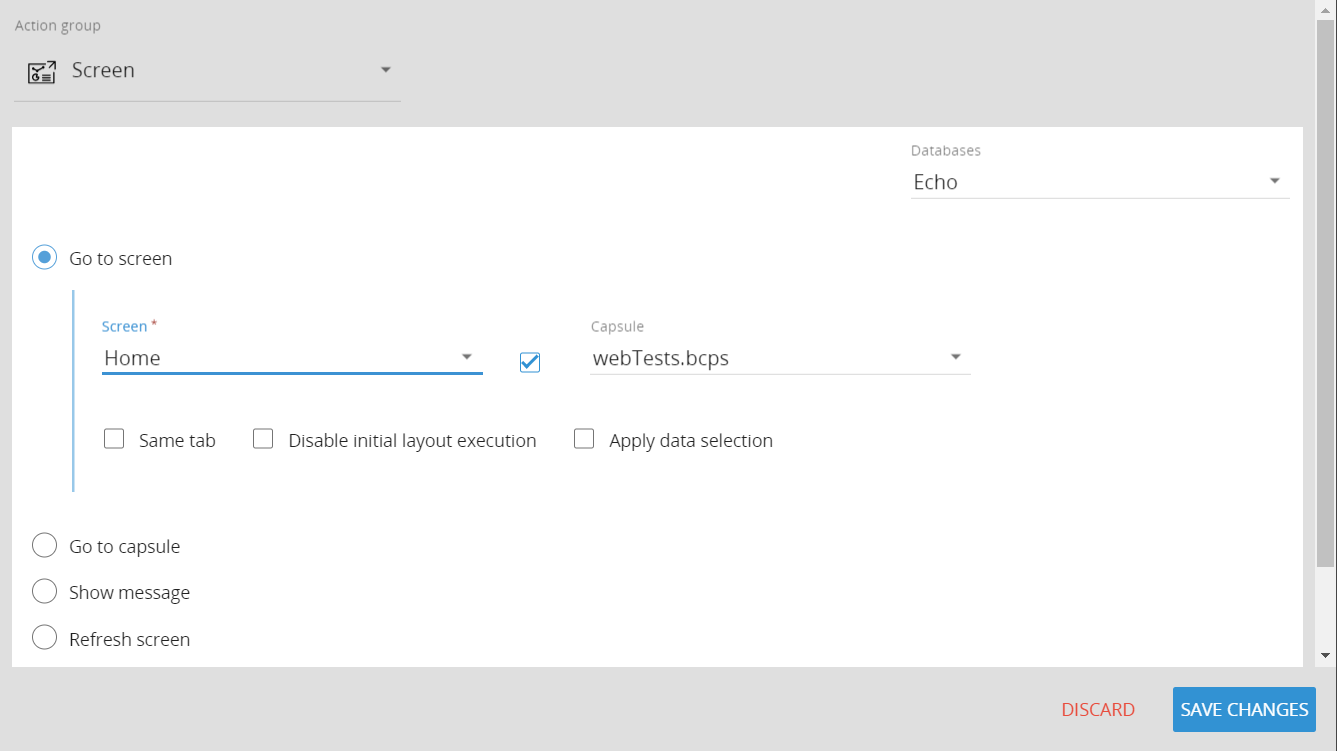
When configuring a Go to screen action, it is now possible to select another capsule and a target screen for the navigation procedure. The configuration is shown in the below image.
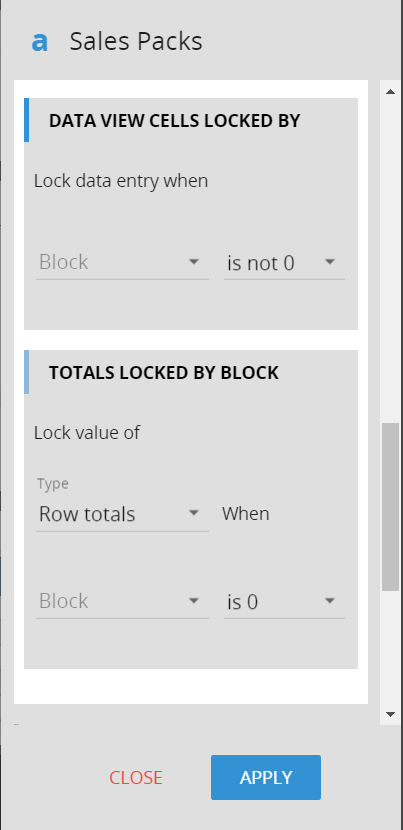
A new option is available on the data-entry lock configuration. It is possible to decide if the locking block is locking when the value is 0 or different than 0. Blow the new configuration box.
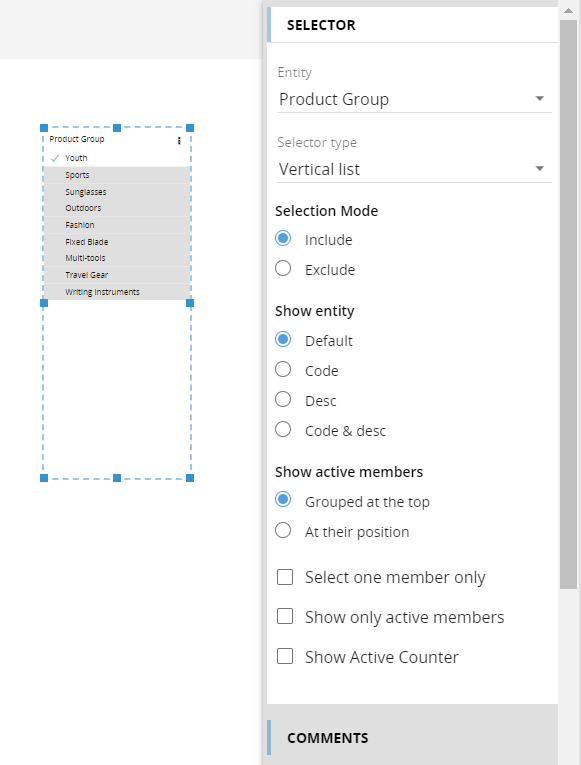
The settings configuration of the selector object has been reviewed as per the below image:
The Pause and Play function of the selector has been reviewed and enhanced. Multiple members selections dragging the mouse over the selector object are now supported.
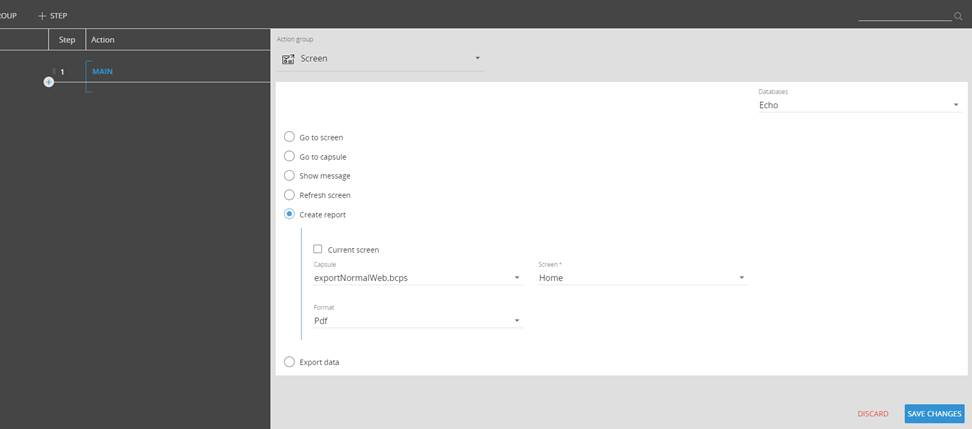
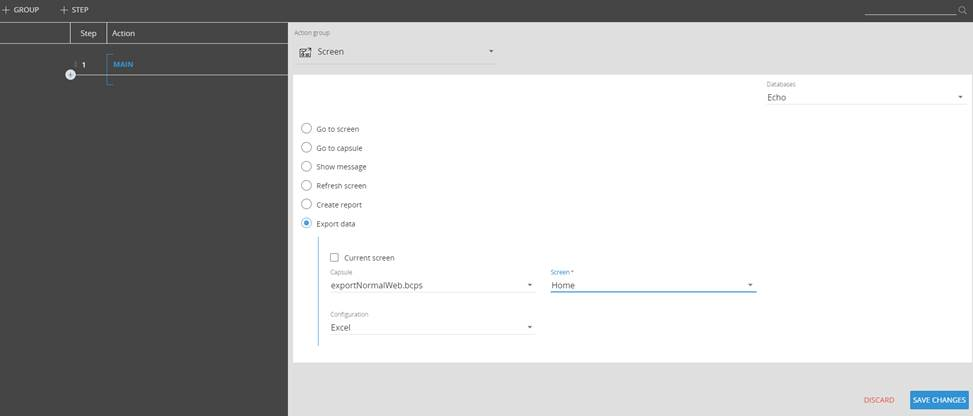
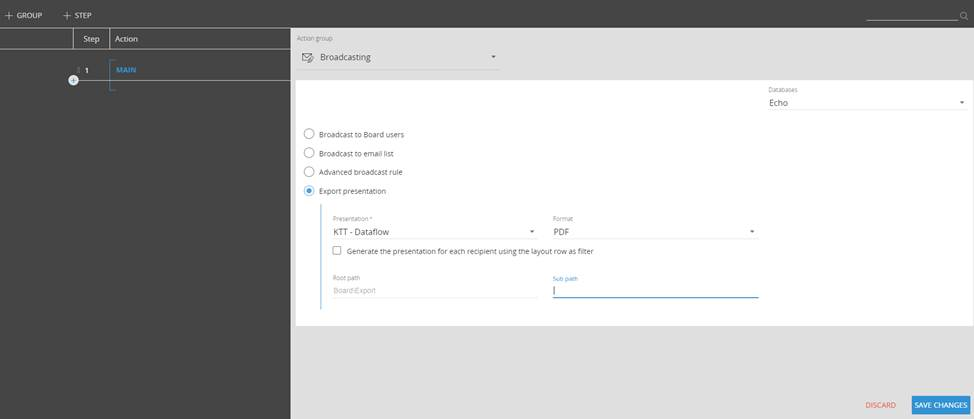
It is now possible to configure an export action from a procedure. The files are exported on the server. The available export functions are:
1) Create Report procedure step: available in capsule procedures under the screen group. It runs the printing function on a specific screen when it's called from a procedure.
2) Export Data procedure step: available in capsule procedures under the screen group. It runs the export data in excel format on a specific screen when it's called from a procedure.
3) Export Presentation: available in capsule procedures under the Broadcasting group. It exports a presentation in a specific folder on the server that is running the Board Web API Engine. The Root Path by default is "C:/Board/Export". This parameter can be customized in the appsettings.config configuration file of the Board Web API Engine (available in the App_Data folder). This customization can be done adding the following parameter: <add key="exportPresentationActionRoots" value="path" /> where path is a custom root path. Multiple paths can be added using the comma as a separator. Then, multiple path choices will be available on the drop-down list in the root path field while configuring the procedure step. The sub path is not mandatory.
It is now possible to automatize the execution of a transporter package. A Transporter package can be executed from MS Windows Powershell and command line or from Unix shell. This allows to automate and schedule the execution of Transporter packages during a given service window. This automation is available under the System Administration section on the CLI automation tile.
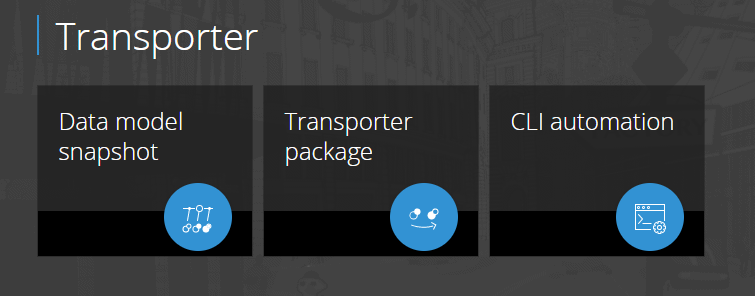
All the instructions on how to run it are available on the CLI automation section of the web application.
It is mandatory to enable the Token service and create and have available the transporter package on the target instance.
The naming convention on the data-reader actions has been changed on the web application.
In the bullet chart it is now possible to configure drills, master layout and apply a selection from the sliding toolbar.
It is now available a shortcut to jump in edit mode into a procedure from a screen object where the procedure is launched.
The Gauge object supports the drill-down function.
The dataview search supports a multi-line text (it works in OR).
An enforcement of the Sparse Structure to prevent database corruptions has been introduced in this version.
The pager object is now available on the Excel Add-in.
The page by and selections options are now available when a single object is exported in excel. (clicking on the toolbar export button). The option is available when you have a selector or pager in the same screen where you have the object to be exported.
A malfunction on the Broadcasting scheduled tasks that occurs when a task is not configured properly has been fixed.
A malfunction in the concurrent opening of capsules and screens that was holding the BoardFolderProfiles.dat file has been corrected.
The decimal separators on a excel extraction are now consistent between the sublines and the totals.
The clear entity action doesn't display the standard time entity list anymore.
The suggested values list based on an entity in a dataview follows the screen selections.
Azure AD authentication through the SAML2 protocol is now supported on the win client and the office add-in.
The apply on totals option on the rule blocks is now available on the web designer.
Enhancements in the management of exceptions during the transporter actions.
The suggested values are now available in the drill-down window on the web.
An enforcement on the protection from XSS attacks has been applied on the web application.
The save/undo option affects also the data-entry on BLOB cubes on the web application.
A visual issue (absence of scrollbars) in the file upload page on the cloud platform has been fixed.
A malfunction on the data-reader ETL while is evaluating a numerical vs text type has been fixed.
A malfunction on the execution of an ETL combined with the regional settings of the Windows user that is running the BOARD service has been fixed.
A fix on the propagate cell template in the dataview settings has been introduce on the web.
A malfunction on the ASCII data-reader procedure step that is showing the wrong detail information about the protocol has been fixed.
The relationships management on the web has been reviewed and optimized.
A malfunction on entity block treated as numeric in dataview layouts has been fixed.
Decimals digits are now visible on the geomap blocks.
A malfunction on the procedure launcher due to case sensitive characters has been fixed.
A malfunction on the ATO insert new member function and the code length of new members has been fixed.
A malfunction on the edit description of the ATO pager has been resolved.
A malfunction on the disable record count option on the data-readers connection definition has been fixed.
A malfunction on select entity based on cube not displaying all related cubes has been fixed.
A malfunction on the Broadcasting for which modifications on an existing task were invalidating it has been fixed.
A misalignment between the Win Client and Web Client on the management of subtotals and locked cells has been resolved.
A malfunction on the Impact Analysis due to the Folder Profiles configuration has been fixed.
A correction on the usage of selectors in screens with dynamic selections has been introduced in this version.
A malfunction on the export presentation to file done by users without administrator rights has been fixed.
A malfunction generated by saving a data-entry with the pattern based on allocation followed by a triggered procedure has been fixed.
Users with a database security access mode set as read and write can now edit procedure steps that contains data model objects.
The excel add-in workbook selection has been fixed.
A correction in the sparsity structure protection system has been introduced in this version.
Multiple issues on the data entry by suggested values on the web dataview have been fixed.
An error that was occurring while defining manually a bottom-up relationship has been corrected.
A performance issue on the layouts execution has been corrected.
A malfunction on the upload corporate font functionality has been fixed.
Modifications on layouts in a presentation slide are now kept in the export when the file type is excel.
An error on the cloud upload functionality has been fixed.
A malfunction that was occurring while playing with selector objects and the screen selection has been corrected.
@functions on labels are now shown as text and not as numeric values.
A malfunction on the markers of the chart objects has been corrected.
A malfunction that was occurring changing a setting of the broadcasting step has been corrected.
The broadcasting steps can now be configured and scheduled without run it manually the first time after their creation.
Suggested values on text cubes can now be cleared to delete the content of an existing cell.
A malfunction on the dataview search box when the configuration has more than 1 entity by row has been corrected.
When performing data entry on relationships the dataview will display code and/or desc of the parent entity according to the block configuration.
A malfunction on Cognitive Space that generate an error "Exception has been thrown by the target of an invocation." has been fixed.
A malfunction on layout extracted through the function "Export Selection" does not show the selection has been fixed.
A malfunction on Corporate Identity Designer that was not working correctly has been fixed.
A malfunction on the map object in the Win client, which did not show the maps, has been resolved
Multiple issues on the Create Report/export to PDF from Presentation have been fixed.
The Full BOARD installer packages have been updated. The new Patch versions contains a set of new features and bug fixing. All the details are listed below.
The Select Bookmark is a new feature introduced on the web application. It allows the users to create their own library of different selects that can be saved and reused in the capsule screens. So the users can play with the selections through selectors and screen selections (when it's allowed) and then save it. Each saved selection is called Bookmark. Each user can create its own bookmarks that are available just for himself.
The bookmarks can be created and used through the application menu as per the image below:
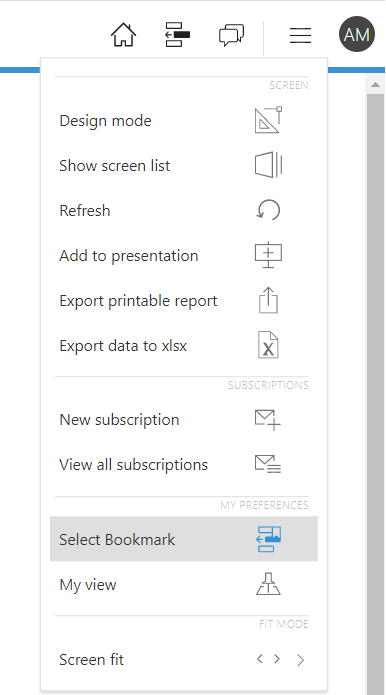
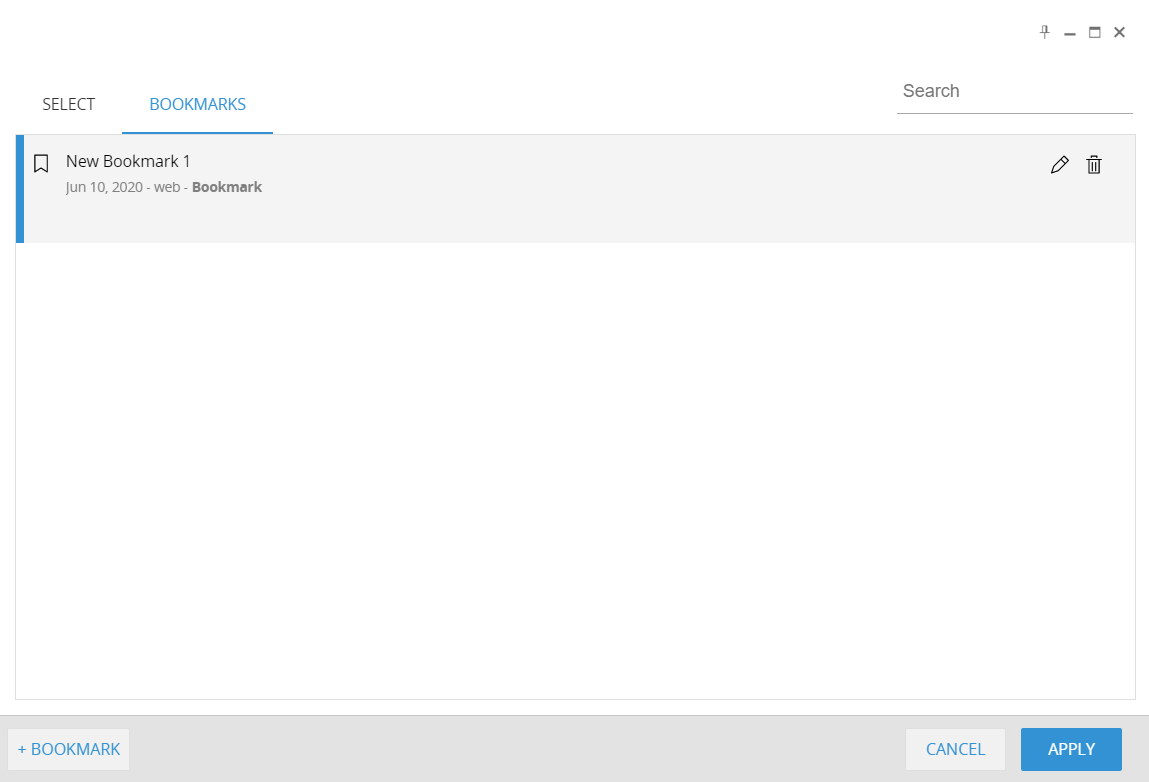
Clicking on Select Bookmark the configuration pop-up window appears:
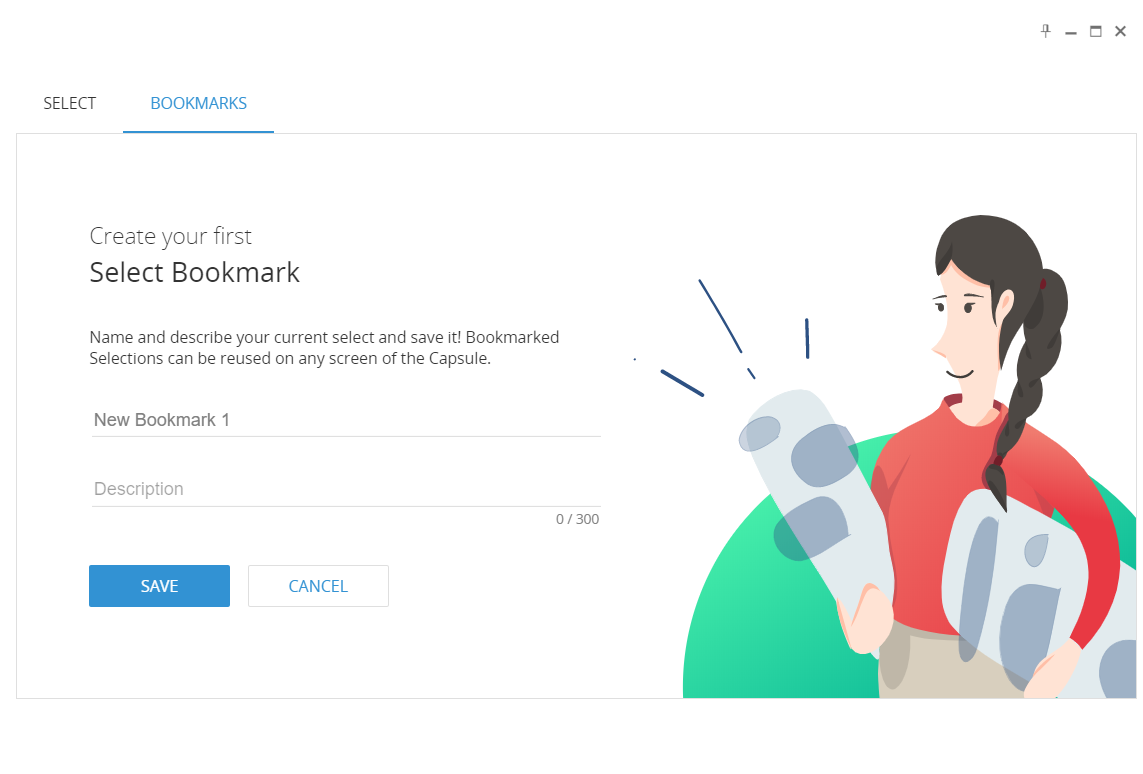
It is now possible to give a name to the specific select bookmark, define a description of it (maximum 300 characters per each description) and then save it.
Once it is saved, the list of the available bookmarks is updated with the new bookmark. It is possible to edit the name and the description and delete the saved bookmarks through the pencil and recycle bin icons on the right side of the bookmark object.
It is possible to add new bookmarks clicking on the +BOOKMARK button.
It is possible to apply the bookmark to the current screen just double clicking on the bookmark. It is also possible to apply the bookmark to the current select window selecting the bookmark and clicking apply. Then the current select is updated appending the bookmark selection to the current select. The select bookmark supports the multi database option.
The My Screen View is a new feature introduced on the web application. It allows the user to save a modified view of the capsule screens. The users can modify layouts through the layout editor and the quick edit layout, drills configurations and pager synchronizations in play mode and the save the custom view.
The custom view can be recalled from the user. It is possible to save a single view per each screen and each user have their own views available.
The My View function is available on the web application menu as per the image below:
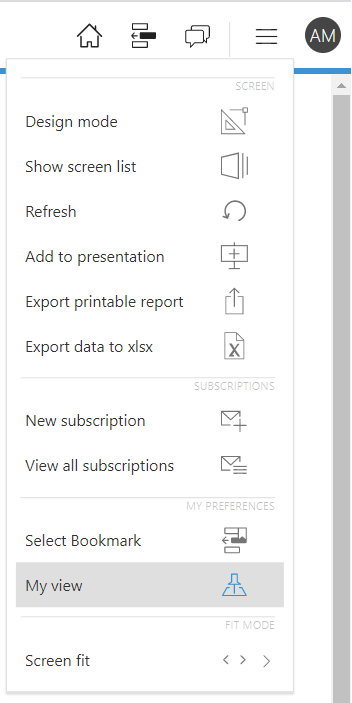
Clicking on My View the configuration pop-up window appears:
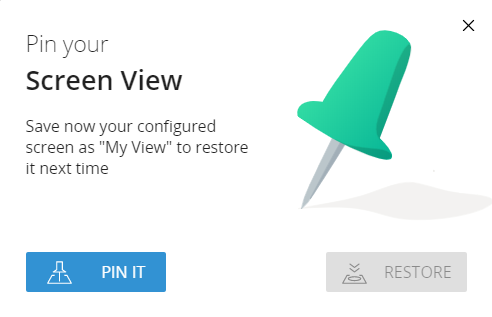
Clicking on Pin It the modified view of the screen is saved and available for the user.

The restore button apply the pinned view. The Update button will save and overwrite an existing saved view.
It is possible to sort the columns of a dataview layout based on the column total value of a block. The sort by column is available only on the DataView Toolbox. It is available under the Filter settings of the Layout Designer. The Keep Top and Keep Totals Options are available for the sort by column.
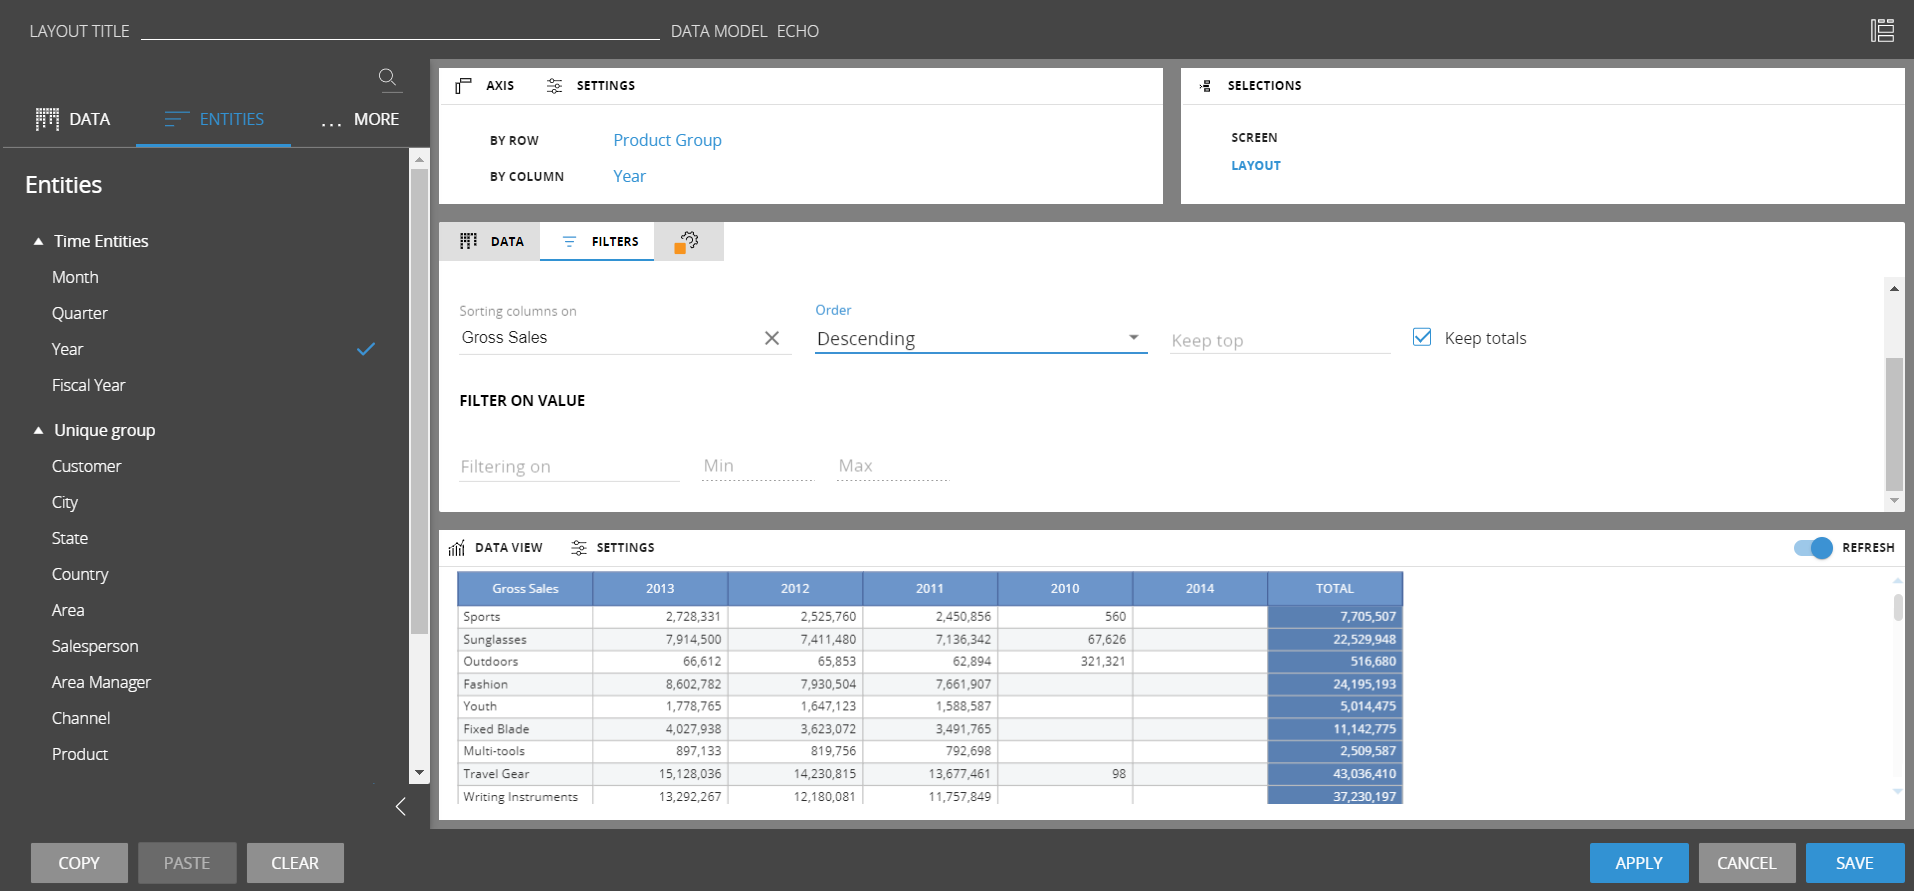
The column sorting is available only for layout with maximum 3 entities by column. It is not applied on blocks with the detail by option enabled.
Defining an host as an http/https address the add-ins will connect through the standard ports for those protocols and not through the 9700s ports. The protocol needs to be specified in the host configuration as per below:

It is mandatory to have the BOARD WebAPI Engine deployed on the server to use this configuration because the web Engine is acting as a proxy for the communication with the BOARD Engine. If this configuration is used, it is not required to open the 9700-9710 TCP ports because the communication go through the standard http/https ports. When this host configuration is in use, the Windows Authentication is not available for the specific host configured in the connections.
This new version contains enhancements on the vertical layout settings:
the alerts are now supported on the web
the block formatting is now supported
There are also new general enhancement on the web client:
A search field is now available on the extract cube procedure step.
It is now possible to define a default template for the entity formatting.
It is now possible to navigate directly on a nested procedure recalled on a call procedure step when the user is working in the procedure designer.
Below the list of fixes included in this version. If not specified, all the client-side fixes are applied to the web client only.
If a text cube contains a string with a negative number only, the export to excel will consider the sign
The transporter is also creating new Groups for the rules once is launched
Space characters set as a first character on label captions are considered on the caption in play mode
A malfunction that was preventing the pager object to keep the right sizing in play mode has been fixed
Send To action name supports now Japanese characters
An issue that was preventing the deletion of a Monthly cube version has been corrected
The add to presentation function is not showing anymore screens that belongs to capsules with the hide screen list enabled
A malfunction on the concurrent update of presentations has been fixed
An issue on the create printable report feature executed on a screen with a printing area and the repeat by function enabled is now fixed
An issue that was preventing the visualization of cubes without any group assigned has been fixed
A malfunction that was preventing to execute the clear all variances function has been corrected
Procedures are now alphabetically sorted when displayed on lists (such as procedure lists on the button action)
The spacebar key can now be used in the search fields on the procedure steps such as clear cubes
The web tree-map is now showing the entity details if the detail by is enable on a shown block
A fix for the display of long database name in the data-model designer has been developed
A malfunction while setting the Limit drill down entities and using the drill anywhere has been fixed
An issue that was occurring on a specific layout configuration with the layout select in keep mode intersected with a screen selection has been fixed
A malfunction on the color of the Waterfall Grand Total has been fixed
A malfunction on the export rule from the web client has been fixed
An issue that was preventing to read fields with the dash (-) symbol as a last character has been fixed
The menu object is now inactive when the user is in design mode on the screen
The dataflow algorithm detail is now shown on the log section of the web application
When data entry is saved through a procedure, if the data entry has been made on a dataview with scrollbars, the focus of the dataview is kept after the refresh
A malfunction that was causing an unexpected logout action while the same user is trying to login from 2 different locations but typing a wrong password has been resolved
A malfunction that was preventing to correctly restore huge databases has been fixed
An issue that was preventing to search through a data entry with suggested values based on entities with more than 300 members has been fixed
A malfunction on SQL datareaders mapped on columns that contain the word "Measure" in the name has been fixed
An issue that was not showing the relationships definition when the capsule name contains the & character has been fixed
When the hide screen list property is enabled it is not possible to see the screens from the capsule hamburger menu
An issue on the credentials using the LDAP authentication has been fixed
An issue on the data entry action on a text cube defined on a layout inside the expander container has been fixed
The calendar options on the custom time entities are now visible on the layout editor time function configuration
A malfunction on the responsiveness of the label shapes has been fixed
An issue that was preventing to drill anywhere when the license level check param is set to Medium has been fixed
A malfunction on the export to excel with selections has been fixed
An issue that was preventing to export to excel layouts containing formula with the character ";" has been corrected
A malfunction that was preventing to configure and correctly use the dynamic drill to screen feature has been fixed
An issue with the configuration of fonts and borders on the cell templates for the entities has been fixed
A malfunction that was preventing to expand dataview collapsed groups when the master layout option is enabled has been corrected
An improvement of the transport action for the data-readers objects has been introduced
The corporate identity designer has been fixed. This is valid only for the Win Client
When a new selection is applied on a chart through a dataview master layout on the same screen, the export to excel function triggered on the chart will consider the new selection
It is now possible to perform data entry on grand totals on dataviews with the flatten mode enabled
When changing the color of the subgroups of the sitemap, this modify is reflected on the "arrows" of the menu object
A malfunction in displaying RTF content on a text cube has been corrected
The drill down to screen function with the option Go To Screen enabled is preserving the selection of the target screen
A fix for the usage of the transporter with ROLAP cubes has been introduced
The entity editor object can be set on empty entities
An enhancement on the cube version visualization has been introduced in the data model designer. When cubes have many dimensions in the structure, it is possible to mouseover to see the details
Procedure If-Then-Else steps show now the details on the procedure steps list
When the Hide screen list option is enabled on a capsule it is not possible to navigate through direct URLs. It is possible if the screen was already opened from a user in the same browser session
Extract and reload of text cubes is considering the carriage returns
A malfunction that was showing twice the custom time entities on the layout editor has been fixed
A wrong visualization of the max item number on the time entities has been removed
An enhancement on the chart type and chart series type has been introduced
A correction on the show value applied on the label object has been introduced
Selection are kept when navigating back and forth with the browser arrows
Version 10.6 has a full web HTML5 client. Capsules that are created from the web client have a new format: ".bcps". The old ".cpsx" capsule can be still used in play mode in the old format. Old capsule in ".cpsx" need to converted into the new ".bcps" format to be used in edit mode on the web client (a common web browser). The migration process is automatic and documented HERE. The system will retain a copy of the capsule in the old format renaming it with the "(BKP) tag in the capsule name. The ".bcps" capsules cannot be opened from the BOARD Windows Client.
Important Notice
Excel Workbooks that contains Board Layouts configure with layout selections need to be verify. The layout selections may be lost during the upgrade process due a compatibility issue.
Broadcasting features installation
The broadcasting features (subscription, send to and broadcasting) require an additional service that execute the mailing function. The web API Engine installation (self-hosted) deploys a new service "BoardMailerService" that is used for the Broadcasting like functions. If the Web API Engine has been deployed under IIS, this new service is not automatically deployed on the instance. An additional set of CMD commands must be run on the server to deploy that service.
Below the commands for the "BoardMailerService" deploy:
"C:\Windows\Microsoft.NET\Framework\v4.0.30319\installutil.exe" "C:\inetpub\wwwroot\B10WEB\Bin\Board.Mailer.Service.exe"
sc config BoardMailerService start=auto
sc start BoardMailerService
Where "C:\inetpub\wwwroot\B10WEB" is the IIS path where the BOARD web application is hosted.
Other details on the configuration of the Mailer service can be found HERE.
Printing features installation
This features relies on a Windows process (Board.Web.Snapshotter.exe) that requires the installation of the .net Framework 4.7.1 . Please notice that this version of the .NET framework requires Windows Server 2012 or later.
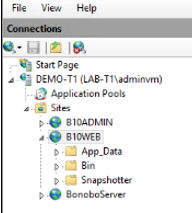
If you are deploying the Board Web Service using IIS, make sure to configure your instance as described below:
|
The 'Snapshotter' folder must be cut from the Bin Folder and copied in the IIS Board Website Root (like the App_Data folder). For additional information please refer to the Boardville Community Wiki Document. |
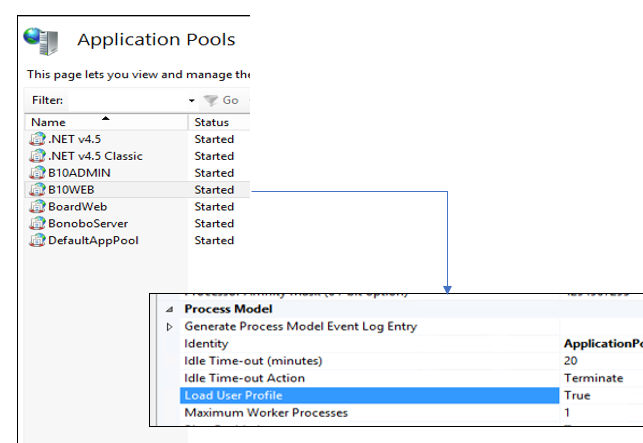
|
In the Application Pool of the IIS Board Website, go to advance settings, and set parameter “Load User Profile” to true. |
No additional configuration are requested if you're deploying the Board Web Service suing its own http Server.
After upgrading the Board Server it is required to upgrade all Board Client and Office Add-in installations to the same version 10.6. A Capsule created or saved using version 10.6 can't be re-opened with an older version such as version 10.5.x or even older.
When you open Capsules created with prior versions of Board (version 9 or 8) a request of upgrade to Board 10 format prompts out. If you click Yes the Capsule is automatically updated in few secs and enabled to the Board Web Client. If you click 'No' you can still go on to use the Capsule but with the Board Win Client only
It is possible to change some settings of the Snapshotter Process editing the file C:\Program Files (x86)\Board\Board WebApi Server\App_Data\config\snapshotter.config (if you run IIS refer to IIS App_Data Folder location path).
| <add key="host" value="http://localhost:8011/" /> | It's the snapshotter process host address. Change the IP port if needed |
| <add key="applicationUrl" value="http://localhost/" /> | As configured on your site bindings, for example: https://yourhostname.board.com/ If the web application port has been changed, you need to specify the port here in the applicationUrl definition |
| <add key="minPoolSize" value="1" /> | It's the number of Web Client (Browsers) that can simultaneously generates reports. By default it is from 1 (min) to 5 (max) |
| <add key="maxPoolSize" value="5" /> | |
| <add key="workingFolderPath" value="..\reporting\" /> | The temporary folder path where screenshots are saved while generating the report |
| <add key="logLevel" value="Error"/> | You can setup Error, Verbose, Debug. (Error by Default) |
| <add key="logPath" value="..\log\Snapshotter\{Date}.log" /> | The folder Path where logs generated by the reporting jobs are saved. |