New Extract procedure steps
Two new Actions (Procedure steps) have been added in the "Extract" actions group in the Procedure designer: Bulk insert to SQL Table and Export Dataset.
These new steps allow for much faster data extraction from Layout executions, even with many Data Blocks and many Entities set by row, and allow you to export that data to a CSV file or to an external SQL database table.
The new, high performance Export Dataset action can also be invoked through a Board Query REST/API, replacing data extraction through files when other systems need to retrieve data from Board.

Bulk insert to SQL Table
Before Board 2021 Winter release the only way to write a massive amount of files to a SQL table was to use a Dataflow step.
However, the Dataflow step has various limitations, such as performance slowdowns with huge datasets and the ability to write only one Cube at a time on the target SQL table.
That's why we created the new Bulk insert to SQL Table feature: with it, you can export huge amounts of records from different Cubes and quickly insert them into a SQL table.
To configure the new Bulk insert to SQL Table step, proceed as follows:
- Configure a Layout to define the data to be extracted. Once the Layout query is defined, a table showing information about the data (Board Entities and Data Blocks) and values to be inserted will appear: values are color coded in order to better identify them in the final INSERT INTO statement.
In this case, the Layout editor doesn’t return down totals and doesn’t support Entities by column, Rules, sorting, filtering and ranking functions.
Enable the Extract zeroes option to extract all data for all members in the active selection, regardless of whether Blocks in the Layout contain data or not. You can enable the option only on the most nested Entity (of each Relationship tree) set By Row.
Any active Select also applies to data extracted from the Layout query. - Connect to the target relational database:
- Select an existing SQL Source and click on the CONNECT button.
Once you're connected to the SQL database, the button will turn green to indicate a successful connection and the "Table" dropdown menu will show all available SQL tables.If the SQL connection you need hasn't been configured, click on the CREATE button to jump to the Data Sources configuration page.
- Select a destination table. When a table is selected, information about its columns will appear as shown below.
Table and column names are color coded in order to better identify them in the final INSERT INTO statement.
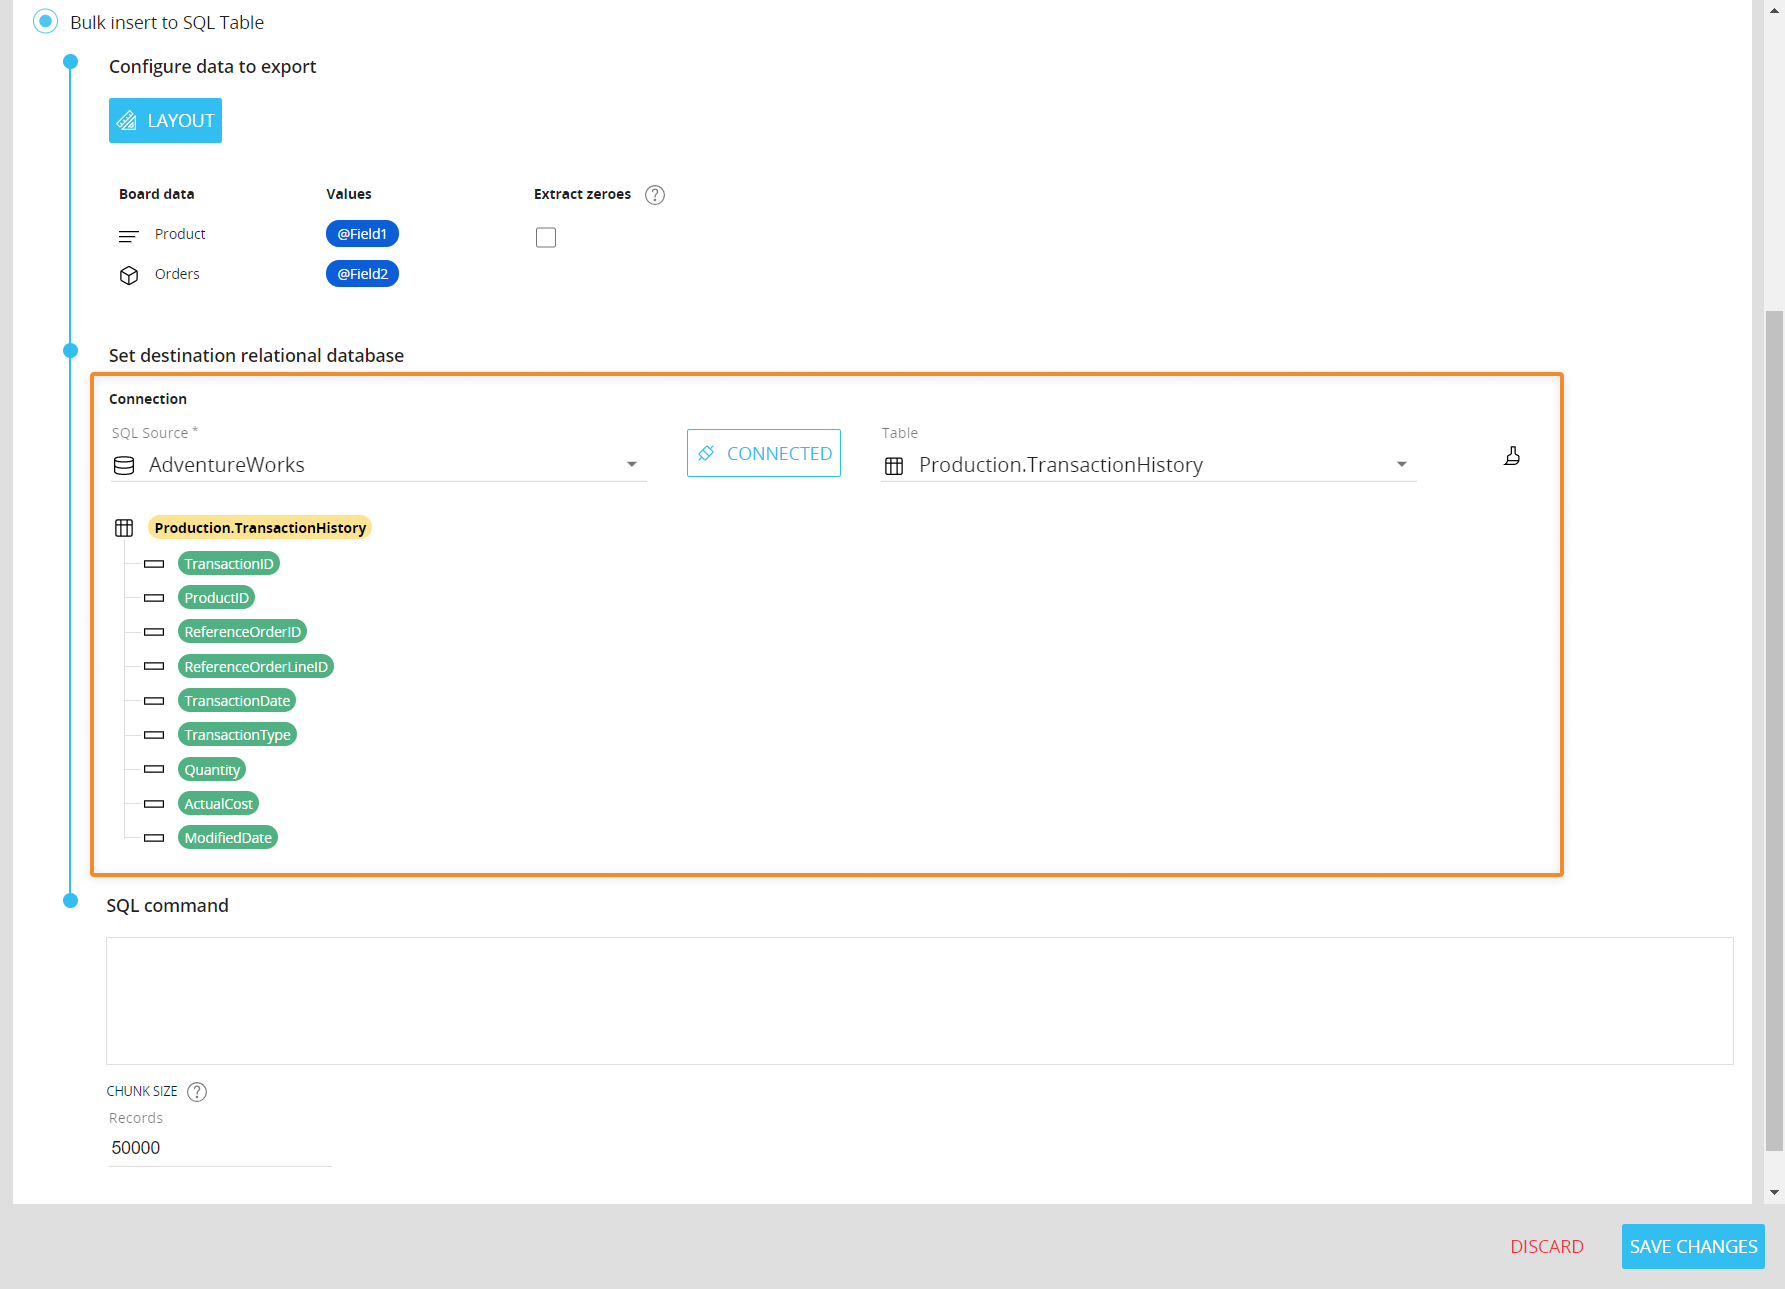
Click on the brush icon to disconnect from the current SQL database and start over.
- Select an existing SQL Source and click on the CONNECT button.
- Write the INSERT INTO statement using values, table name and column names displayed above. If entered correctly, all identifiers in the statement will automatically reflect the background color displayed in previous configuration steps.
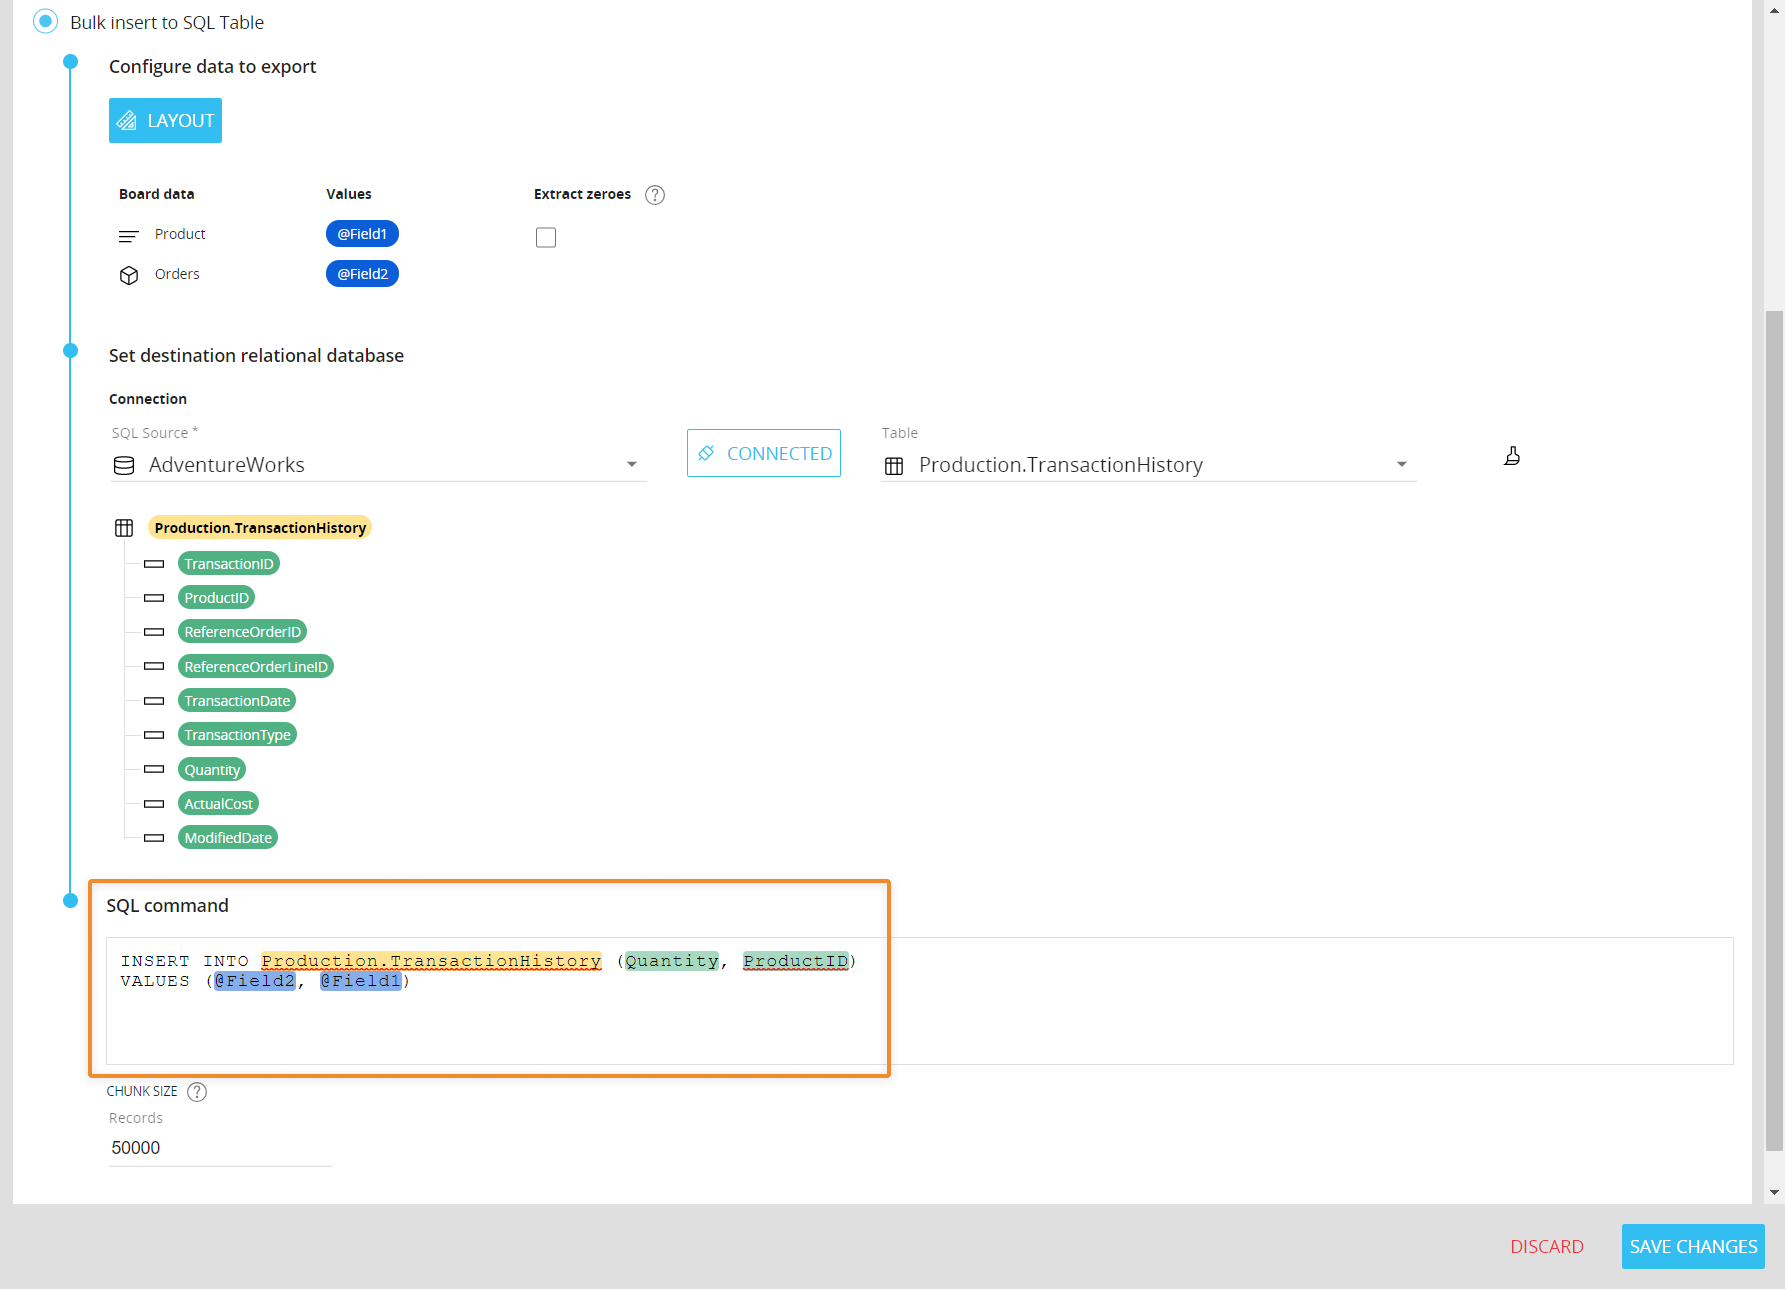
The only command allowed in the "SQL command" field is the INSERT INTO statement.
The Chunk size option allows you to set the number of fields (columns) processed with a single INSERT INTO command.
You should always adjust the chunk size value in order to obtain a good balance between performance and payload size when working with very large datasets. If you set a low chunk size value, the INSERT INTO command will be iterated multiple times with smaller payloads. If you set a high chunk size value, the INSERT INTO command will be executed fewer times, but with larger payloads. Be sure to check the target SQL database limits and set the chunk size accordingly. -
Click SAVE CHANGES.
Export Dataset
The Export Dataset is a new Procedure step that allows you to export data to a CSV file much faster than the Extract Data View to file (formerly named "Export Layout to file") step. It also overcomes limitations of the Extract Cube step, since it supports data extraction from multiple Cubes at once.
We recommend the new step if you need to export massive amounts of data with a Layout configuration that has multiple Entities set By Row.
To configure the new Export Dataset step, proceed as follows:
- Configure a Layout to define the data to be extracted. Once the Layout query is defined, a table showing information about the data (Board Entities and Data Blocks) will appear.
In this case, the Layout editor doesn’t return down totals and doesn’t support Entities by column, Rules, sorting, filtering and ranking functions.
Enable the Extract zeroes option to include zero values for selected Entities in the exported file. You can enable the option only on the most nested Entity (of each Relationship tree) set By Row. This option works just like the Dataflow "extend" option for the calculation domain introduced in Board 11.
Any active Select also applies to data extracted from the Layout query.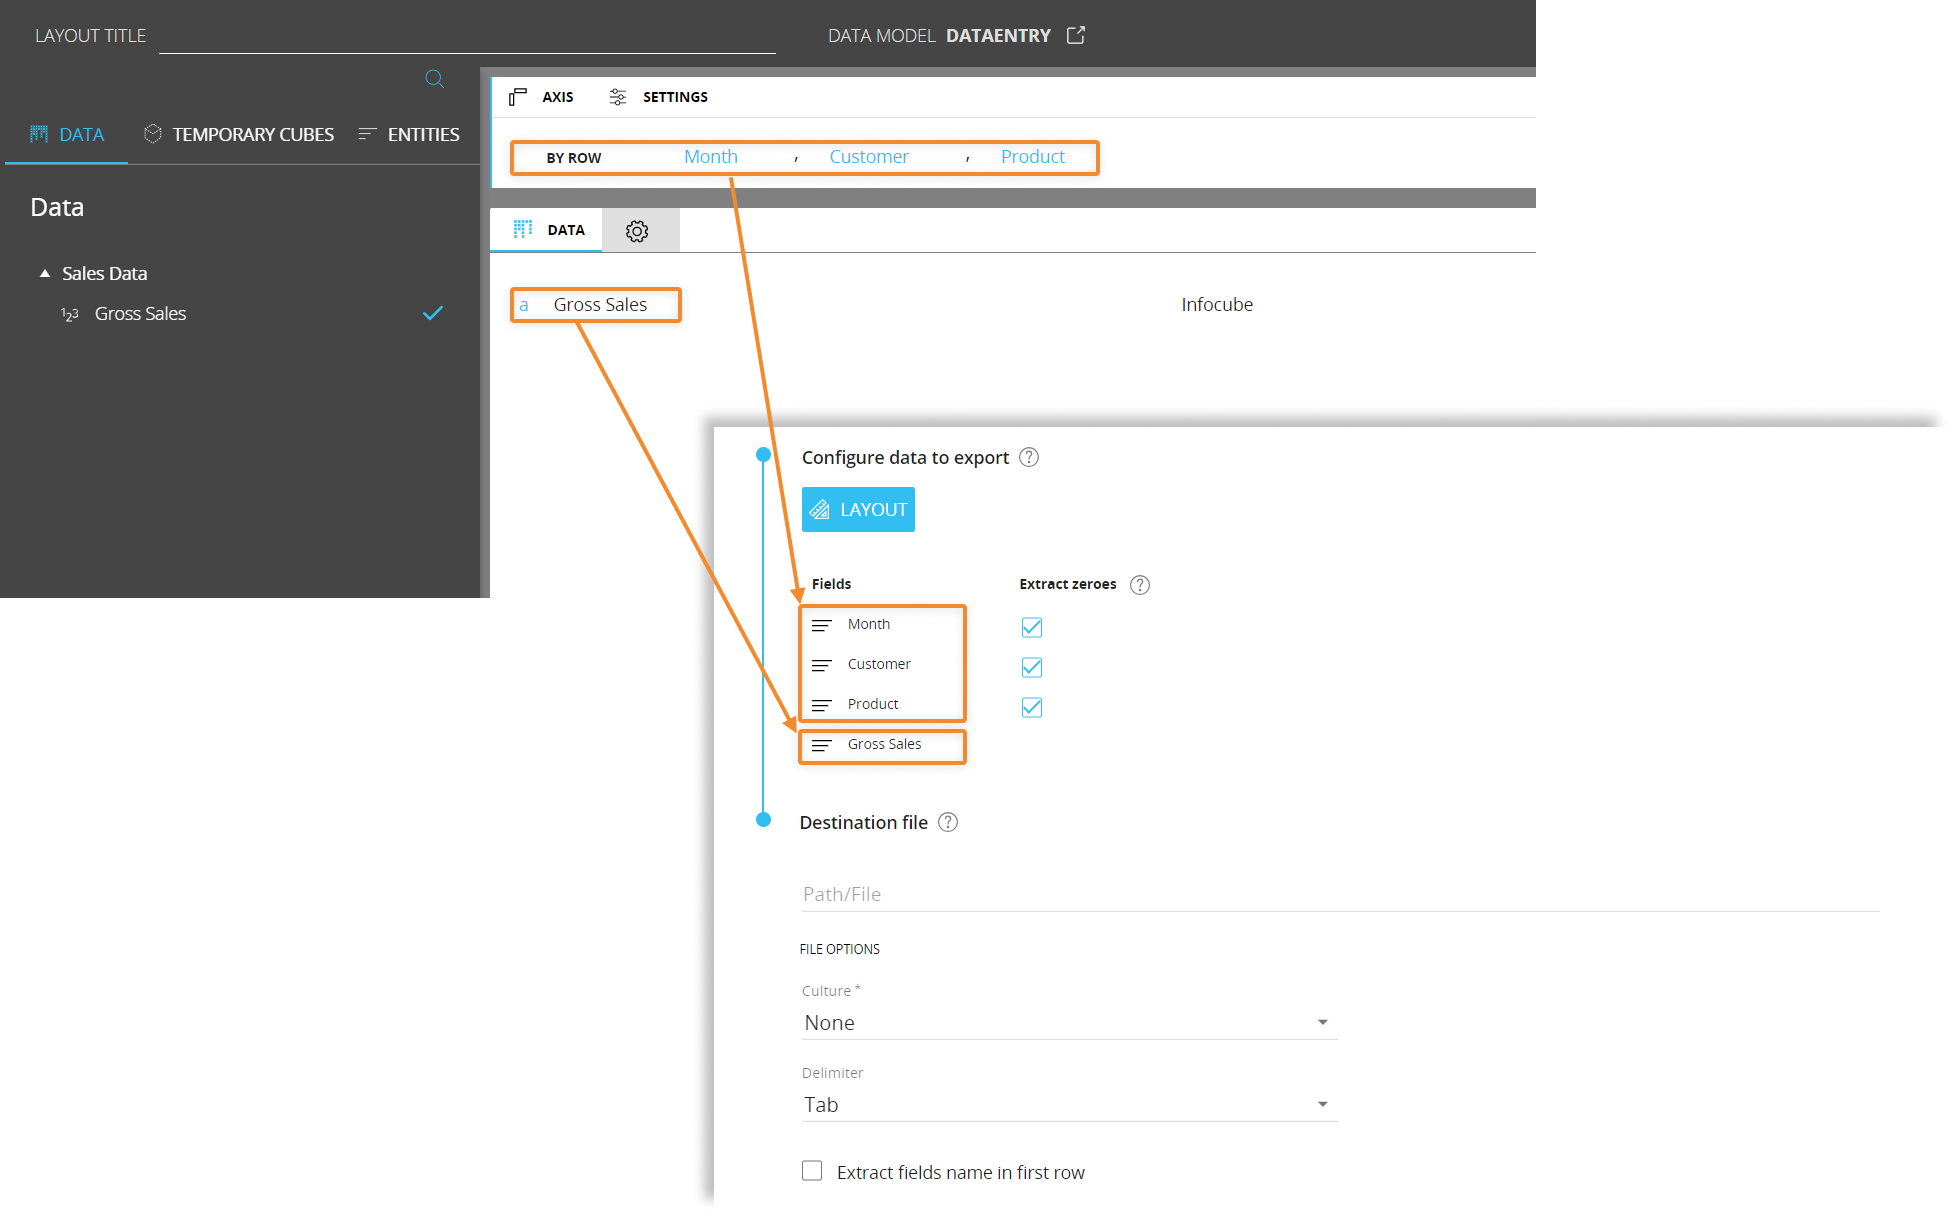
- Configure the CSV file to export: define the destination path, the file name, its regional settings, its delimiter and whether to extract fields names as headers.
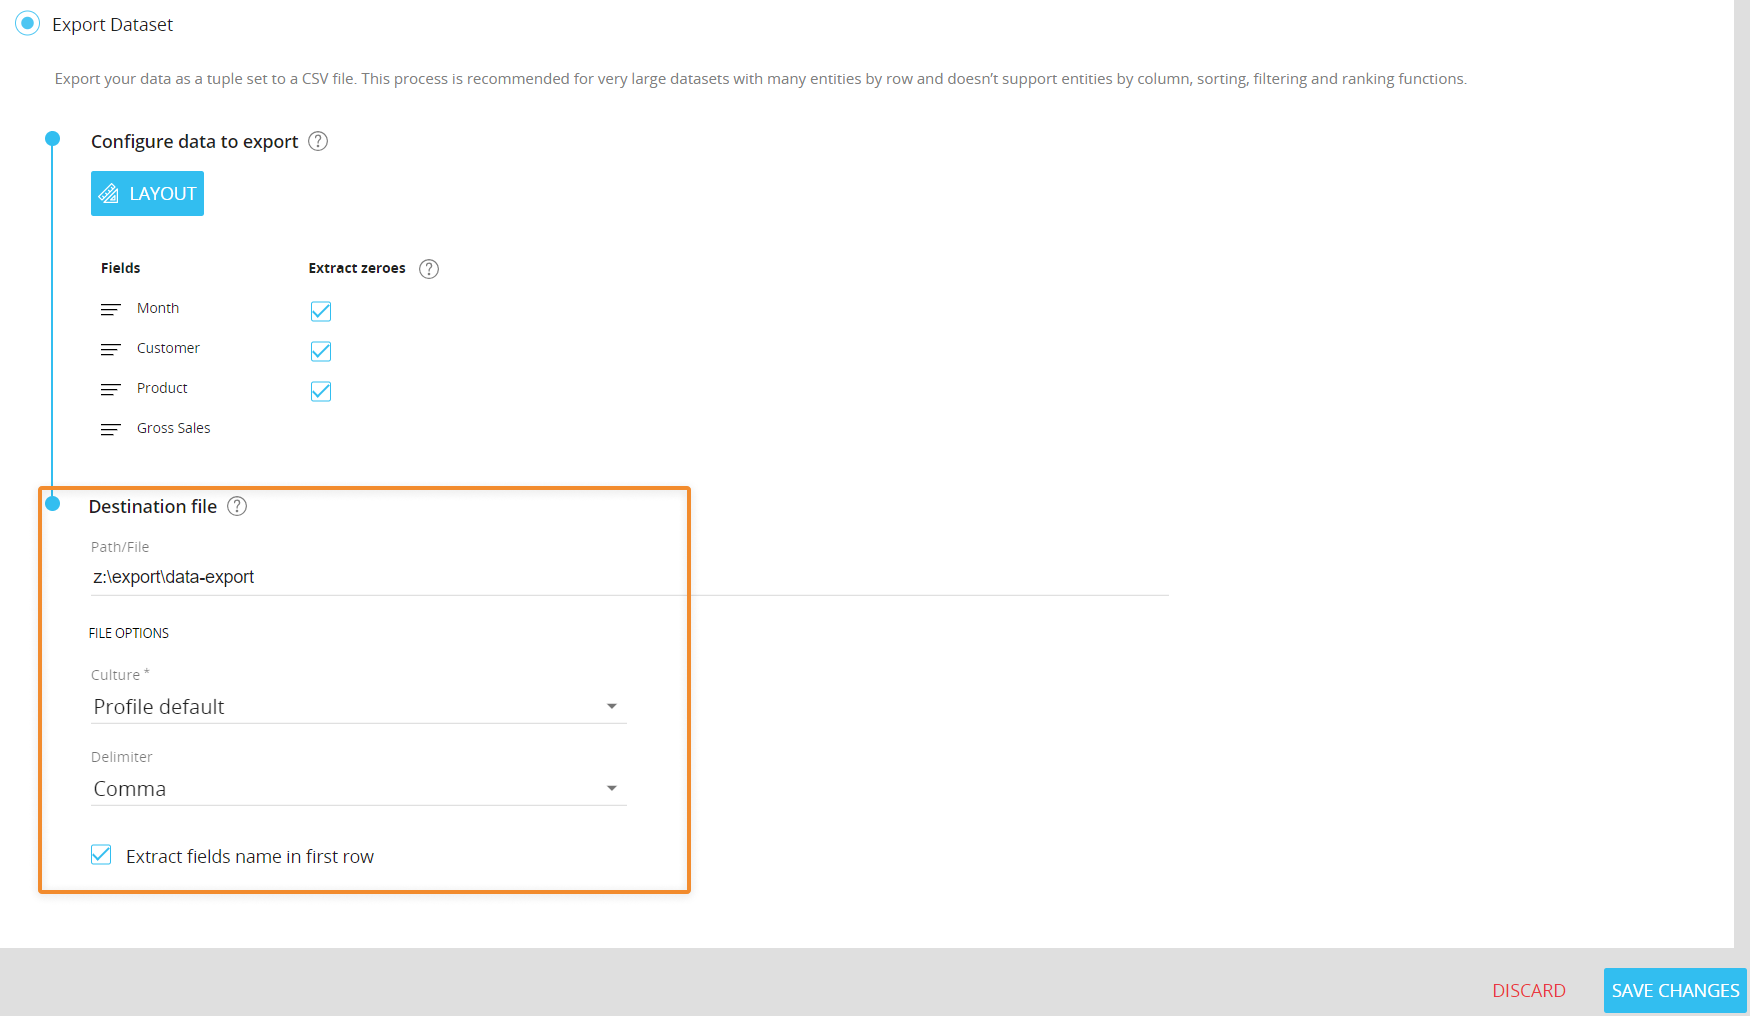
The destination path field supports relative and absolute paths, as well as environment variables.
For on-premises environments: if you don't enter any custom path, the default extraction path will be used (c:\Board\Dataset\filename.txt).
For cloud-based environments: Cloud Customers will have to export data to their shared storage area (z:\) by entering the desired path or by using the %bss% environment variable. If the path you entered doesn't exist, Board will automatically create non-existent directories on the shared storage area.
If no file name and no path are entered, Board will automatically export a file named Export.txt to the default extraction path (c:\Board\Dataset\).
Under the "Culture" menu, you can apply the desired regional settings to data in the output file. Choose "none" to apply the server default culture, while the "profile default" setting applies the culture of the user running the procedure. - Click SAVE CHANGES.
The Export Dataset action can also be invoked through a Board REST API call.
To configure the request, proceed as follows:
- From the API Queries section of the target Data model, click on the +API QUERY button
- In the query configuration panel, give your API a name that will be used to make the API call and write an optional description to explain which data will be returned from the API call
- Select Export Dataset as query type and configure a Layout query to define the data that will be returned from the API call
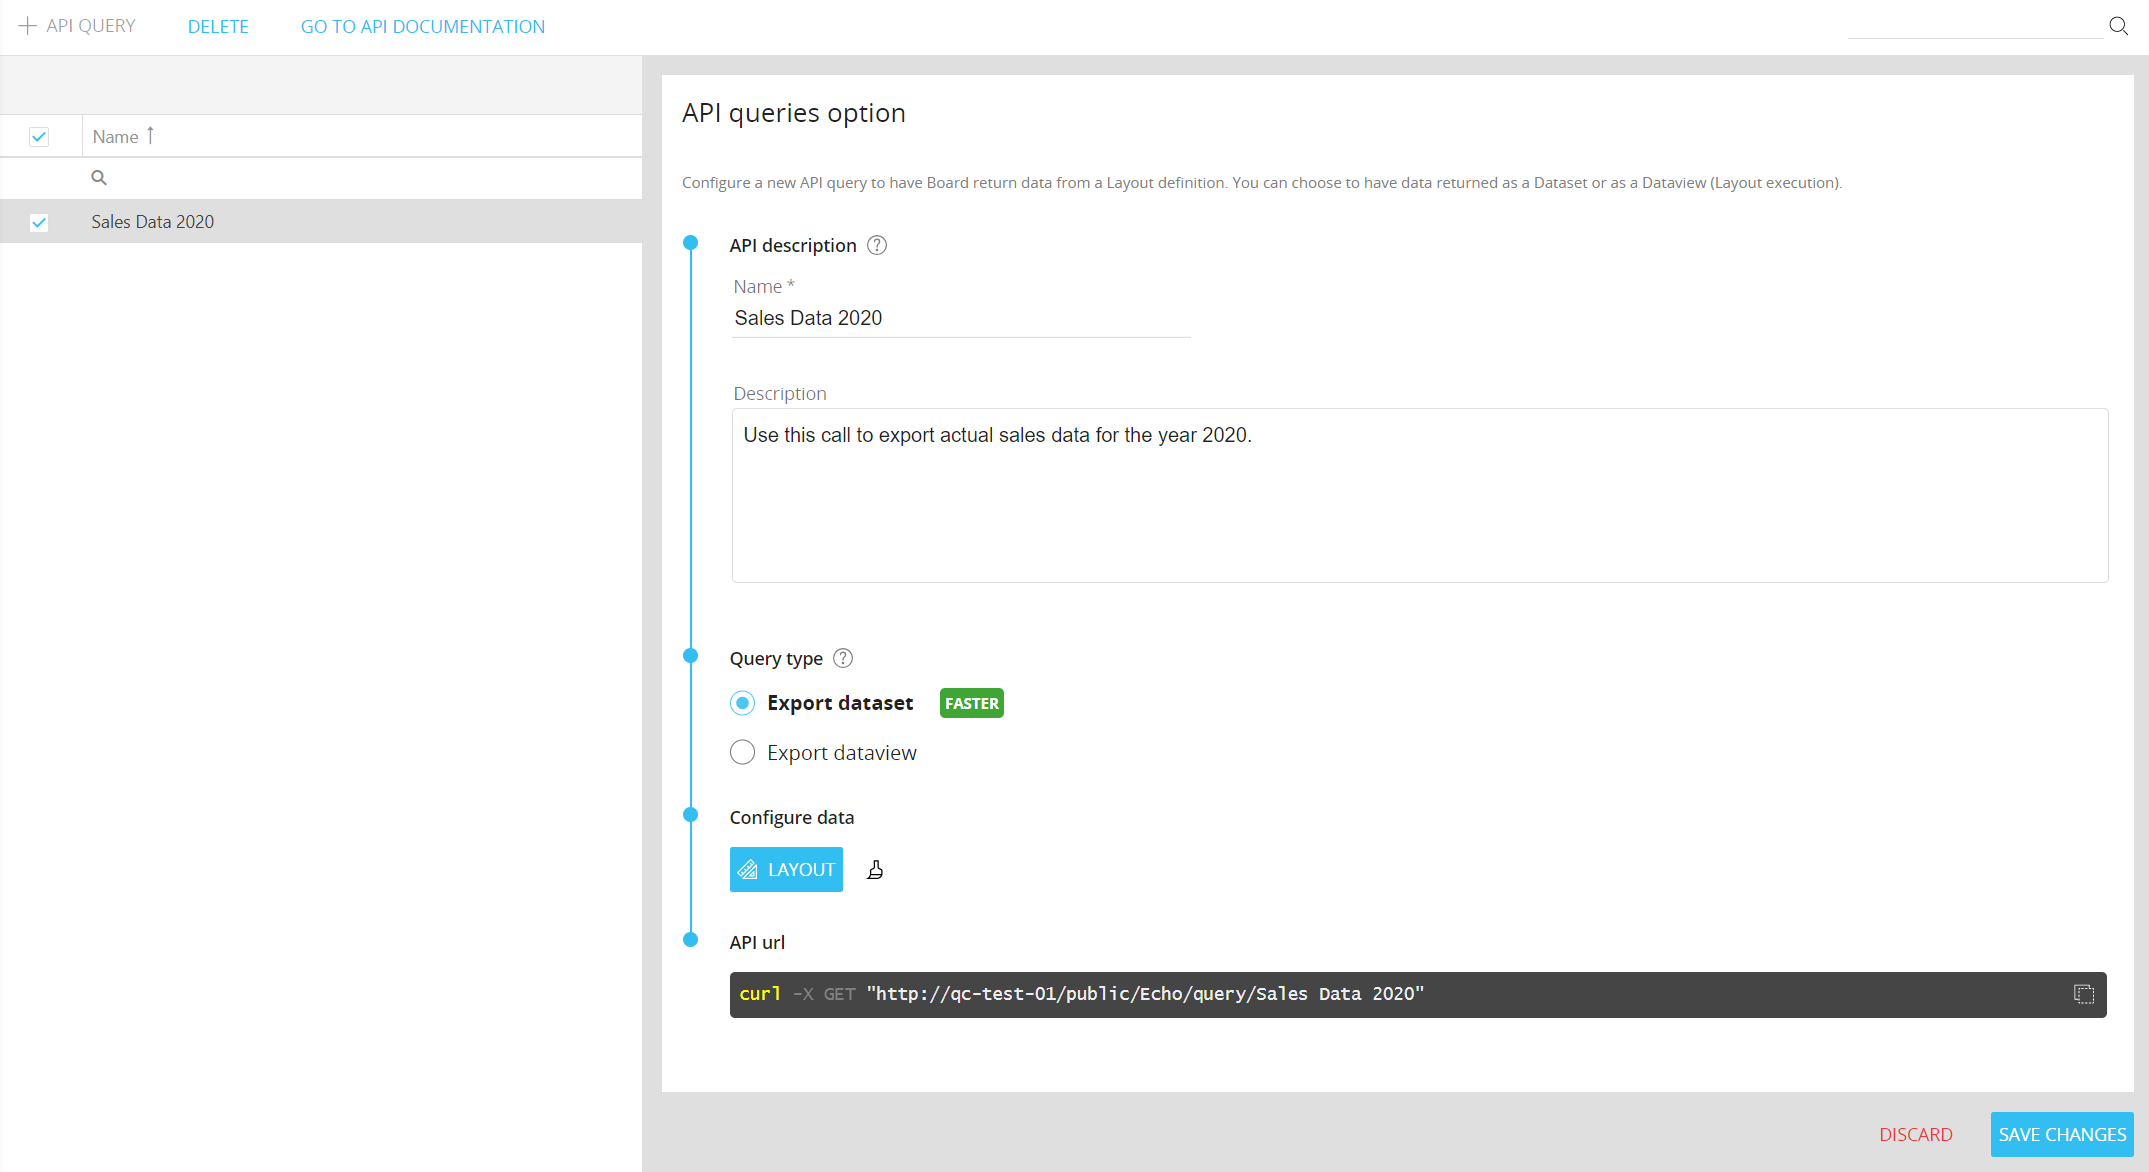
The Export Dataset option, just like the Procedure step described above, doesn’t return down totals and doesn’t support Entities by column, Rules, sorting, filtering and ranking functions. We highly recommend this option over the Dataview one, since is faster and works better with datasets of any size.
The Export Dataview option returns a complete set of data using Board’s Layout Object capabilities, but can be slower with very large datasets and many Entities set in the Axes. It's still available for back compatibility reasons.
Click on the brush icon next to the LAYOUT button to reset the current Layout definition and start over. - Copy the GET request to perform your newly created query and retrieve data from the selected Data model.